Tired of a boring builder grade bathroom?
Add board and batten for instant beautification!
I know you all have been wondering where in the world I’ve been lately.
Well, family duties have taken priority over decorating and blogging.
Gasp!
Yes, there is more to life than decorating, but I did manage to squeeze this project in this weekend.

This board and batten project started Sunday afternoon.
I just could not take the boring half bath on our main floor any longer!
Remember the before pics?
You can see the REAL before-before bathroom pics and my first attempts at improving the space with oil rubbed bronze by clicking HERE.
The only nice thing in this pic is my framed pic I purchased from The Lettered Cottage.


Here is a mini Board & Batten TUTORIAL:
There isn’t any specific height when doing board and batten.
I chose a height I thought would look best and also I didn’t want to deal with the light switch.
The main horizontal board was a 1”x4”x8’ piece of pre-primed pine. It was cut to length, leveled, and nail gunned in place.
This was repeated all the way around the room.
This was repeated all the way around the room.
The battens (the vertical pieces) were 1”x 3”x 8’ pieces of pre-primed pine.
I measured the height from the top of the baseboard to under the horizontal board and then cut the battens to that length.
The spacing was determined by centering one batten on each wall then working my way outward until I found a distance I liked.

Don’t you love my high tech measuring device?
Can you tell I have 4 kids?
Nine inch spacing worked best in this small space.
Nine inch spacing worked best in this small space.

Once the spacing was correct I secured each board with painters tape and marked the edges with pencil.
Why you ask? Well, I knew I needed to make one more additional cut on each board before I could nail them in place.

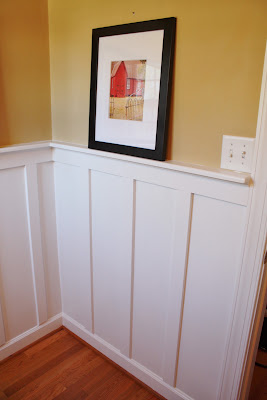
Because I did not change out the baseboards, I knew the result meant that the battens would protrude out beyond the baseboards.
So adding a bevel to the bottom is more visually pleasing to the eye.
The boards were cut on a 50 degree bevel, leaving a little flat edge that would “sit” on the baseboard.

Before nailing the boards permanently, I made sure each board was plumb and then nailed it into place with my nail gun.
I love that nail gun!

I then spent the next 2 days caulking every board’s edge with paintable caulk.
This is tedious but makes a huge difference on the appearance.
Every inch was painted with a semi-gloss paint. I chose Dove White by Behr.
To be honest, I hated the paint. It doesn’t “level” or cover well at all, and took several coats.
I need to just stick to my Sherwin Williams Harmony paint.

A top ledge shelf was added to the horizontal boards by using more of the 4” pine.
My husband helped round out one side of each board with his router (that’s one tool I haven’t attempted yet).
For extra detail a small piece of cove molding was placed under the shelf ledge.
It gives it a finished look.

The mirror was then framed out with vinyl molding.
To learn how to easily frame your own mirror inexpensively you can read my tutorial by clicking HERE.
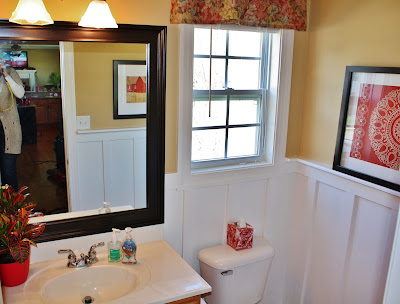
Huge improvement!

I would like y’all’s opinion on the picture placement.
Do you all like the casual appearance of the pictures resting on the shelf (left) or the pictures mounted on the wall (right)?


Doesn’t Kevin & Layla’s (The Lettered Cottage) “Gathering Place” look so much nicer with the board and batten now?
I think Layla would approve!
The bathroom is brighter and more interesting.
I’m thrilled with how the bathroom looks now!
Kim
Linking up to:


It looks fabulous! Nicely done!
I definitely vote for casually resting on the board and batten! Great job, looks fab!!
Looks great! I love B&B — and I like the more casual photo leaning 🙂
Your bathroom turned out fabulous!! I love the look of B&B! Martina
looks great! such a nice addition to your already pretty space.
Very nice, Kim! You did a wonderful job!
XO,
Jane
Looks great!! I love that print from The Lettered Cottage and love it leaning.
Looks Great! I love how you angled the battens above the baseboard. It’s a very creative way to have batten board without having to rip out your old baseboard. Check out some of these Wall Treatments that might stir some thinking! http://bit.ly/fwKCWs
I really like the placement of the pictures! Did you make or buy the larger one resting on the shelf? I REALLY like it!
I really like the placement of the pictures! Did you make or buy the larger one resting on the shelf? I REALLY like it!
I love the bevel at the ends of the boards…Great Look…I may have to borrow!
Gatheredinthekitchen.com~ To answer your question, the large picture was found 2 weeks ago on clearance at Target for $12! I sprayed the frame with ORB paint. It was a light oak, like my floors, which made it look rather country, which I did not want.
Thanks for the nice comments everyone!
Wow! What a difference! Thanks for the tutorial….it’s something I really want to try soon and your bathroom is very inspirational!
Gorgeous! You make it look SO easy!! 🙂
Why, yes! Gathering Place looks great with that beautiful board and batten! 😀 Awesome addition!!!
wow, that really brightened up your bathroom! We have b & b in our living and dining areas and all my frames are propped on the ledge rather than hung. I love the look of it that way.
Our main floor half bath needs a makeover too. Yours looks fabulous.
Kim, It looks amazing. Do you think I would get the same look with 1/4 thick boards?
What type of paint did you use? Flat, eggshell?
Thanks!
semi gloss 🙂
Really like the pictures sitting on the shelf!!
I like the way you angled the batten to match the depth of your baseboards. Before deciding to do a board and batten treatment in our master bathroom, we had already purchased normal baseboards. Now we’re trying to figure out how to make them work with our B&B plan.
Great job, by the way! I bet you’re still loving it!
Erin @ The Great Indoors
Can you share the name of wall color?
Blonde by Sherwin Williams (their Harmony paint in an eggshell sheen).
I love that look! I know you said you used Sherwin Williams Harmony instead of Dove White. Was it Dove White in Sherwin Williams Harmony or another white paint using Sherwin Williams Harmony Paint?
Hi Karen! Harmony is SW’s green-line of paint, which I love. I think the color was just their Ultra white.
Thanks so much!
~KIM
I love both of those prints. Where did the red geometric one come from?
Hi Shannon! Actually I picked that wall art up at Target… on clearance ($12) !!!! It was a great find!
Hmm, wonder if I could find a lovely piece of fabric and do the same…