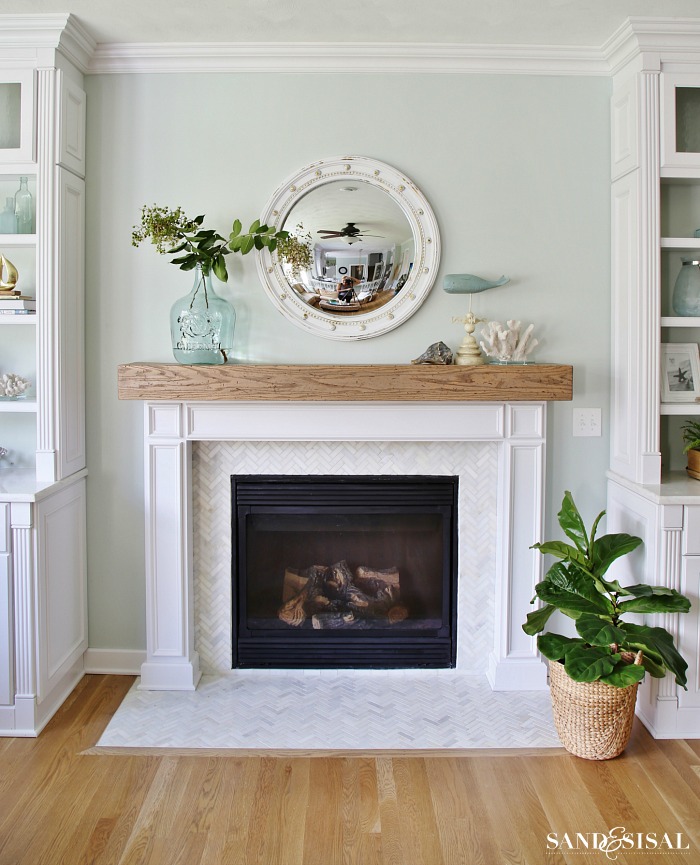
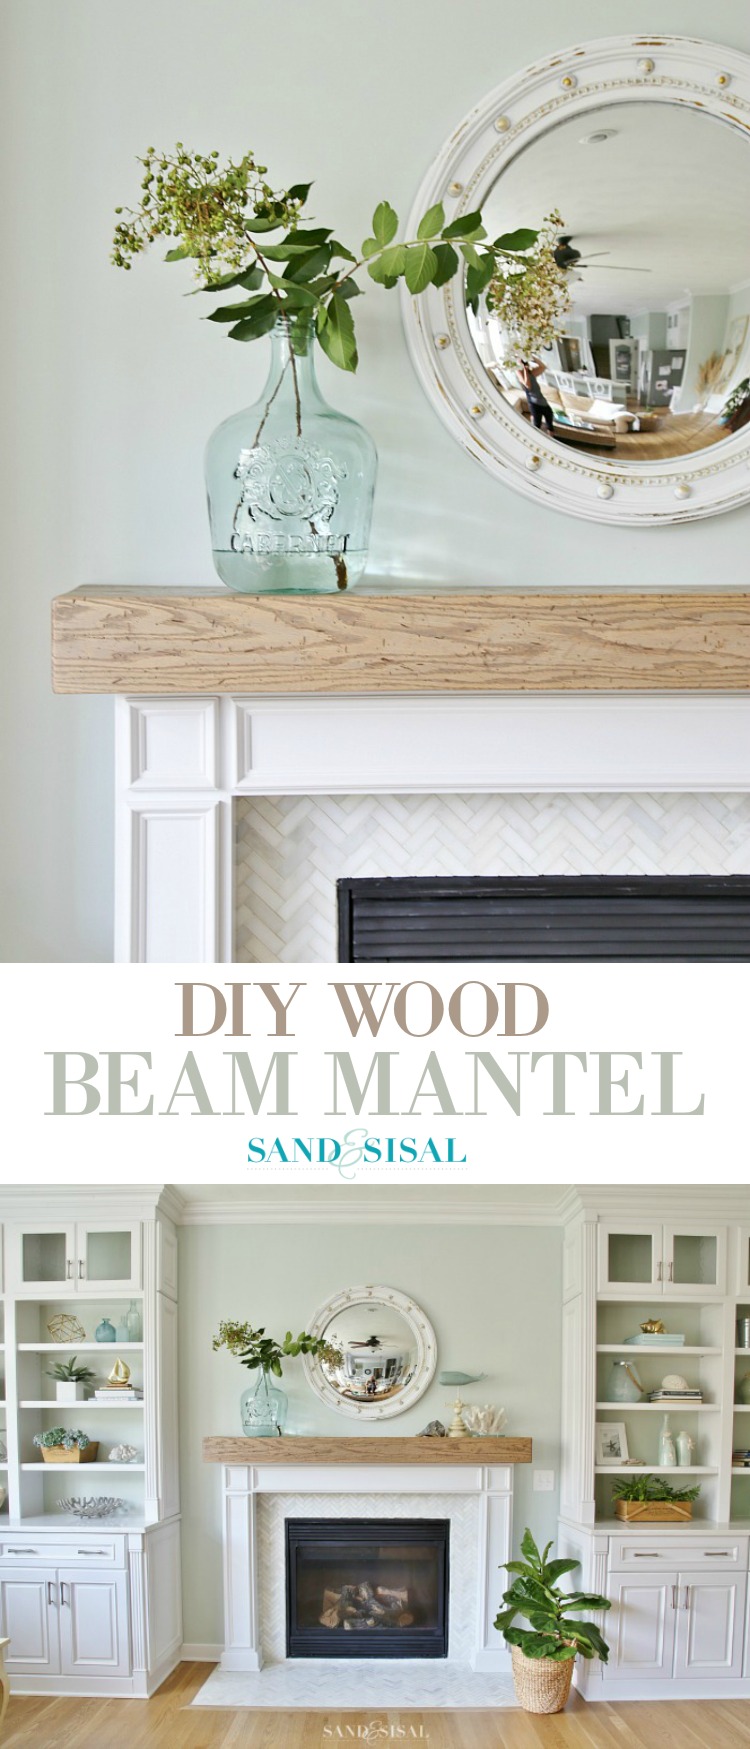
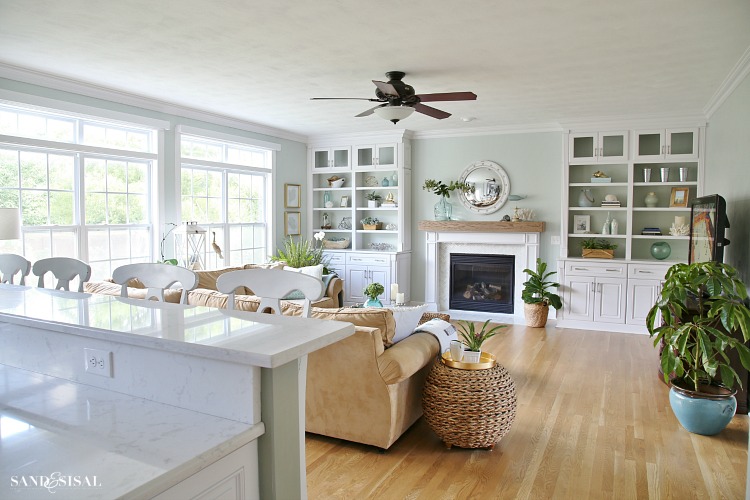
I want to start by thanking everyone for the incredibly kind comments on our Coastal Family Room and Fireplace Makeover! THANK YOU! The process of making over our fireplace has been quite the journey, as it all has been. Like I mentioned in the previous post, our old fireplace was not porportional for the size of the room or the height of our ceilings and it was more formal than my tastes. So in a moment of impromptu DIY impulse, we demo’d the entire fireplace surround and hearth and started over. Today I am going to show you how we made a DIY Wood Beam Mantel with a rustic weathered oak finish.
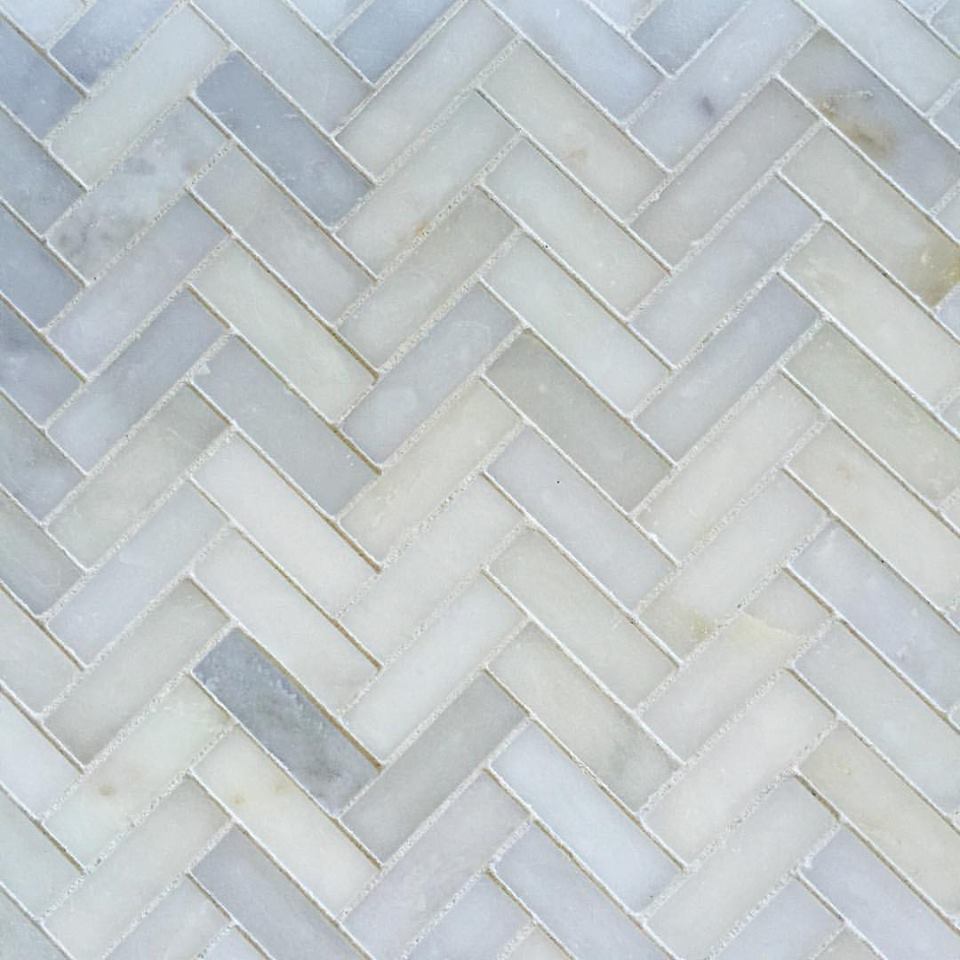
After we completed installing marble herringbone tile, we started building the boxes for the surround. They were quite easy to make. We used 3/4″ thick MDF boards to build the boxes. We built one for each side and one for the top. We laid the 3 boxes out on the floor and then screwed them together.
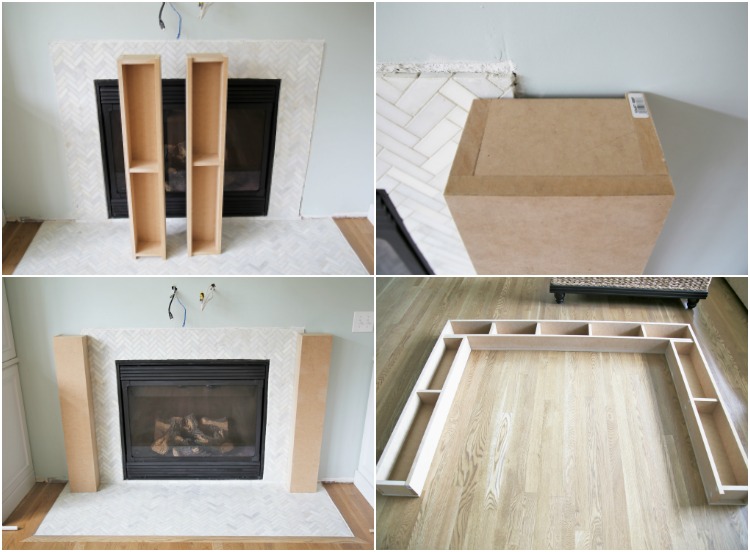
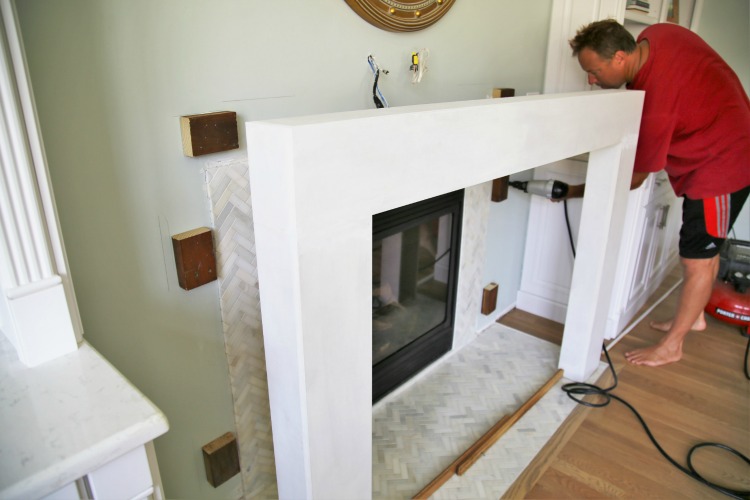
After the 3 boxes were all assembled together, I filled any nail holes, sanded rough edges, and primed the entire piece. We lined it up exactly where we needed it to go and traced around the entire surround with a pencil. We then secured 2×4″ pieces to the wall. These would act as cleats to which the surround would be secured to with a nail gun.
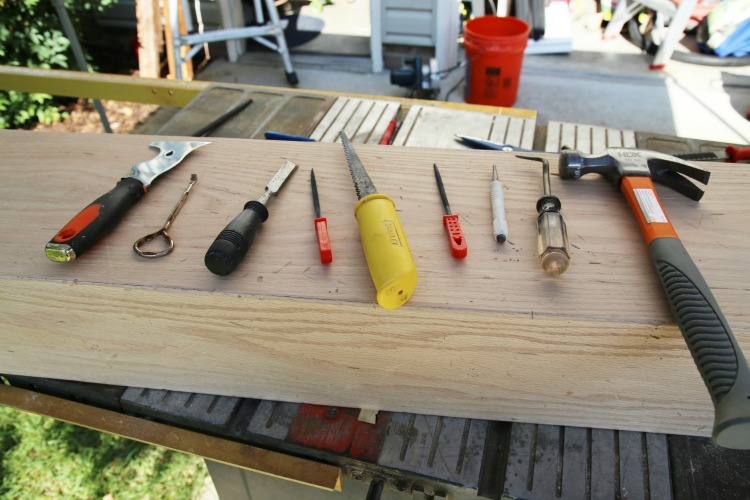
Time to build the DIY Wood Beam Mantel! Now I won’t lie, this was harder than we thought it would be, basically because our tablesaw is not that great. Like anything, the better your tools, the easier the job. I have included to very informative blog posts at the end of this post that were helpful in learing how to make this mantel. Be sure to check those out.
Because we wanted the beam to match our new weathered oak floors, we chose 12″ and 6″ wide red oak boards. We ripped the 12″ boards down to 10″ on a 45 degree angle on our table saw for the top and bottom mantel pieces. Next we ripped the 6″ board down to 5.75″ on a 45 degree angle also. Last were the end caps. Again, all sides were cut on the angle. The reason why we chose to cut on the angle is so that the seams would be virtually invisible and it gives the appearance of a real solid wood beam vs. a hollow box.
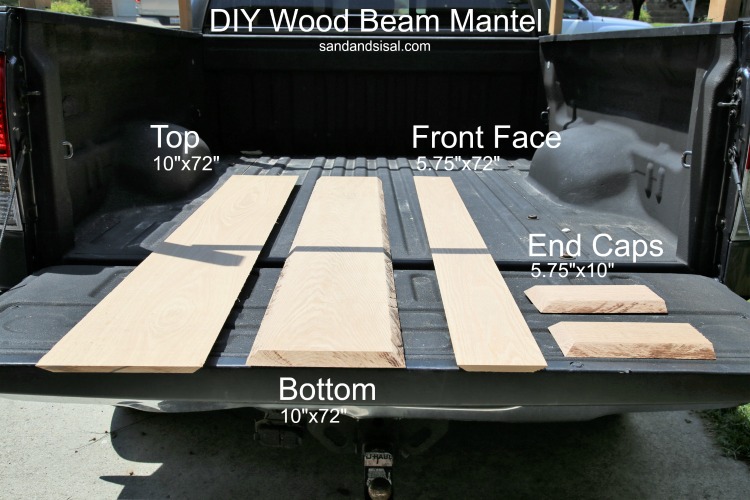
Wood glue was applied to all the beveled edges and then nailed together with a nail gun. The end caps were also glued and nailed. Now you could put in a 4th board and complete a total box but we wanted to keep the DIY wood beam mantel hollow so that we could hide cable and and electrical box inside. We aren’t currently using the cable and electrical but it’s nice to know that it is accessible if we ever need it.

Once the wood beam box was finished the real fun part began….. distressing time! This is the part where you transform your plain wood box into an old and rustic looking wood beam! We used a sander and several tools for the distressing process. I sanded the edges and corners to give them a worn and slightly rounded appearance. The we started beating the heck out the DIY wood beam mantel with a variety of tools. I think hubs had a bit too much fun distressing the beam. Let’s just say he took out his frustration on that poor beam! 😉
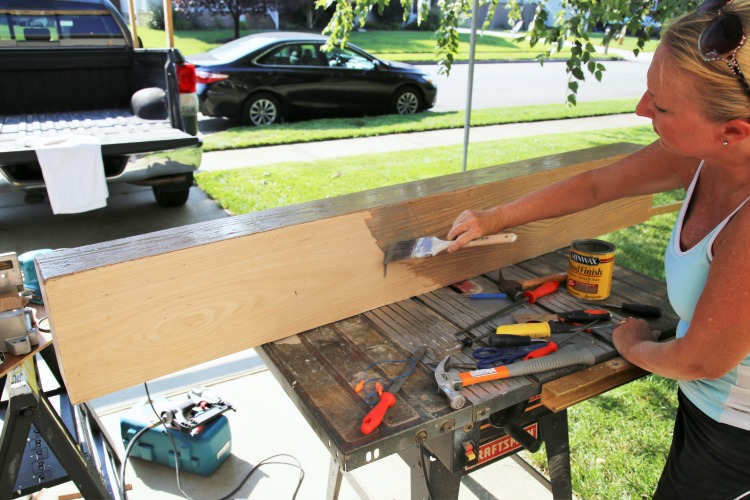
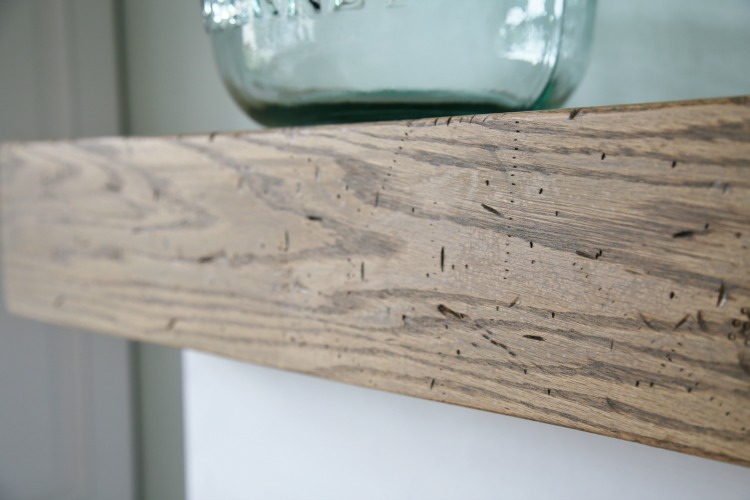
After the distressing was done we applied two coats of Minwax Weathered Oak stain, which is the same color as our hardwood floors. Simply apply the stain with a brush and allow to sit for about 15 minutes then wipe off any excess with a clean, lint free cloth. The stain really emphasizes all the distressing on the beam and ages it instantly. LOVE!
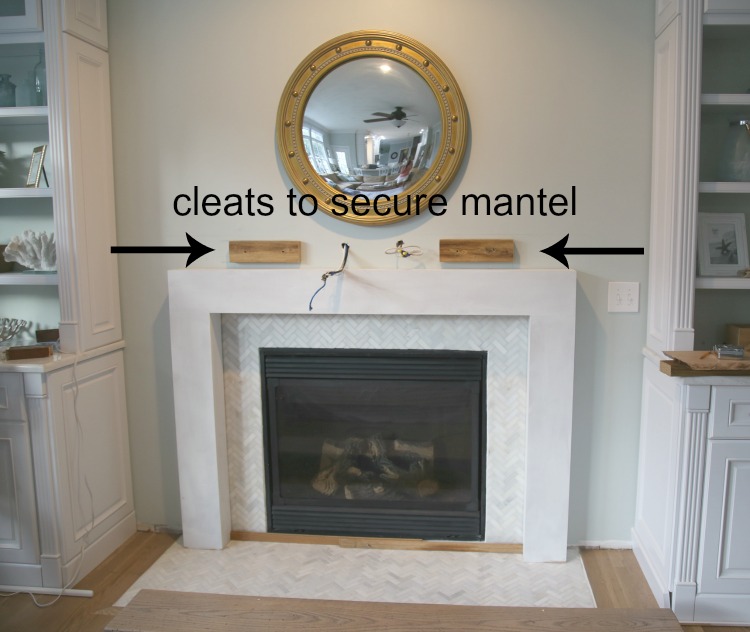
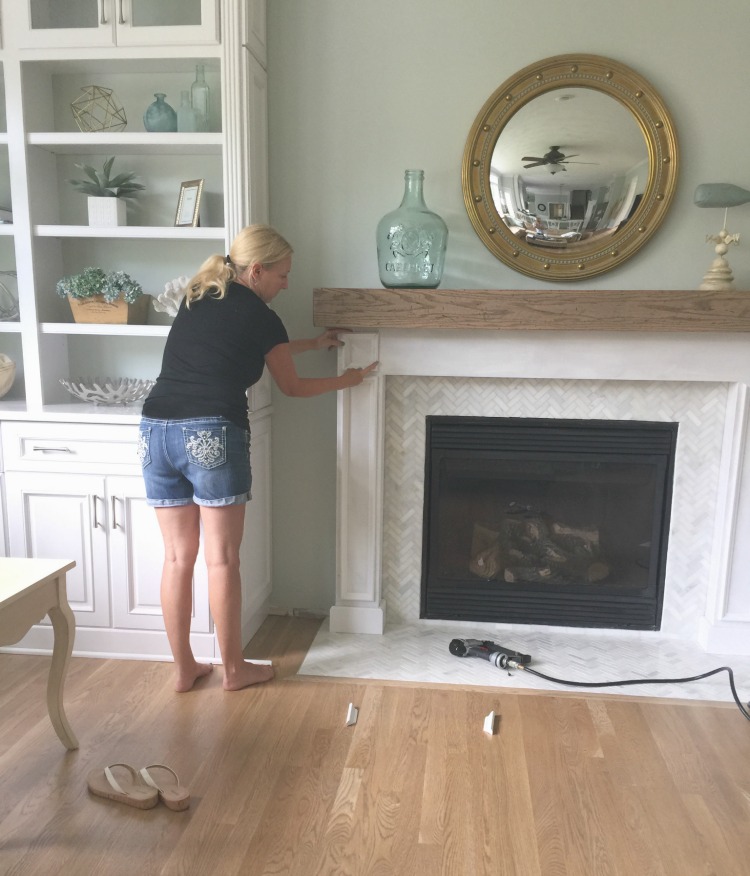
To secure the DIY wood beam mantel to the wall, we needed to screw in a few wood cleats. They were screwed into a header behind the wall. If you don’t have a solid header then make sure you are securing them into the wall studs. We slid the mantel onto the cleats and drilled in a few screws through the top of the mantel, into the cleats. Using screws instead of nails gives us the freedom to remove the mantel at any time if we desire.
To dress up the plain white wood box surround, I made 3 rectangles and 2 square picture frames with PVC molding. Making picture frame molding is so simple and can dress up any surface. I’ve made these (large and small) for several walls in our home. Click on the link to learn how easy it is to make picture frame moldings (wainscoting) for walls or in this case, fireplace surrounds!
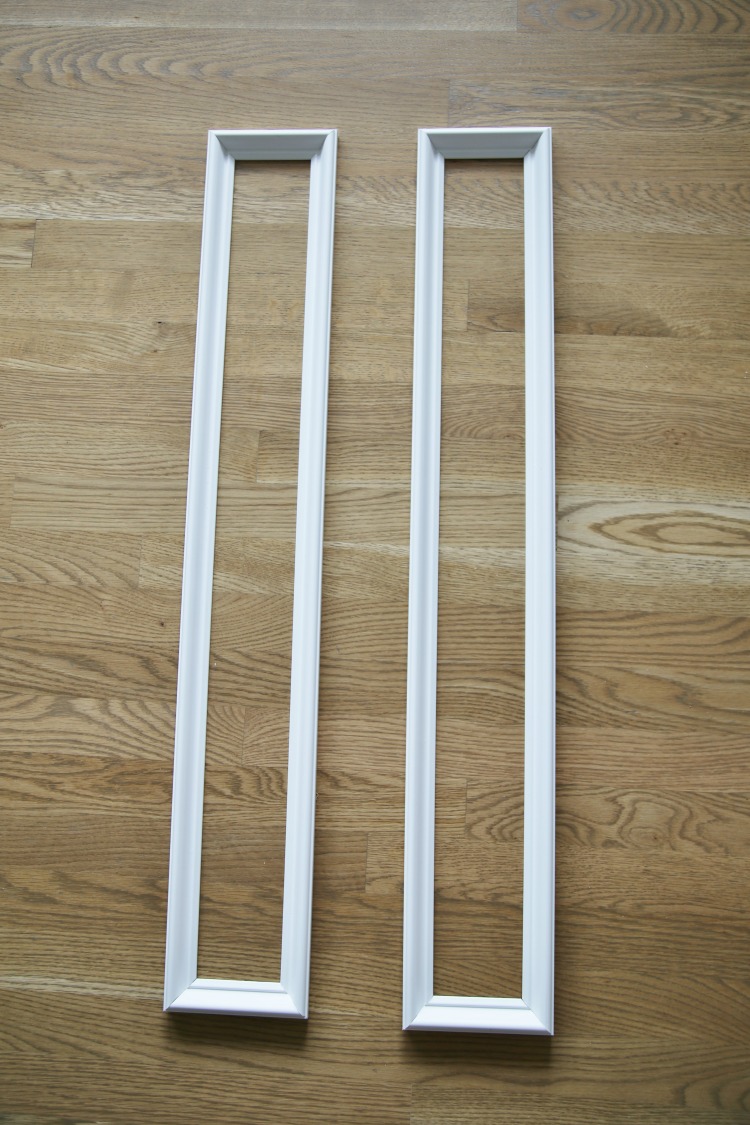
The moldings were nailed in place with a nail gun, then I caulked all the edges and gave the entire surround a few coats of semi-gloss paint.
Here is a close-up of the beam. If you choose to use a darker stain then the seems will be totally invisible. They are pretty minor here. 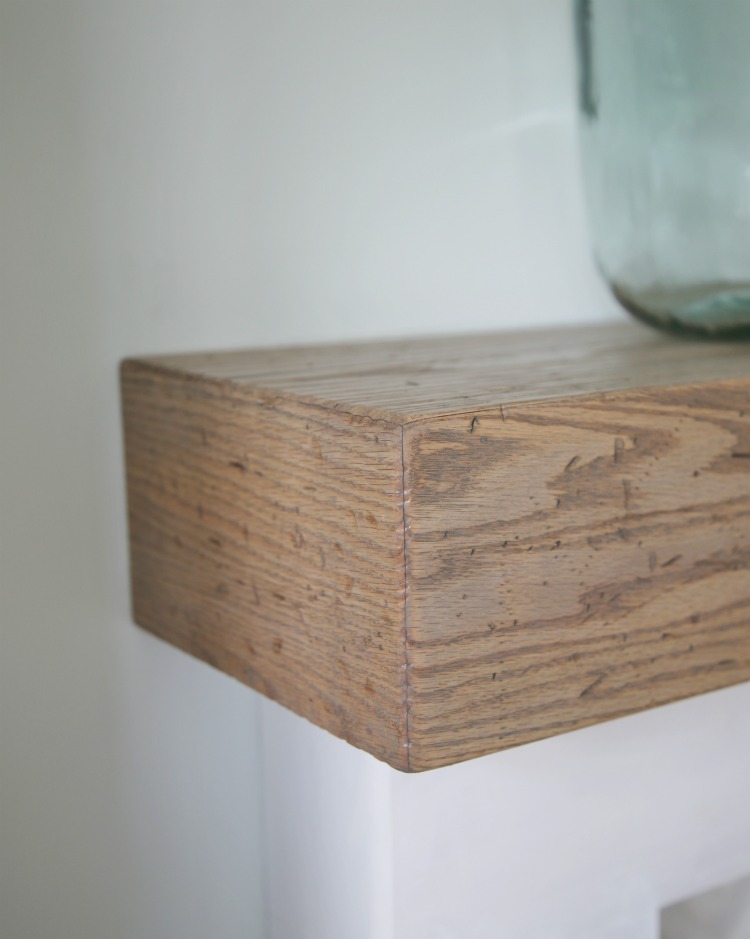
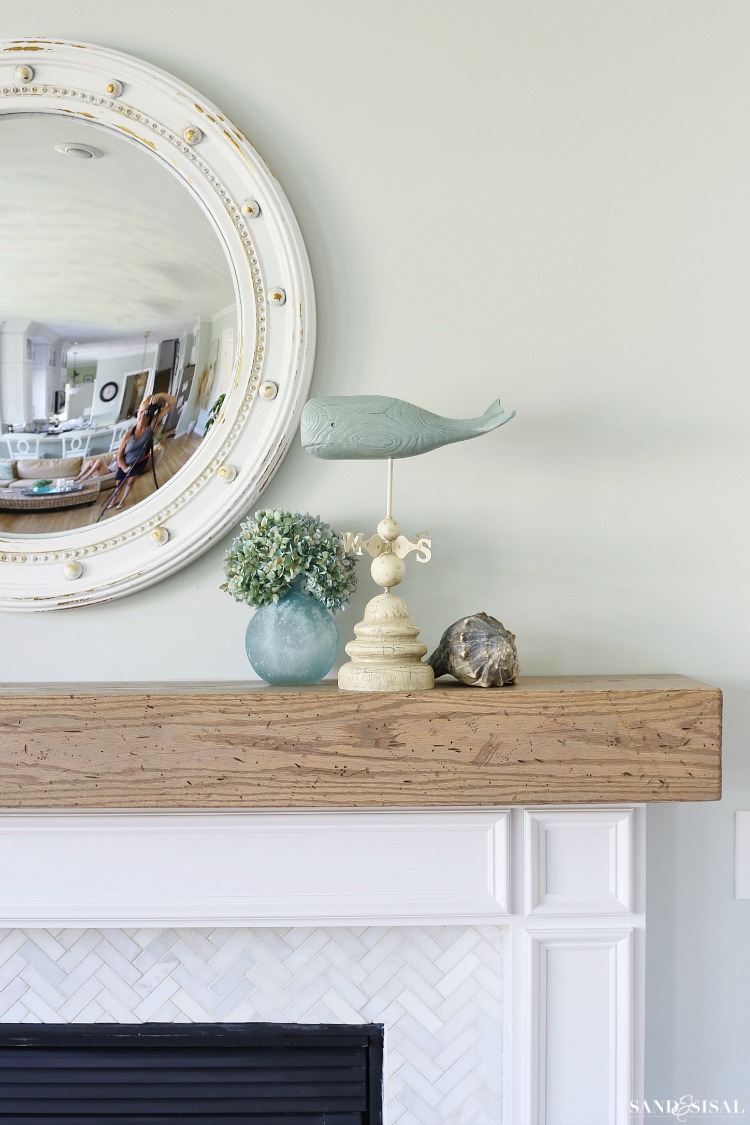
Doesn’t it look great? We love how the DIY wood beam mantel helps keep the overall look of the fireplace from being too formal.
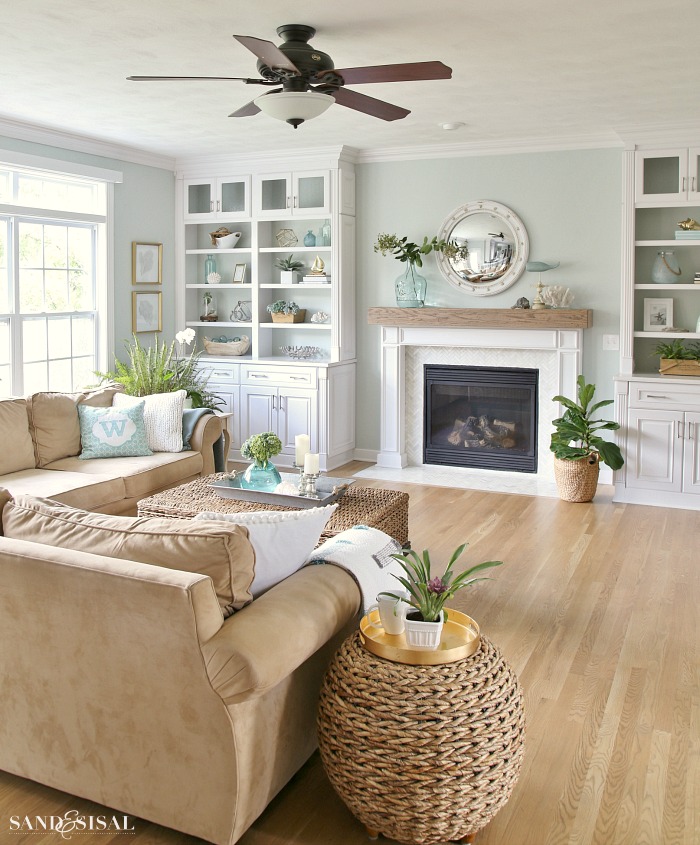
Hope you enjoyed seeing how we built it! PS… the wall color is Sea Salt by Sherwin Williams. (it’s the #1 question I get asked). 😉
LOVE IT? PIN IT!
Here are two posts that were very helpful with learning how to build this wood beam mantel:
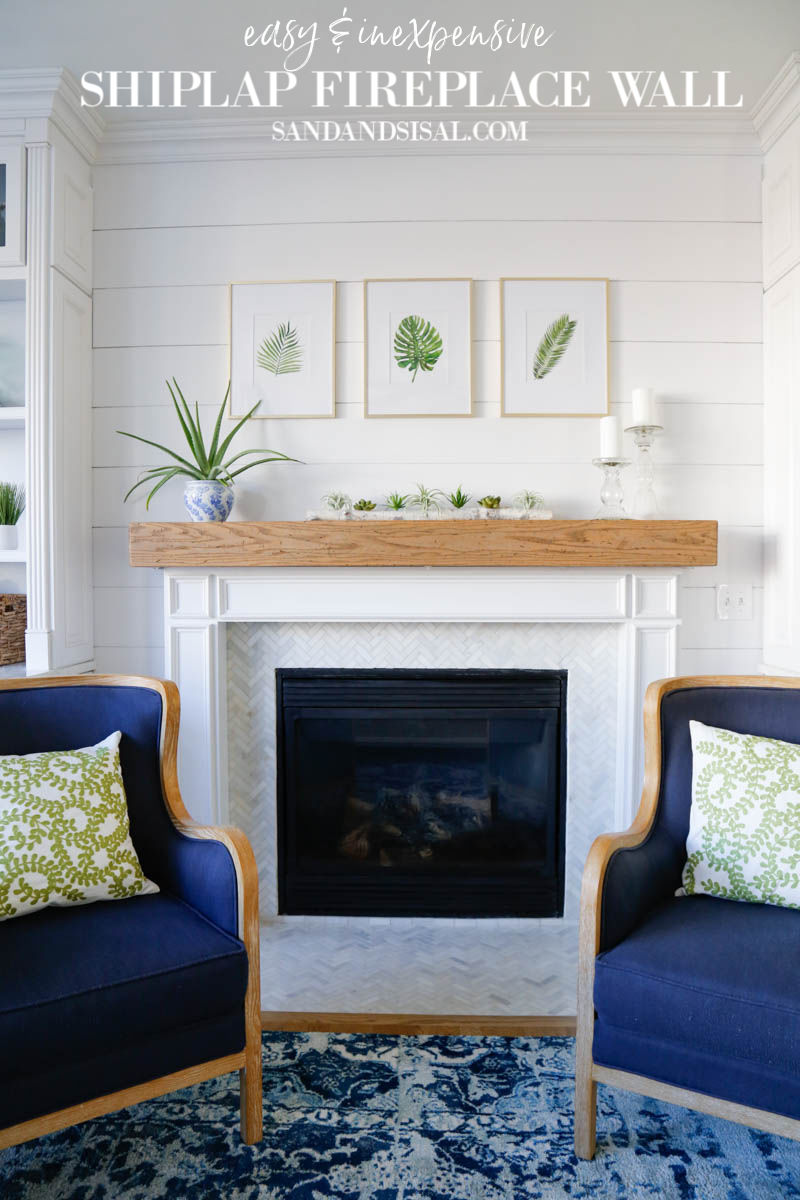
UPDATE January 2019: We added shiplap to the fireplace wall! See my easy tutorial HERE.
You might also like these posts:

How to Install a Marble Herringbone Tile Fireplace Surround
Kim, it is all so beautiful! From a flooded house to the beauty that you have today, is quite a transformation. You and your husband turned a big o’ batch of lemons into a dream! Way to go! Thanks for all the details that you gave us. I may never need to use them, but I’m saving it all. Never know, right?
Thank you Paula!
Your whole family room screams coastal! Love every inch of it! You and your hub did a magnificent job. You both deserve to sit down and relax and enjoy your new family room and kitchen! I’m so jealous!
I am in love with that mantel – and with the entire fireplace!! Gorgeous! We have some work to do on our fireplaces and I am definitely saving your design for inspiration!
Thank you Kristin! I’m just so happy it is finally done!
Wow! THAT’S how you make a fireplace surround?? I had no idea! Beautiful!
It’s beautiful! We’ve been thinking about diy’ing our own fireplace surround and this has inspired me to start! Can I ask what the dimensions are on the fireplace surround boxes?
Thank you Alicia!
The surround boxes are 5″deep and 7″ wide.
The cuts made to the edges of the mantle boards to glue them together are great! From a distance at first, I thought it was a solid piece of wood. Well done!
Hi, this is first time visiting your site. Beautiful room! Did you build or purchase cabinet/shelving units on either side of the fireplace. If you purchased them, do you mind sharing where?
Thanks Pamela! We had those made by a custom cabinet maker. They match our kitchen cabinets and are topped with Cambria Quartz counters (matching the kitchen too). Hubs and I did the crown molding above them though. 😉 We have built our own built-ins before and give a full tutorial. You can see it here: https://www.sandandsisal.com/2014/10/diy-built-in-bookshelves.html
Kim, I absolutely love what yall did with your fireplace. Can you give me the height of your surround boxes? Also, the finished height to the top of the mantle?
Is it necessary to bevel/45 deg. cute the back edges of the cap that face the wall? If so what is the purpose? Beautiful job.
Hi Mary! It isn’t, We actually were concentrating so hard to make good cuts and were in such a cutting zone we didn’t notice until afterwards! 😉 Thanks so much! ~ KIM
Love love love! What color is on the walls?
Thank you Michelle! The family room wall color is Sea Salt by Sherwin Williams.
Love this! Question, did you put a finishing clear coat on the beam or just used the stain? Thank you!
Thank so much Mackenzie! No, we just stained the beam. Sealing wasn’t necessary in this situation. Have a great week! ~ KIM
looks absolutely amazing! one question regarding the stain you used, is it oil or water based? thanks for posting!
Thank you! The Weathered Oak Stain by Minwax is oil-based.