It was one of those days when I felt like if I don’t DIY, I will die! Our kitchen and family room renovation has been in full swing for 8 a.g.o.n.i.z.i.n.g long months (insane I know). The whole process has put any home projects of my own on the back burner. As I stood there staring at our overwhelmingly choatic mess, I tried to ignore the disgusting carpeted stairs off our kitchen which were now even more gross after all the construction dust and dirt. No more. This girl’s gotta get her DIY on to stay sane, so I grabbed a few tools and BAM!, went to work at ripping out the carpet and started doing what I’ve wanted to do for years, a Painted Staircase Makeover with Seagrass Stair Runner!
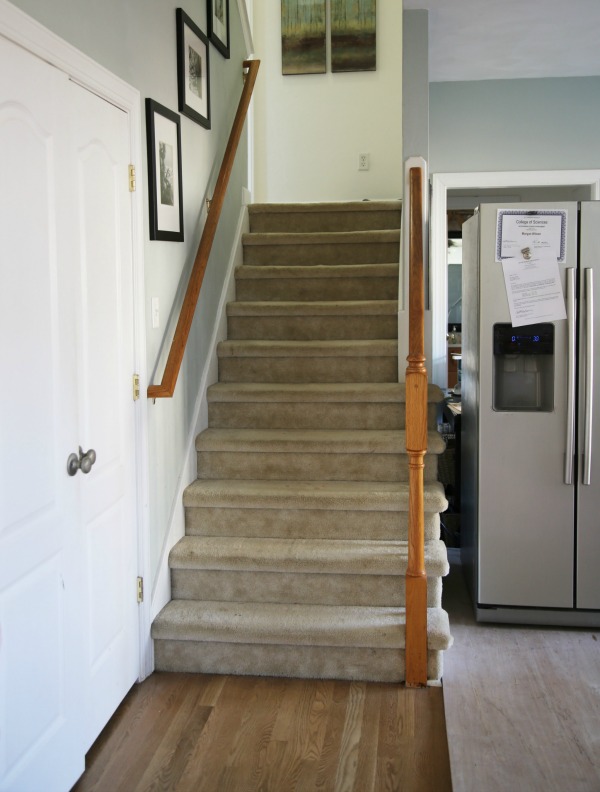
Shield your eyes. Here’s a shot of the carpeted stairs. YUCK. Thankfully these pics are a bit out of focus because the stains are horrible. I’m going to walk you though step by step how I gave the staircase a makeover. Let’s get started.
Painted Staircase Makeover with Seagrass Stair Runner Tutorial
Gather your supplies. For this project you will need the following tools (Amazon affliliate links provided for your shopping convenience):
- hammer
- pry bar
- box cutter
- filter mask
- eye protection
- ear protection
- pliers
- painter’s tape
- tape measure
- 100 grit sand paper
- Minwax Black Stain
- wood filler
- Rust-Oleum Bulls Eye 1-2-3 White Water-Based Interior/Exterior Primer Sealer
- paintable caulk
- caulk gun
- PORTER-CABLE Compressor
- PORTER-CABLE Finishing Gun & Staple Gun
- 1/2″ or 3/4″ staples for staple gun
- Finishing Plywood 7/32″ thick, 2×4′ sheets (available at HD or Lowes)
- Table saw or hand circular saw
- Semi-gloss White Paint
- Seagrass Stair Runner (I bought mine from Overstock.com)
- Hot glue gun
Step 1: Carefully remove the carpet & padding, using a box cutter where needed. You will be horrified at the amount of dirt hiding under the carpet. It was so bad I now want to remove all carpet from my home, so please wear your face mask if you have any allergies. Watch out for those staples! They are sharp! Use the pry bar and hammer to remove the carpet tack strips. This takes a lot of loud hammering (wear your ear protection). Use the pliers and/or pry bar to remove any and all carpet staples.
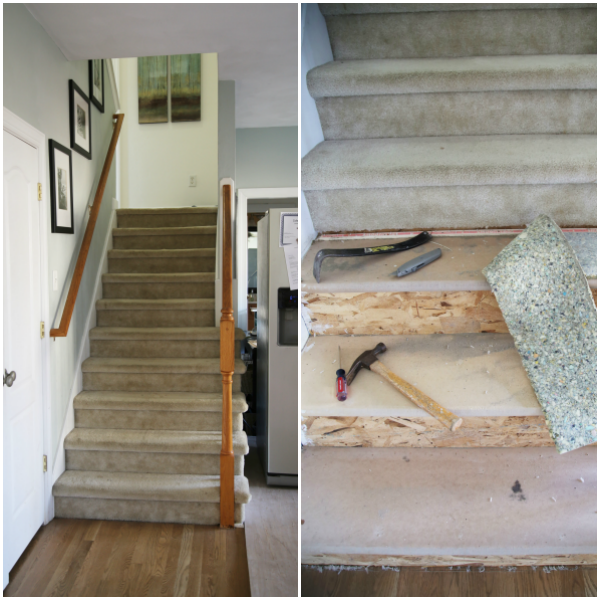
Step 2: Vacuum the step until completely clean. Once you have removed the carpet you will either be blessed to reveal real hardwood under your carpet or be cursed like me and reveal MDF treads and rough plywood risers. If you have MDF and plywood then you will need plan on covering up the plywood with a thin vaneer of finishing plywood.
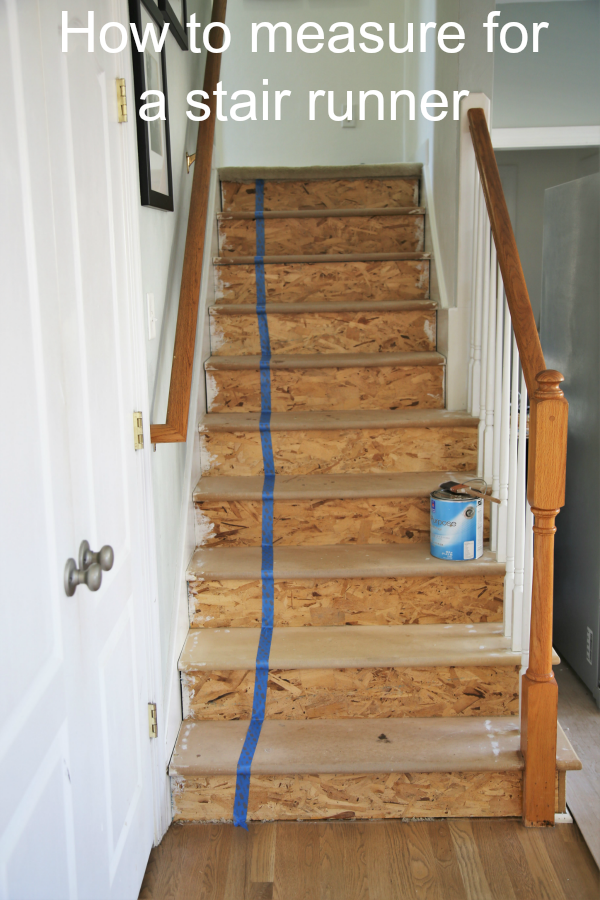
Step 3: Pat yourself on your back. Now it’s time to measure what size stair runner you will need. Do not measure until you have all your carpet removed. Start at the top of your staircase and run one continuous strip of tape all the way down the staircase, making sure to go over and under each bullnose on the tread. Tear the tape when you get to the floor.
Grab a friend, kiddo, or hubby and carefully peel off the tape and walk it across your room and lay it on the floor. Now MEASURE. This tape measurement is the absolute minimum for the size runner you need to order. I ordered a 2’6″ x 16′ seagrass stair runner with black border from Overstock ($109).
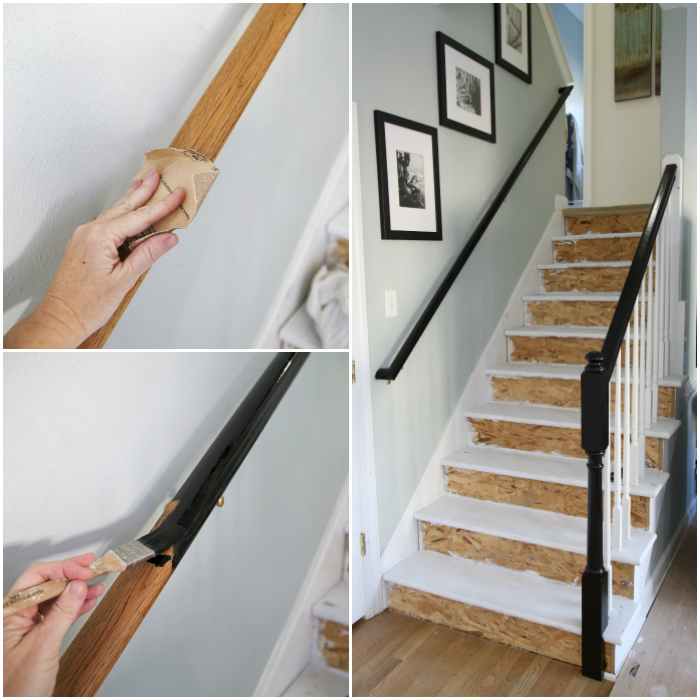
Step 4: Our banisters were an ugly butterscotch stain and no longer matched the newly refinished floors in Weathered Oak. Sand and stain the railing and banister. Clean the banisters and railings well. Lightly sand all surfaces of the stair railings and banister with 100 grit sandpaper. Wipe clean and make sure they are free of dust. Paint on black stain. I used Minwax stain in Black satin. Follow directions on the can.
Step 5: Covering the stair risers. Cut the finishing plywood into strips that are the width and length of your stair risers. Nail them to the risers with a finishing nail gun. Fill any nail holes in both the plywood and MDF with wood filler, then lightly sand any grit away. Caulk ALL edges with paintable caulk and then prime the staircase treads and risers with quality primer.
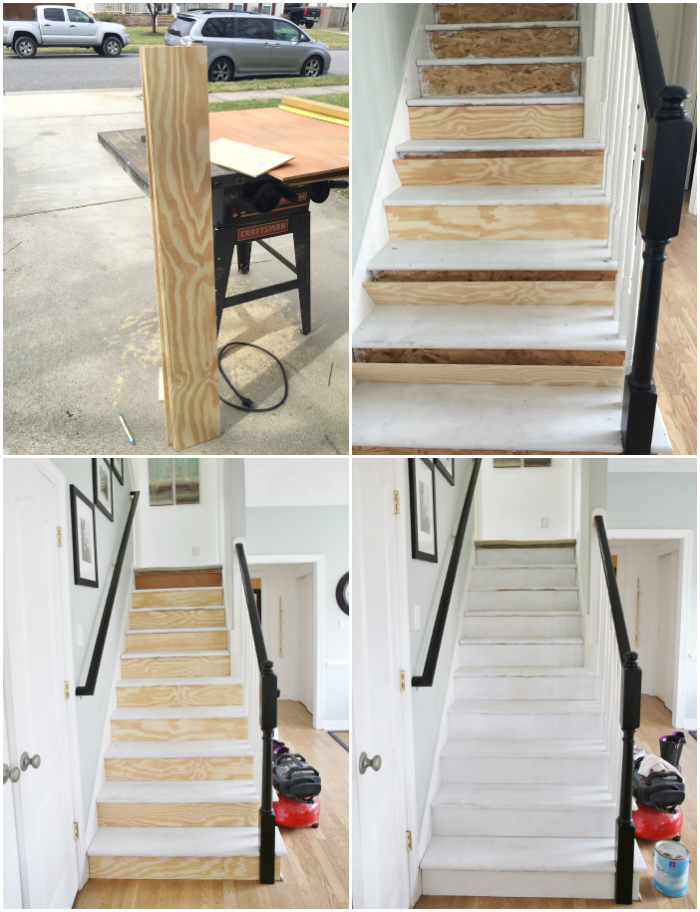
Step 6: Paint Staircase with 2 coats of semi-gloss latex paint. It looks so nice and fresh I almost left it as is, but I know that with 4 kids, those white steps wouldn’t stay white for long.
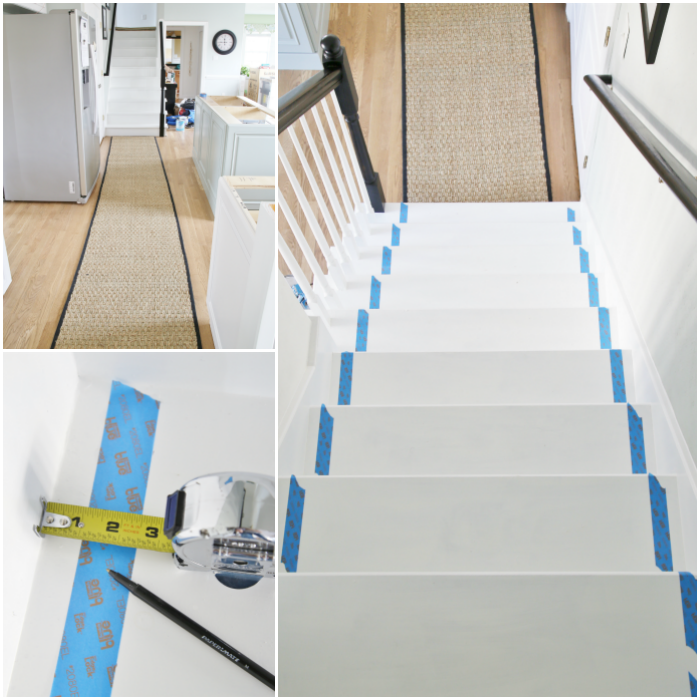
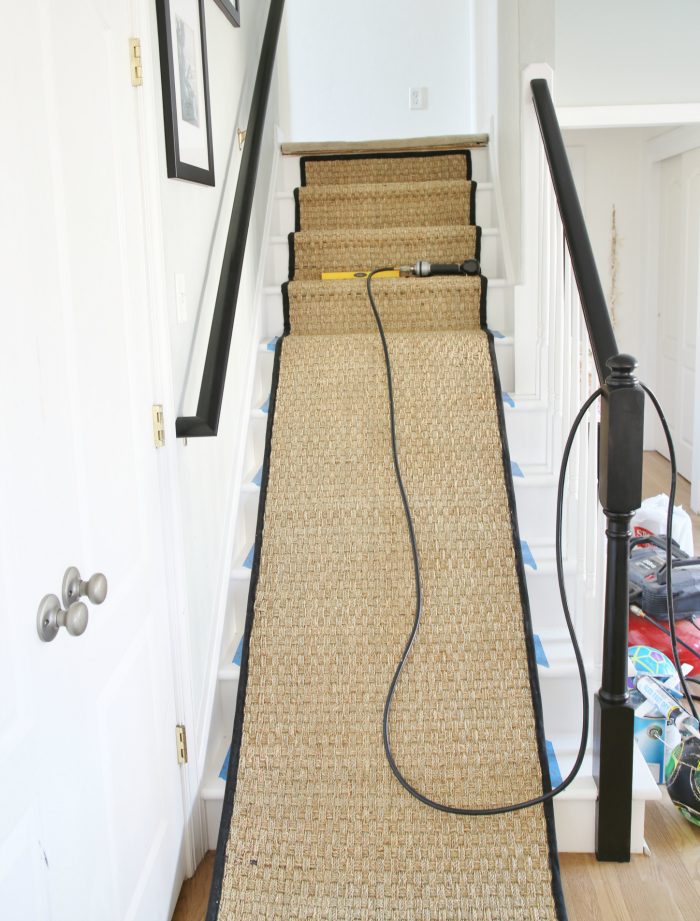
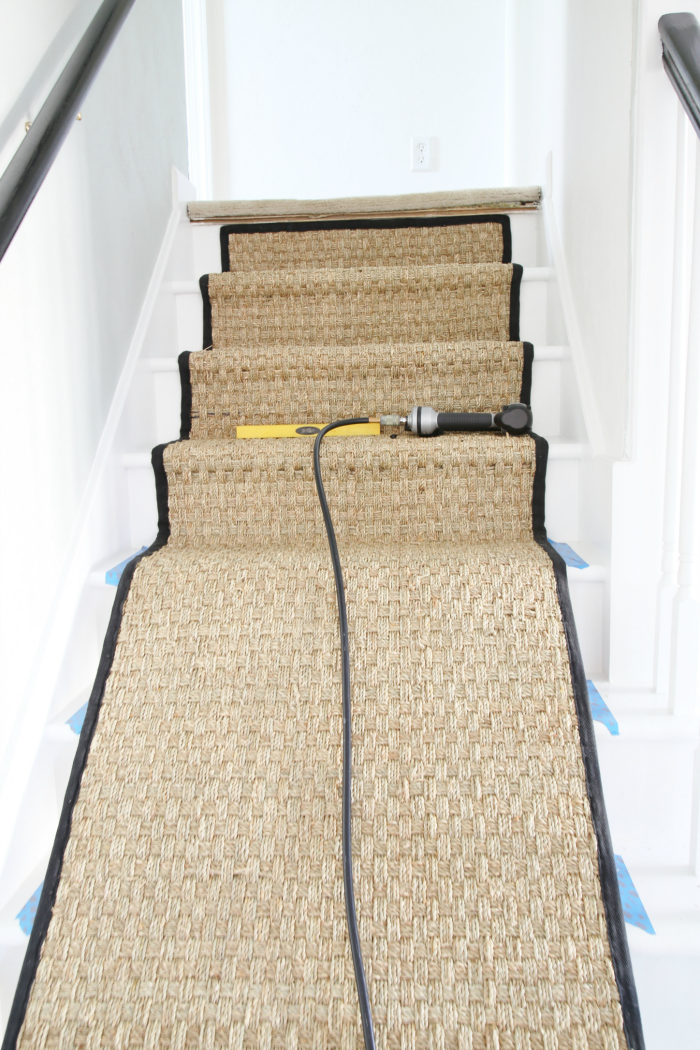
Step 7: Time to install the seagrass runner! Woo hoo! Unroll the seagrass runner and allow it to sit flat overnight. Measure the width of the runner and take that measurement and center it on your staircase. For mine, I needed to maintain a 2.5″ space on either side of the seagrass runner.
Use painter’s tape to mark the exact perimeters of your stair runner. This is a very important step. If you do not do this, then the stair runner can easily get misaligned.
Step 8: (This step is where you could use a second person to help but I somehow managed by myself). Pull the hose of your air stapler all the way to the top of the steps and set it down. Next, pull up the seagrass rug to the very top step’s riser, center the rug between the tape lines and staple to secure. Start in the center and then work your way outward. Be sure to put enough initial staples in.
My seagrass rug has a thick basket weave pattern and was not super pliable, so forming it around each step took quite of bit of muscle power. Go ahead and skip your zumba class the day you install the rug… you’ll burn plenty of calories stapling the rug! 😉
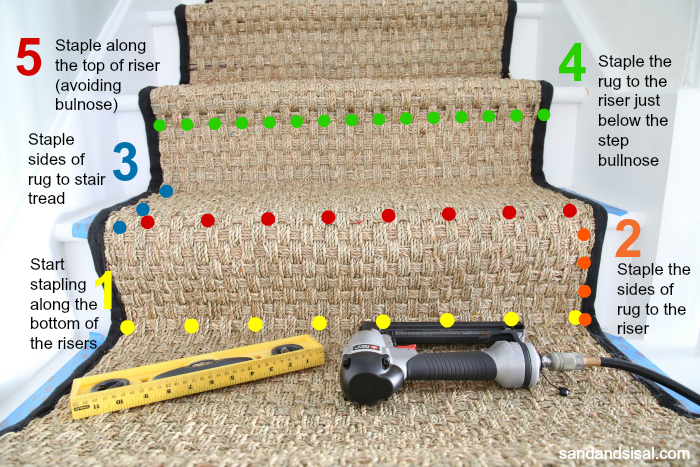
I made a little graphic for you that shows the order of stapling which I found works best. The picture is just for illustration purposes.
IMPORTANT: Work on one step at a time then move down to the next.
- Bring the rug down over the bullnose to the lower step, pull firmly and place your first line of staples along the bottom edge of the riser ( yellow dots).
- Staple along the sides, into the riser, working from the bottom to upward. Make sure not to staple on the ribbon border or your staples will show. (orange dots)
- Staple the sides of the rug to the stair tread. (blue dots)
- (This step takes muscle!) Push the staple gun hard right under the bullnose and pull the trigger, making sure you are shooting into the riser NOT into the bullnose. I stapled every inch or so, working from one side to the other. (green dots)
- Staple along the top of the riser, near the edge but avoid hitting the bullnose. (red dots)
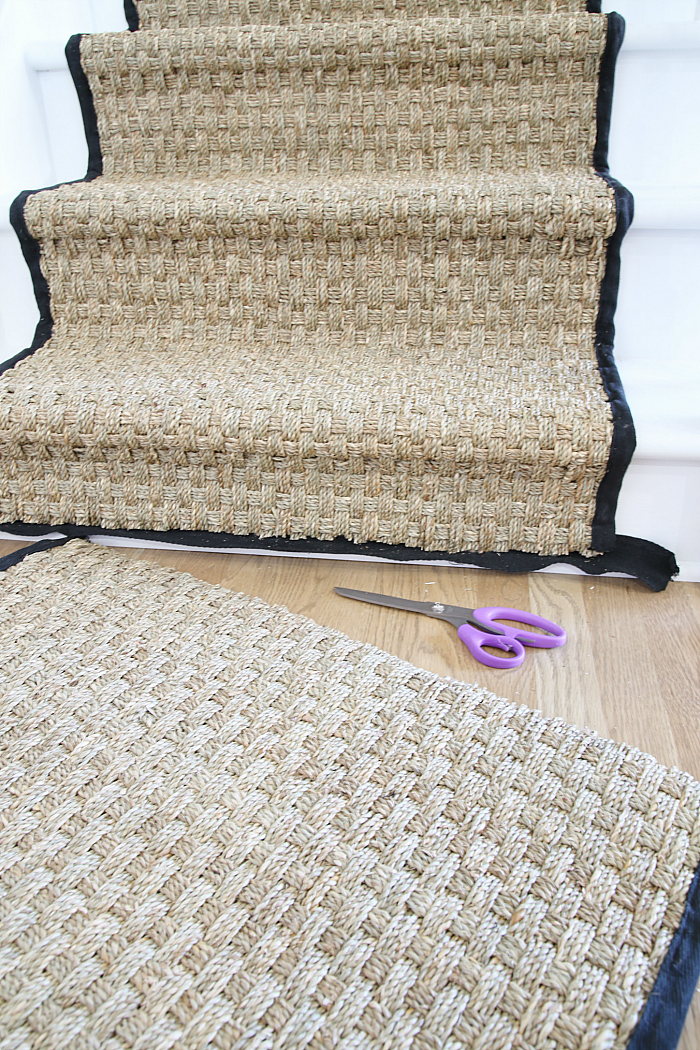
Step 9: Cut the bottom of the rug just above the shoe molding with very sharp scissors. Don’t staple all the way down the sides quite yet. Remove the ribbon edge from end of the scrap rug piece. Hot glue that ribbon onto the bottom of the stair rug. Now you can finish stapling.
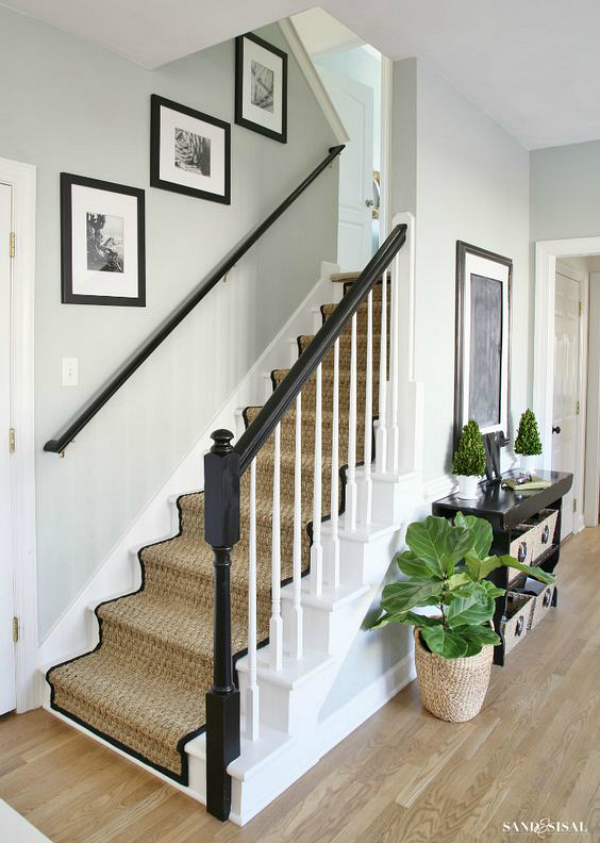
Ta-da!
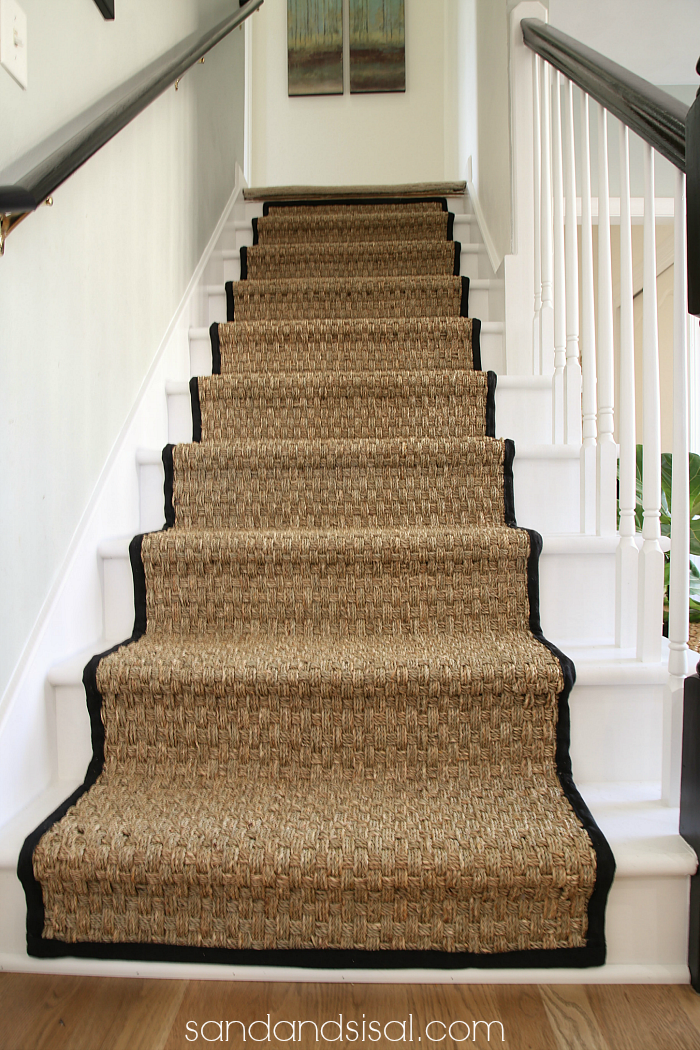
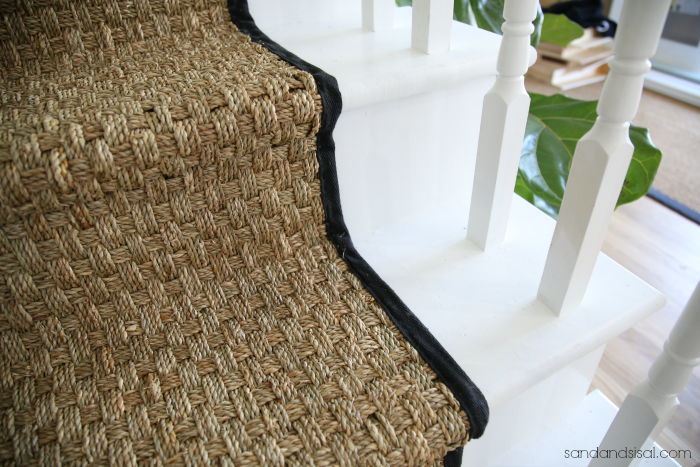
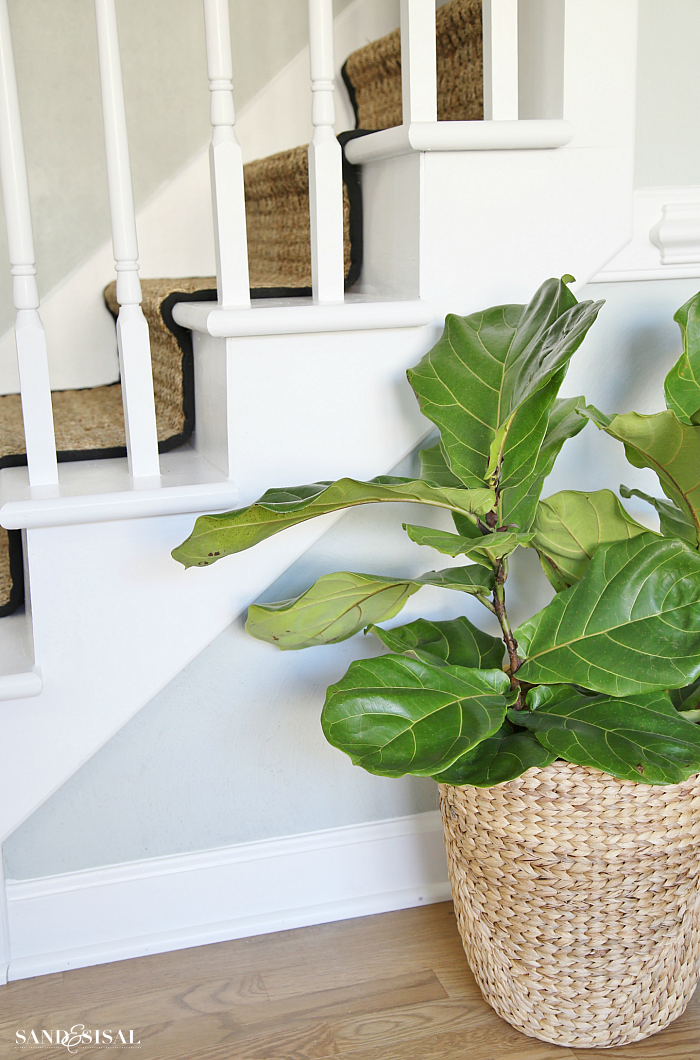
Here is a closeup of the basketweave seagrass stair runner. The beauty of using seagrass is that staples are not visible! It was easy to hide them within the weave.
We are all so happy with how it turned out! Our home has 4 seagrass rugs in it. I appreciate seagrass because it is very durable and cleans up great. My sister once dropped an entire pan of lazagna onto our kitchen seagrass rug, sauce, cheese and all. You’d never know it today!
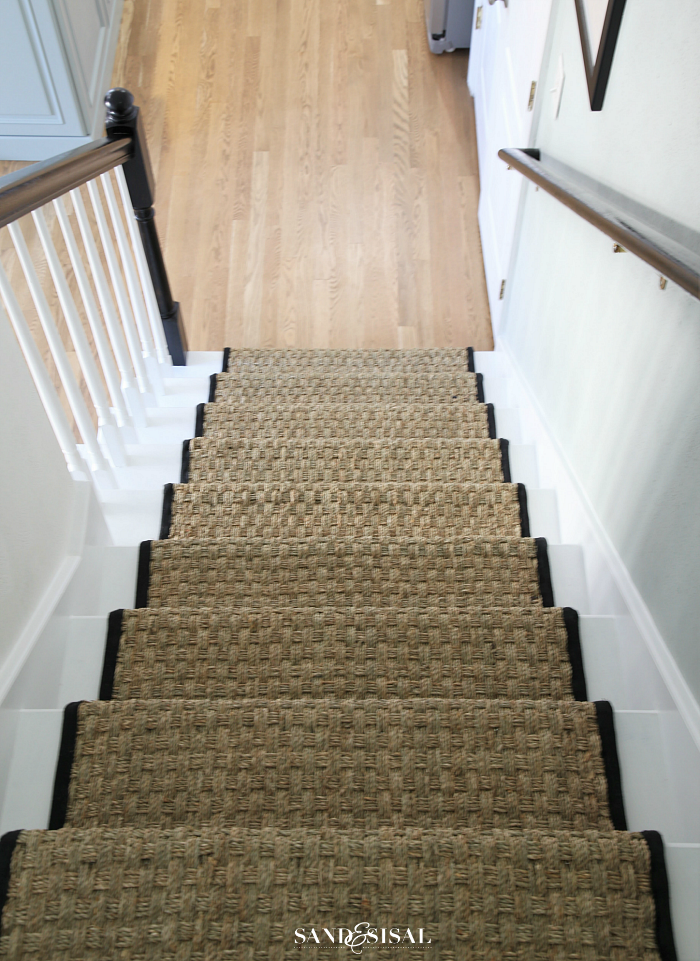
Our future plan is to put hardwood flooring upstairs but we’ll have to wait a bit, hence why you see the unfinished edge at the top of the landing.
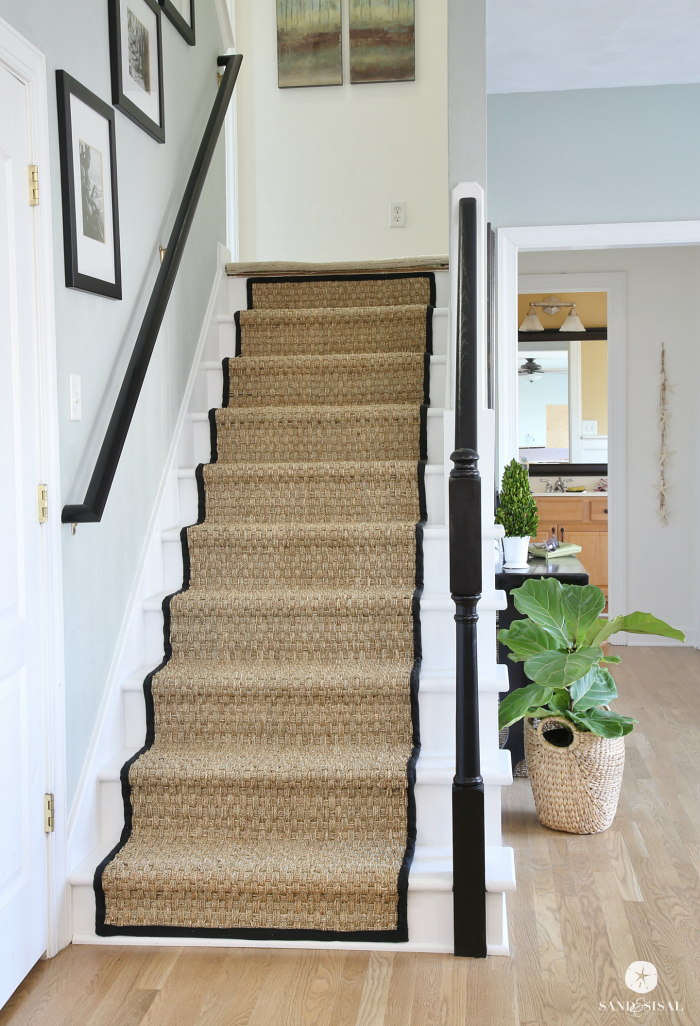
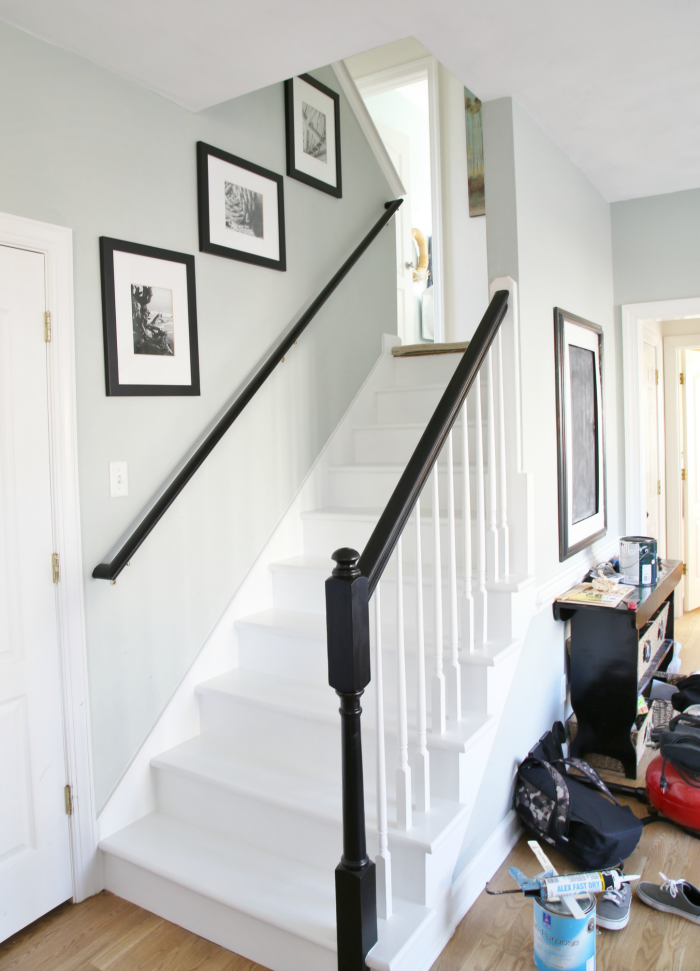
The painted staircase makeover has brightened up this part of the house and now will look so much nicer since it is open to the newly remodeled kitchen.
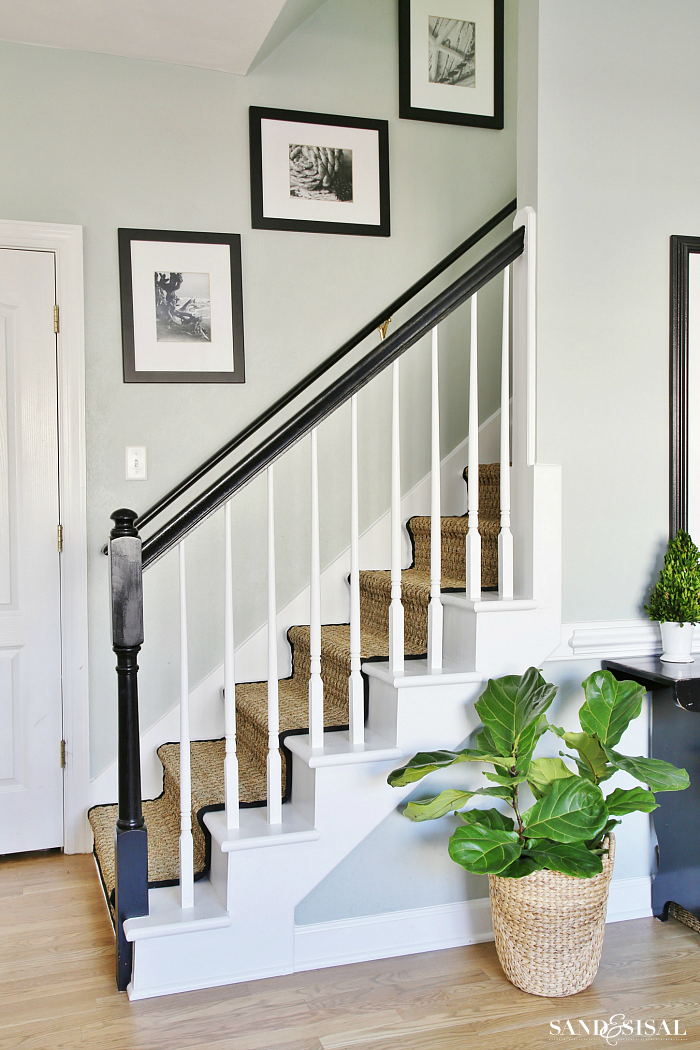
The black stained stair railings, black ribbon edge and accents help keep the space from looking too casual, or light and washed out. And I love the contrast against the white painted staircase, the Comfort Gray (SW) walls and Weathered Oak stained floors.

So what do you think of my Painted Staircase Makeover with Seagrass Runner? I’d love to hear from you!
KIM
I love it! I’ve been wanting to do this on our staircase, but I haven’t been able to get my hubby on-board with painting the stairs (he wants the treads to be stained wood). I think we’ve come to a compromise – I get to paint the risers white, he gets the stained wood treads, and I get to install a seagrass runner! Thanks for the instructions, it will be a big help!
Sounds like a great negotiation! Thanks for the kind comment. Best of luck on your stair reno!
hi kim…im thinking putting laminate floor or porcelain tiles but the budget…too much i menthe way you made yours sound like its on the budget:) if you dont mind where you got the seagrass carpet
Hi Cherry! All the supplies are listed on the blog post with links to where I bought them. The runner is from Overstock. All the links are blue colored, and can be clicked on to then be taken directly to the stores. Hope that helps! Have a great week! ~ KIM
How did you put the wood veneer underneath your staircase railing posts?
I love this! Maybe I missed it in reading but how long was the runner that you purchased? Thanks!
Thanks Paula! I thought I put it in there but I’ll go back and double check. I ordered an 18′ long runner and ended cutting off about 3 feet. I was nervous to order a smaller one. They do carry runners in tons of length options which is nice.
Kim awesome job! True testament to the power of DIY and I’m so glad you did it. Thanks for sharing.
Thanks so much Jaime! I’m so happy I did it! 😉
Hi Kim,
I’m doing exactly the same. My staircase carpet makes your old one look great!!! I’m in the process of looking for a runner, can I ask where you got yours from?
Thanks
Diane
Hi Diane! I bought it from Overstock.com. It was a really great deal is the quality is NICE!!! 😉
The transformation is absolutely amazing! I really love how the black trim on the runner goes with the newly repainted handrails. It almost makes me wish we still had our 2 story home to try this!
Thank you so much Pat!
Looks great! Someday, do a post on HOW you got the lasagna out of the seagrass rug… 🙂
Ha! Thanks Karink! We 1st gasped and then quickly scooped it up the spatula and then scraped up every little bit we could. Then we dabbed it with a towel and then poured club soda all over the spill area and kept dabbing with fresh towels. The kitchen rug is from Pottery Barn and has a much tighter weave. It would’ve been much harder to clean if it was a basketweave like the runner is. 😉
So awesome Kim!! I love it! I so want to do this. Ok, what is your wall color? I’m obsessed. Big hugs friend.
Thank you so much Cyndy! The walls are SW Comfort Gray 😉
Kim, you have blogged to an exact tee, what I had envisioned doing to my stairs! Thank you so much – your stairs turned out gorgeous! You also saved me a ton of money because even though I am an avid O.com shopper, I didn’t realize they made the seagrass runners in the long length needed. For my stairs, I will need to purchase the 22′ one. Had I not read your blog, I would have paid so much more at a carpet store I’m sure. Love your style – keep up the great work!
Thank you so much Shelly! Best of luck on your stair renovation too!
I had no idea sea grass was so easy to care for! I love sisal, but it’s impossible to clean from everyday dirt and considered wool to look like sisal. Looks like I have my solution, thank you!
Looks amazing. what a dramatic difference. I really like the color on the walls going up the stairs. could you tell me what color and paint brand your used?
thank you,
marina
Thank you Marina! The walls are Comfort Gray by Sherwin Williams. 😉
Your colors are perfect & I love how you used black to accent & pull together the space, as most of the time we ignore our stairs but you’ve made them really pop out nicely. Curious as to why you stapled the tops of the treads – was the weave loose enough, that you were worried the sisal would move & lose it’s shape?
Also, how much time would you suggest people allow to complete the install portion of this project?
Great questions Tina! I stapled the top of the treads to flatten the weave of the rug a bit and secure it better. I wear heels quite a bit and any loose or raised rug sections could be a hazard. It also made the overall look of the runner much neater. Thanks Tina!
Kim that is so gorgeous! I love Seagrass too & would consider doing a runner like this if I ever do stairs again. You did a great job!! I love my Dash & Albert runner too on my stairs project & it was pliable. But wow what an impact that Seagrass has!!
Thank you Rhoda! Your staircase is so lovely and I’m a huge fan of your runner too! Trust me, I was thinking about how pliable your rug was while I was breaking out in a sweat trying to bend mine around the treads! XOXO!
Your stairs are absolutely amazing. We just moved into a new home but we’re not able financially do any up grades. The steps are carpeted and when they get all dirty, I plan a makeover like yours. The treads on my stairs are not MDF but a cheap lumber with lots of knots. Will I still be able to sand and paint them? The risers are the same material as
your risers and I will face them with plywood.
Hi Lin! Yes, absolutely! When you get around to refinishing them, just be sure to sand the treads if they are rough and in your case, I would use an oil based primer with stain blocker. The wood tannins in the knots are notorious for bleeding through the paint if not primed well. Congrats on the new home! 😉
YOU are a genius! I’d like to know what the wall color is around the staircase.
Thank you Charley! It is Comfort Gray by Sherwin Williams. (One of my all time favorite colors).
Love the new look, but how did you finish the top riser on the stairs where the carpet met, in the photo I can tell it wasn’t finished off?
Thank you Diana! It’s not finished off. We plan on ripping out all the carpet on the landing and the adjoining playroom sometime this summer and replacing it with either laminate or pre-finished hardwood. That is when a new bullnose edge will be installed on that top step landing. 😉
Where did you buy your stair runner? I have seen several online, be sure I get a quality rug.
LQQKS Amazing! I have a question about the Sea Grass runner — how do you like its durability for traffic? Is it showing wear? And does it have enough resistance so that you don’t lose your footing? It looks “smooth”, and wonder if someone walking down with leather soled shoes might “slide”…if that makes sense?
Hi Lisa! I have owned several pure sea grass rugs. One of which is over 13 years old and still looks fabulous! That one was from Pottery Barn. The stair runner is pure sea grass as well and is a large basket weave. It is in no way smooth. I infact would have preferred a more smooth weave. Mine is very textured and to answer your question, it has held up well so far and no one has tripped or fallen. In fact I find that the basket weave has more grip for footing than most.
Hi Kim,
I just love all of your pics and designs! We’re in the process of re-doing an entire 80’s beach house and it is a very daunting task. However, your pics and diagrams/explanations are extremely helpful- also your kitchen is gorgeous. I plan on somewhat duplicating your staircase, although we have a right angle turn and a landing in between 2 short sets of stairs so we will have to seam the sisal rug on the landing in between and turn a corner. Not sure if we will be able to do the seaming without a professional. One question is though- what is an MDF tread?? We haven’t yet discovered what is under our ugly berber carpet yet but aren’t expecting anything good!
Hi Jen! MDF stands for Medium Density Fiberboard and is what the stair treads are made out of. It is very common building product. It has a smooth surface but dents and chips easily and does not tolerate water at all. As far as your staircase landing is concerned, I have seen what I have done but they left the landing bare. It looked just fine. Best of luck to you!
What was total time for project: days & hours per day?
Hi Pamela! It’s a pretty fast project. You could complete it in one weekend except the carpet needs to be removed to get an accurate measurment for the stair runner, then you have to order and wait for the runner to arrive.
Not for cat owners….they think you just installed a giant scratch pad just for them!
Ha! Great tip Theresa! I’m highly allergic, so I don’t need to worry about that.
Hi! The stair case looks fabulous! As does your entire house. Question about the bannister stain. (realize this post is quite old!) Did you use Minwax Polyshades or just basic Minwax stain. The polyshades are supposed to be good if you are staining over stain. I have a light oak stair case that was supposed to be retained 5 years ago lol. It does not match our darker wood floors. Before I venture out to buy the stain, just wanted to make sure. I honestly didn’t know you could stain over stain which is great because I didn’t want to paint it! Thank you!
Hi Cheryl!
I used the Minwax Polyshades. The existing finish was really well worn off already. We gave it a light and even sanding before the staining. It has held up pretty nice so far. 😉
Hope that helps!
Have a wonderful week,
KIM
Thank you for your reply Kim. Polyshades is what I have and I will give it a try! Thanks for the tips!
Where can I purchase this runner?
Hi Melanie! I’ve updated the post with the link to Overstock where I mentioned I bought it from. You can see it here —> http://rstyle.me/n/cihnb9xqg6
May I ask how this holds up after time?
Of course!!! It’s only been a year since we madeover the stairs but they still look just as good today! I have 4 kids (3 teens) and these stairs are used more than any staircase in our house. The sea grass is crazy durable. I JUST gave away my Pottery Barn Sea Grass rug that had for 13 years under my kitchen table. It held up to lasagna spills and everything a family of 6 could throw at it. I highly recommend sea grass if you are looking for durability and easy cleaning.
Hi Kim,
Your stair case is fabulous I just love it. Would you mine tell me the color of your stair case? I just love the white you choose.
thanks
Caroline
Thank you Caroline! I use Extra White by Sherwin Williams for most of my trim & molding in the house. It’s a fabulous clear white with just the slightest warmth to it.
Considering doing something like this as well. I am curious, how do you think the seagrass would hold up with a large active dog?
Hi Jen! We had a dog and seagrass rugs for years (10+) with no issues. As long as you keep his nails trimmed then you shouldn’t have a problem. 😉
I just love this! What would you suggest to do with a landing? Just leave it painted white and then continue the runner on the next bunch of stairs..? And if so, should I purchase 2 separate runners so that I have the 2 finished edges for each..? I hope that makes sense!
I also am totally copying your kitchen!! You did an AMAZING job with your whole house, it’s just gorgeous!
Fabulous question Cris! This was my quandry too. We have a landing at the top of the stairs which leads into the laundry room and playroom and then another set of stairs continuing up. If your landing is small then I would just paint it white like you already had planned and yes buy a separate runner for the next flight of stairs. The runners come in several lengths. Hope that helps!
Awesome! This is the best blog post on doing a runner on stairs. I’m going to do it tomorrow. Thanks!!
Thanks Dixie! Good luck on your stairs!
Hi! I love the look of your stairs! You did an amazing job! I clicked on the link for the runner and two of the reviews said it was too rough to be walked on frequently so I wanted to ask you. I would be putting this on stairs that the entire family walks on barefoot every day pretty much all day. Would you recommend it? Thank you!
Hi Tara,
Thank you so much! I couldn’t be happier with the how the stairs turned out. As far as the texture goes, I’m guessing it comes down to personal preference. These stairs are used the most by my family. As beachy people, we are always barefoot. None of our 4 kids complain about the stairs. This particular rug is in no way soft, but it is crazy durable. I don’t mind it. Would I prefer softer? Yes, but to be honest, for stairs, I want durability and sure footing stability over comfort. Like I said, it’s a personal choice.
Hope that helps!
Good luck!
KIM
How’s it all holding up!? Just ordered our runner and getting the walls painted!
Hi Laura! The staircase is still looking great! Send me a pic when you are finished, I’d love to see it!
What is the paint color of your upstairs hallway? The colors in my house are in the same color scheme as sea salt, comfort gray and oyster bay. Your house is beautiful!!!
Hi Addison! Thanks so much! The color of the walls at the top of the sea grass stairs is Simply White by Benjamin Moore. 😉
What color is your wall color? I love the stairs!
Thank you so much Kandi! The wall color is Comfort Gray by Sherwin Williams
On the step of your process where you talk about centering the runner and leaving 2.5″ on either side, I assume you are talking about centering on the portion of the stairs with a wall on either side. Your first 5 steps from the bottom, however,have wider treads to accommodate the banister poles. This of course causes the runner to not be centered on this portion of the staircase. Because of the way your staircase is constructed (1/2 open right hand, 1/2 wall on either side, this approach looks balanced. What it there were banister poles all the way up the staircase? Would you center the runner between the wall on the left and the left edge of the poles on the right, or would you center on the tread width, making the riser looking balanced and the runner-to-left wall and runner to right banister poles uneven?