We all have 1 or 2, or 7…seriously, nope, make that 8 (Oh geez… shhh!) of those inexpensive laminate furniture pieces that we bought (because we couldn’t afford anything else), received as a hand-me-down, or ones that we simply just loathe. In my case I am guilty of all 3!
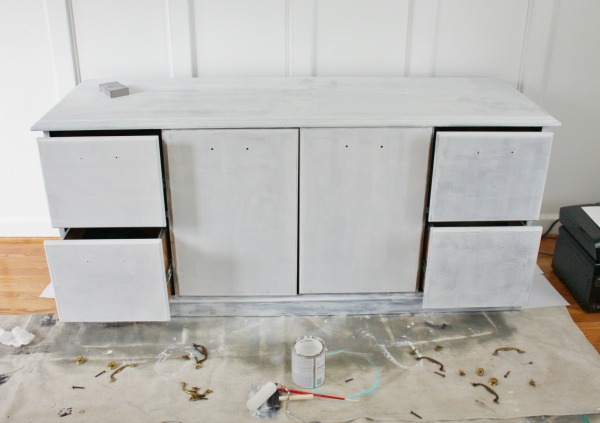
Hubs brought home this bohemouth, reddish fake wood, laminate credenza from an old office they were demolishing. It must weigh a gazillion pounds and has several chips and scrapes. But hey, I really can’t complain, we were in serious need of storage and filing for my home office, and it was FREE! I am a firm believer in up-cycling, and breathing new life into old items if possible. Hey, our landfills are full enough, don’t you agree? But…… after living with Mr. Chipped, reddish, fake wood wannabe credenza for a year, I no longer could take it. The credenza needed a makeover! Today I’m going to show you How to Paint Laminate Furniture and free yourself (and myself) from the ugly!
 To Paint Laminate Furniture you will need the following supplies:
- Shur-Line 4-Inch Foam Mini Roller with 12-Inch Handle
- Rust-Oleum Interior/Exterior Oil Primer Sealer Cover Stain, 1-Quart, White
- 3M Contour Surface Sanding Sponge, Super Fine
- Pro-Extra 2-1/2″ Angular Glide Brush
- Semi gloss paint- I used SW’s Emerald Semi Gloss Latex Paint in Pure White
- Paint Essentials 4-Feet x 12-Feet Canvas Drop Cloth
Step 1) Gather your supplies. Now like I said before, this credenza weighs a ton and I could not easily move it, so I decided to paint it right there, inside my house. I made sure to tuck a canvas drop cloth under the edges to catch any drips from primer or paint.
Step 2) Remove all hardware. My hardware was a not-so-attractive- faux brass.
Step 3) Prime. I bet you thought I would say SAND! Nope! Everyone has a different opinion on whether you need to sand or not. Now, lightly sanding with a fine grit sand paper will not hurt, but I haven’t found it necessarily imperative either. Laminate is not wood. It is a plastic coating, or a plastic-type coated paper. The KEY to having the paint stick is to use the proper primer. I recommend using Zinsser Oil Based Primer. This stuff sticks like glue! I love their water based primer too, but when painting laminate, just go for the oil based, I feel it adheres better.
Apply 2 coats of your Zinsser Oil Based Primer with a smooth foam roller. Allowing for proper drying time between coats.
Step 4) Lightly sand, in small circular motions, with a super-fine grit sanding sponge. This is the same sponge and method I’ve used when sanding between layers of chalk painted furniture. Don’t skip this step (unless you like a slightly bump texture)! The super-fine sanding sponge is made to lightly sand between layers of primer or paint. This process smooths out the “orange peel” texture left behind from the sponge roller and gives the primed surface a polished and soft, buttery finish.
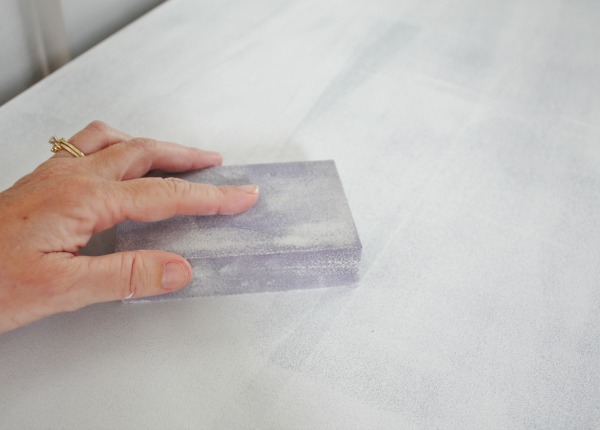
Wipe the paint dust off with a lightly damp cloth. The primer is paintable within an hour or two, but I prefer waiting until the next day before you paint and sanding right before you paint.
Step 5) Paint! Apply a good quality, latex semi-gloss paint with a beveled edge, paint brush. Brush the paint on in long and smooth strokes, going in the direction of the grain of the wood. (Ok, it’s a fake grain, on fake wood, but you know what I mean). Allow to dry several hours and then add a 2nd coat of paint.
Step 6) Re-attach hardware. Now, this hardware was (of course) a very odd width and I could not find replacements easily. So for now, a simple remedy was to spray paint the drawer and cabinet pulls with a silver metallic spray paint. This is super easy fix and will last! 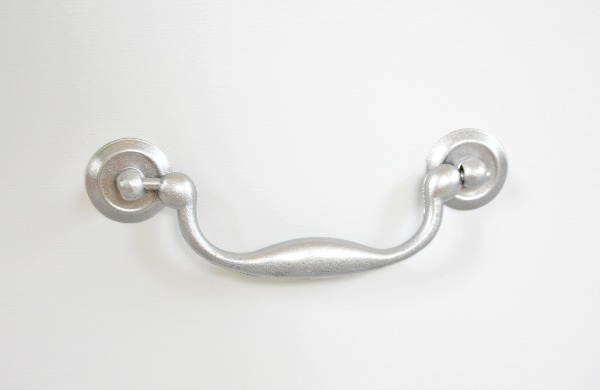
Step 7) Step away from the furniture! Allow your freshly painted piece of furniture to dry and cure before you place any type of heavy items on it. This might take a few days up to a week.
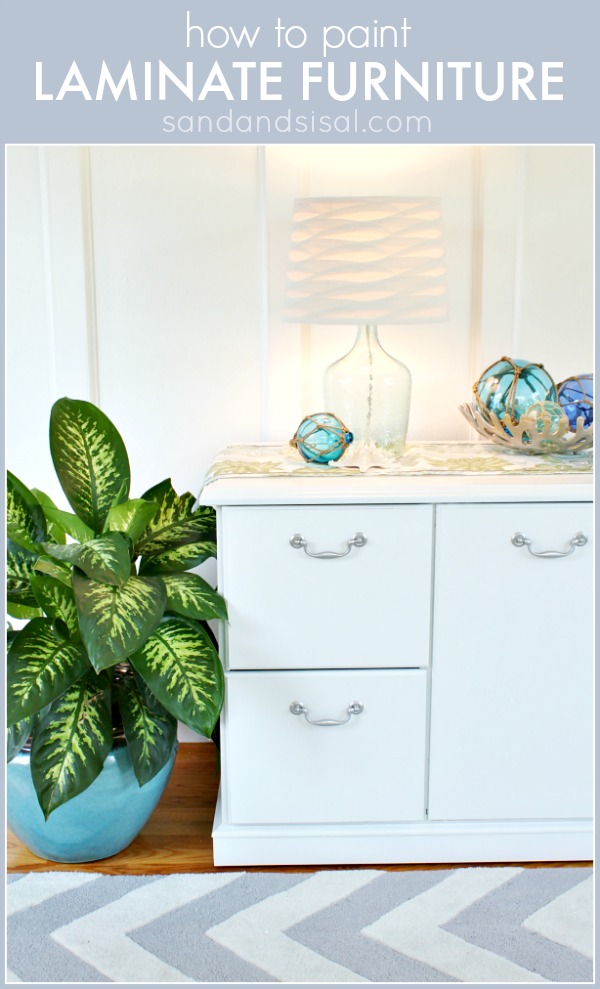
I am so very happy with how it turned out! I wish I had done it earlier! Good bye ugly ol’ laminate, hello beautiful!
 Stay tuned for the rest of my home office makeover coming up next week!
If you liked this post, then you might enjoy:
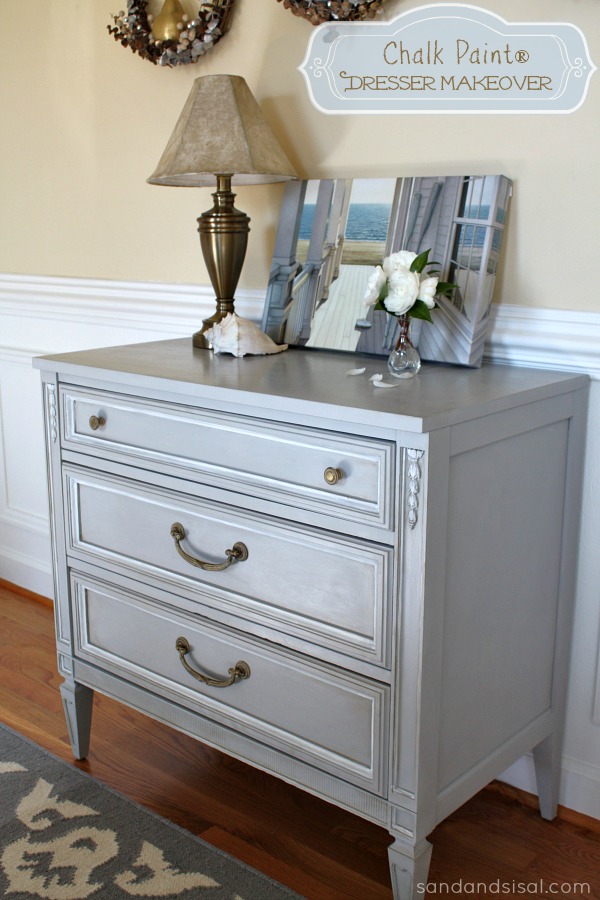
Chalk Paint Dresser Makeover (part 1)
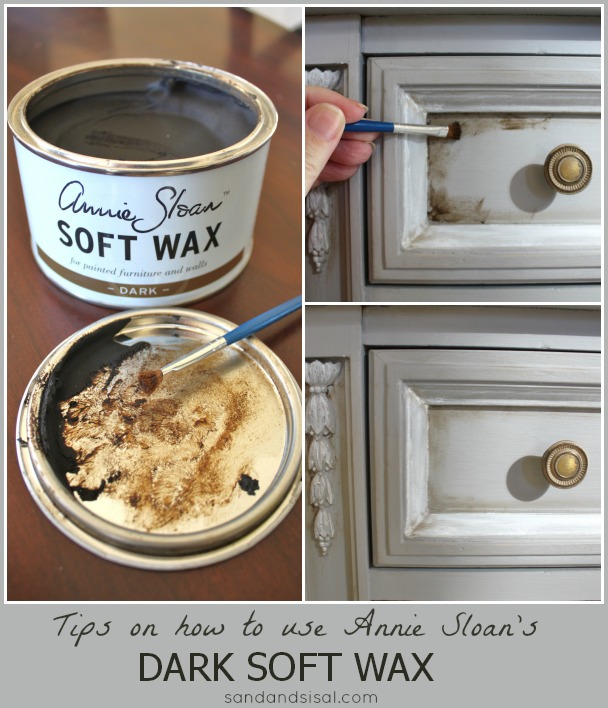
 Chalk Paint Dresser Makeover (part 2- How to Use Soft Wax)
KIM
Great job girl and great tutorial! Even better, it was FREE! Yay! High five friend! xo
Thank you so much Cyndy!
Looks great! I know you are excited to have the extra storage.
Thank you Paula! Yes, I love storage space (wish I had more!).
I love the re-do!! Gorgeous!! The blues and greens in the room really ‘snap’ with crisp, clean,soothing, personality. Love it!
Thank you Jackie! I will be revealing the entire office makeover really soon. I’m loving the fresh and summery color scheme. 😉 Thanks for the sweet comment!
~KIM
very nice makeover it looks brand new and expensive xx
Wow what a difference. Looks brand new and gorgeous. I definitely will be trying this with a laminate piece I have and hate. Thank you for the excellent tutorial
Love this! And it’s perfect timing as I am almost ready to paint an ugly laminate rolling kitchen cart. I wasn’t going to do primer (I’m slightly lazy), but after reading your post… Now I’m thinking I should :-/
Thanks for another superb post!
Heather
I’ve never heard of sanding in a circular motion. Even though laminate has no real grain, it would seem best to sand in the direction of the grain had the surface been wood. Also, did you use oil-based paint as well as oil-based primer. The piece looks great.
Hi Teddee! I used a latex paint. I normally would not sand in a circular motion, but we are not sanding wood, we are sanding primer. And we are using a super fine grit sanding sponge which is made to sand between layers of paint. The sanding sponge’s purpose is to ever so lightly smooth any “orange peel” texture left behind from the sponge roller. Small circular motions will polish it up to a buttery smooth surface. I will edit the post today to help clarify that. 😉 Thanks!
What a beautiful result…a completely new piece. Did you use oil-based paint over the primer or can latex paint be used?
Hi Zina! Thank you so much! I used Sherwin Williams’ Emerald line, latex, Semi-gloss paint. And yes, you can always use latex over an oil based primer.
you really made this piece shine!.. it looks fatastic
I am SO excited that you shared this because I, too, have several pieces of this sturdy, but ugly furniture that need makeovers…but I wasn’t sure where to start! Now, if you’ll excuse me, I’m off to Home Depot! 😉
– Brooke –
What a difference, Kim! I would never have imagined that piece could look so good!
Kim,
Nice work and great blog!
Have you ever had the need or wanted to buy a paint sprayer? I’ve got several med to large projects on the horizon that I could justify buying one. Any suggestions?
Thanks and keep up the good work!
Hi Landon!
I actually have never used a sprayer. I think it is the one DIY tool I’ve never tried yet! Everyone I know who has one, loves it, but they do have a learning curve I’m told. Wish I could give you a recommendation on one, but I can’t. Thanks for the nice comment and checking out the blog!
All my best,
KIM
I can suggest what NOT to buy…During a bout of insomnia while watching late night infomercials I regretfully purchased the Paint Zoom. What they neglect to tell you in the commercial is that you need to water down the paint so much that it drips down the project. Waste of money, time catching drips, messy clean up and you wind up using twice as much paint. The Paint Zoom is a TIRED. Learn from my sleep mistake.
There are “real” compressor paint sprayers and have inquired which one my friend who is a professional painter uses and even his first one wasn’t that great and they require practice to get the knack. They usually leave an orange peel finish unless you like sanding.
How has this held up? We were wanting to try this but in a work environment and not sure of the durability.
It’s held up just fine Rachel. Priming well is the key. I do recommend letting the paint cure for at least a week before your place anything on it, like printers etc.
Hi there,
Am I able to use the chalk paint on laminent furniture? Have u tried it or not? If yes how’d it turn out? I’m starting on my daughters room tomorrow and she has both laminent and real wood furniture. Also, can I use mod podge on the chalk paint? At what step should I do that? I’m adding zebra details to the furniture and I’m NOT artistically gifted so I figured using mod podge would be my quickest and easiest route?? Do u have a better idea? I really appreciate any advice or help u can throw my way!!
Thanks so very much,
Janell
Just wondering why you used a brush instead of foam roller to apply the paint.
Hi Kallie! Just a personal preference. You can use either, but I liked how the faint brush strokes gave the illusion of painted wood furniture vs. painted laminate. 😉
I have a bedroom set from the 70’s…. might have been Thomasville but is a combination of ‘plastic’ details on the cane & circular trim work. And the flat top made of wood. My daughter spray painted the headboard of mostly cane and the half circle trim work with an expresso brown spray paint to use the headboard for her toddler. I like the result so much I intend to spray the chest of drawers with laminated cane work on the drawers and the half circle plastic trim. I think those areas will be conducive to the spray paint. My concern is the flat sides and top of the chest and the desk. I could not find a companion paint to brush on so I intend to spray these flat surfaces. Any hints on using the spray paint on the top of the desk or sides and top of the chest? The headboard turned out beautiful! Hope I can do as well!
Hi BJ! You can use spray paint but I do recommend using a spray primer 1st. I’ve spray painted a laminate dresser and the flat tops look great. Just use long sweeping sprays. Remember it’s always better to spray on several light coats vs. one heavy coat which will have a tendency to pool or drip.
Best of luck!
KIM
I can’t wait to try this! I’ve been looking for a way to paint my laminate dressers with minimal sanding involved but that will still last. I am curious if it is better for me to use oil based paint since it is oil based primer? I am worried that the paint will scratch or chip off easily. Do you find that the latex paint is holding up nicely?
Hi Aleah! You do not have to use an oil based paint, but you certainly can if desired. Because the oil based primer sticks so well, any latex painted over it will also adhere nicely. The credenza has held up great. The drawers are always being opened and closed every day and no signs of chipping yet! 😉
Kim,
I love you blog and tutorials! I wish I read this a month ago. I didn’t sand my laminated piece and primed it with Kilz LATEX and it is already peeling. Foo! I have a half a garage full of laminated furniture so I am going to give it another try (the right way) and see if I can breathe new life back into them. Thank you so much!!
Question. I lightly sanded a laminate bookcase I got and then used Behr’s paint and primer premium paint. Now I am not sure if maybe it just needs to cure or I did something wrong. I was putting some hardware on and it is already coming up when I lightly scratched with the hardware. Should I have primed with with primer first and not used paint with primer? HELP!!!
Getting ready to put this in my 4 yr olds room and wondering if it is going to hold up 🙁
Hi Jen,
I’m so sorry but yes, when it comes to painting laminate, it is pretty imperative that you use a separate primer and I really recommend an oil based primer because it has more “sticking power”. A paint and primer in one will not hold up well. 🙁
i also read the posts on chalk paint and the wax. I was wondering of those methods on laminate furniture also!
Yes! You can use chalk paint on the laminate also. Be sure to lightly sand the surface 1st with a fine grit sandpaper.
Hi Kim! I love the lamps you chose for the credenza. Can you tell me how tall they are? They look just right ! I would like to do something similar on my credenza after I finish painting it (I am almost halfway done-LOVE your excellent tutorial-thank you!) Thanks! Rita
Thank you so much Rita! The lamps and shades are from Target and were sold separately. I’m not sure they still have them. I had to buy mine online. With the shade they stand 20″ tall. I love them too! 😉
Great tutorial! I have a “fake wood” table that I would like to paint but have some bubbling on the laminate top. Would a light sand/prime fix the problem or do I need repair using wood glue. Thanks!
I am doing this, but have a white semi-gloss paint and primer from Lowe’s. Is that bad since I will be priming first?
No, it should be just fine Robyn. The important part of this project is lightly scuffing up the surface and using a separate oil based primer before painting.
Any idea if this would work on laminate cabinets? We have a beach house that has those white/white laminate cabinets. Not going to spend money on new cabinets, would love if I could change the look somehow, but don’t want to make it worse – if that is even possible 🙂
Thanks,
Jill
Hi Jill! Yes, it would. For kitchen cabinets you want to especially make sure that they have a very good coat of the oil based primer. And then you will most likely want to give them a coat of polycrylic over the top for extra protection.
correction “white/wood” cabinets
Just brought home my first project. I’m going to paint a laminate dresser. However it has been spray painted already. Do I remove the spray paint? BTW it was a sloppy job. They got some paint on the sides & inside the drawers.
Hi Cindy! You do not need to remove the spray paint. You just need to prime it really well first with the oil based primer. Be sure to follow all the steps in the tutorial. Good luck on your dresser!
I’ve never made or painted anything . I have some ugly gold laminate furniture . With your help I hope to make and sale some of these things. Thank you do much for your step by step instruction .
Thanks Kim! Good luck on your project!