This post brought to you by Elmer’s ProBond Advanced. All opinions, expressions and design are 100% owned by Sand and Sisal. Tutorial and design allowed for personal use only.
 We used to live 30 minutes away, in Norfolk, VA, home of the world’s largest naval base. My sister and mother still live there. The city’s mascot is a mermaid. Mermaids are everywhere! Do you remember back in the 90’s when Chicago had the “Cows on Parade”? Well, we have the “Mermaids on Parade”. Hundreds of creative mermaid sculptures are everywhere. These beautiful mermaids were the inspiration for my Seaglass & Cedarwood Mermaid.

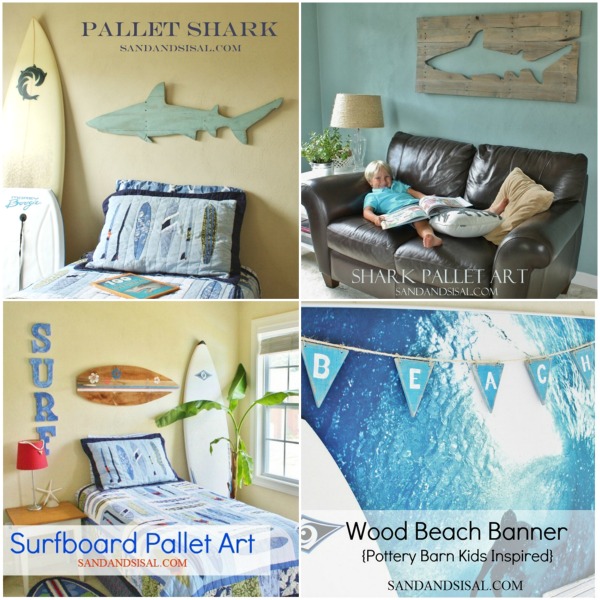
I passionately enjoy woodworking with pallet wood and wood in general to create fun and unique pieces of art. Here are some past tutorials of mine.
To Make a Seaglass & Cedar Mermaid you will need the following supplies:
- transparency sheet & wrapping paper
- 2- 8ft. cedar boards
- permanent marker
- Beach Sea Glass
- acrylic paint
- Elmer’s Carpenter’s Wood Glue Max
- Elmer’s ProBond Advanced Professional Multi-Surface Bond with 100-Percent Weatherproof Glue
- sandpaper
- Tools Needed: overhead projector, band saw or jig saw, safety earwear & eyewear
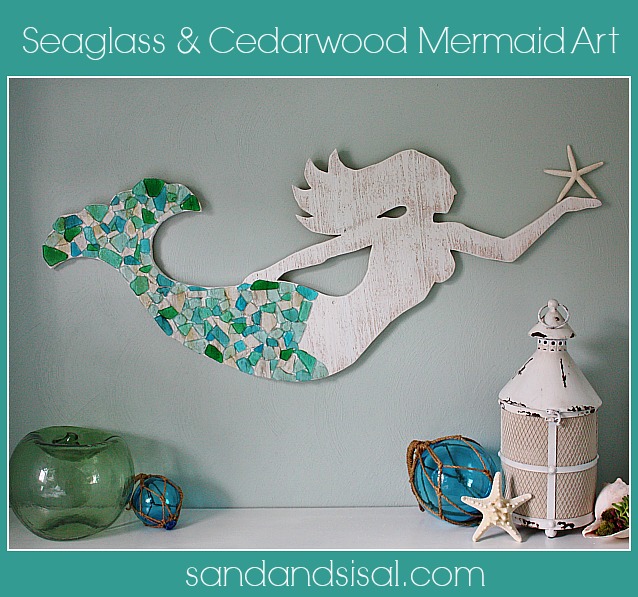
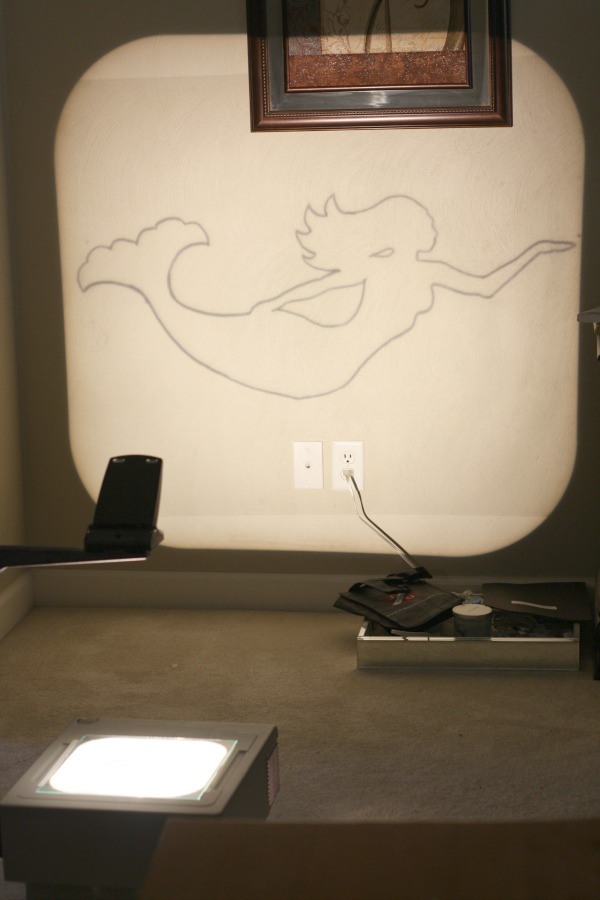
To begin, I started with a mermaid design, which I hand drew on paper then copied and printed onto a transparency. I used to paint wall murals back in the day, and I found using an overhead projector very useful. I projected my mermaid drawing on a wall and then traced it on wrapping paper taped to the wall. 😉 This mermaid art is appx. 43 inches long.
Note: If you don’t have an overhead projector then you can take your print out to a copy shop where they can print a 24×36″ engineer print for you, which is very inexpensive (appx. $5).
The next step was to take it out to the driveway, lay a cedar board on the ground and determine the lengths that would be needed, starting at the tallest point of the drawing.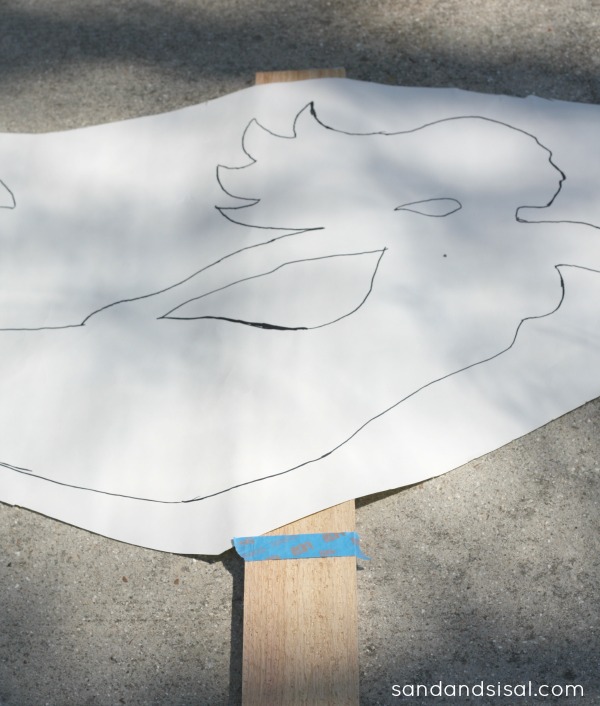
I cut the lengths of cedar wood and laid them along the driveway. I only used 2- 8ft cedar boards.
I traced around the mermaid cut out with a sharpie pen. 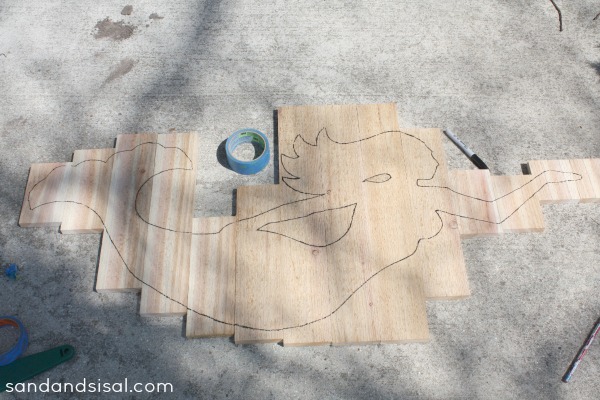
Now comes the fun part…. using my band saw to cut out each board. I’ll be totally honest, this can be scary. Using a band saw takes complete concentration. Like using any saw, one wrong move can result in loss of a finger or serious injury. Always, always, always follow the manufacturers recommendations for all power tools and wear protective eye and ear wear. A band saw cuts like butter! I love it. You can also use a hand held jig saw if you have one.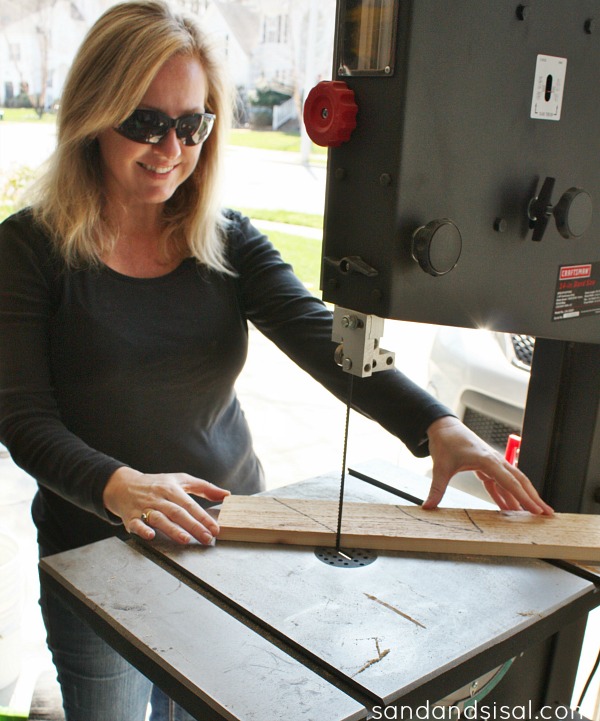
Assemble & Glue: Each piece was glued together with Elmer’s Wood Glue Max. It makes a bond stronger that the wood, is sandable and paintable and cleans up nicely with water. 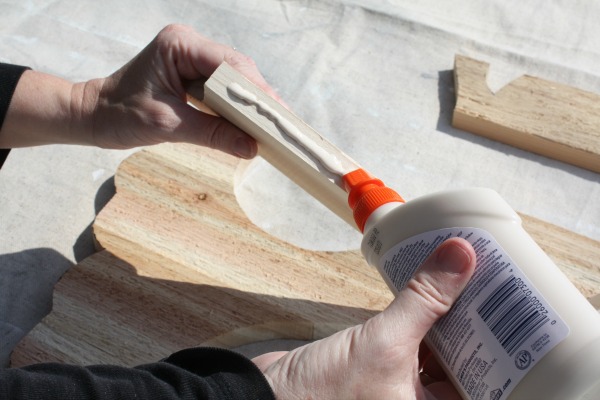
The mermaid was allowed to dry for about an hour before I handled her and brought her indoors. Sand the edges and surface as desired. The cedar boards are rough on one side and super smooth on the other. I wanted a rustic look, so I chose to keep the rough side forward.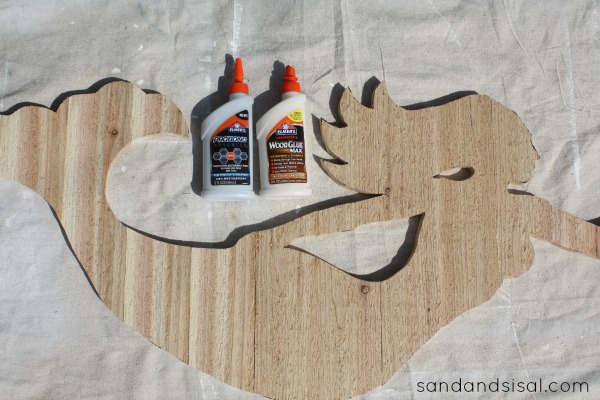
Paint: The mermaid was given a light dry brush with white acrylic paint. I chose to do apply the paint using a dry brush method because I wanted the rough cedar board texture to show.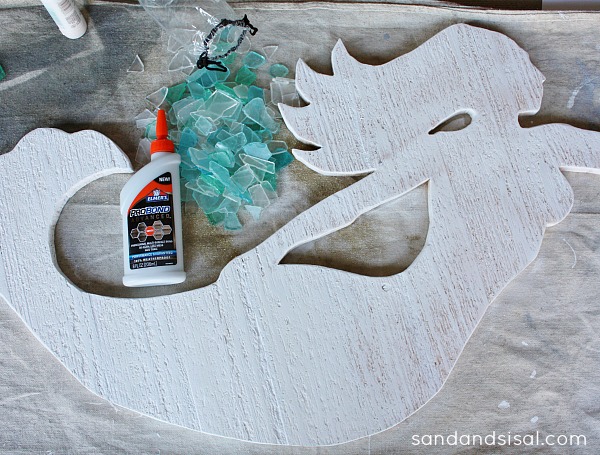
Now it’s time to decorate with seaglass!
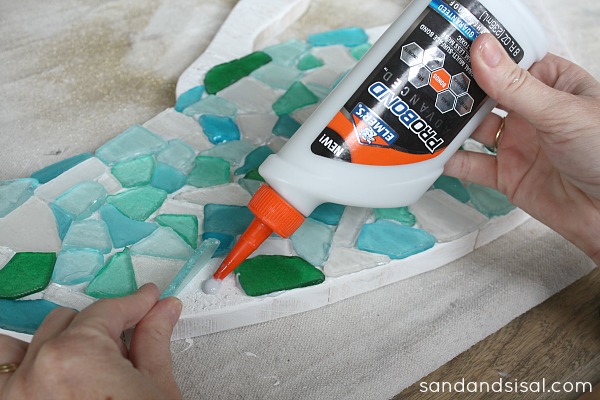
- Arrange the Seaglass: Place your seaglass on the mermaid tail and arrange it so that the seaglass mosaic will fit the way you want it to. This is a dry lay.
- Glue the Seaglass: Next pull out your Elmer’s ProBond Advanced glue! ProBond is an amazing multi-surface, non toxic glue that allows you to adhere porous to non-porous materials together, like wood to metal, glass, or ceramic to drywall, etc. All without messy foaming. ProBond is 100% waterproof too! I placed one dot of ProBond under each piece of seaglass, and lightly pressed to distribute the glue. It set up very quickly and dried to a clear finish. Be sure to follow the manufacturer’s directions on the back of the bottle.
- Tips: Now, be aware that cedar wood has a lot of tannin in it. In any area that I did not seal with paint and the cedar was visible, the tannins did turn the glue a tad yellow. Next time, if I am using cedar, I will prime the wood well, to prevent that from happening.
I couldn’t be more please with how the Seaglass and Cedar Mermaid Art turned out! It is currently hanging in my laundry room, but because this is cedar and glass, and the ProBond is 100% waterproof, this Mermaid Art could totally be displayed outdoors too! 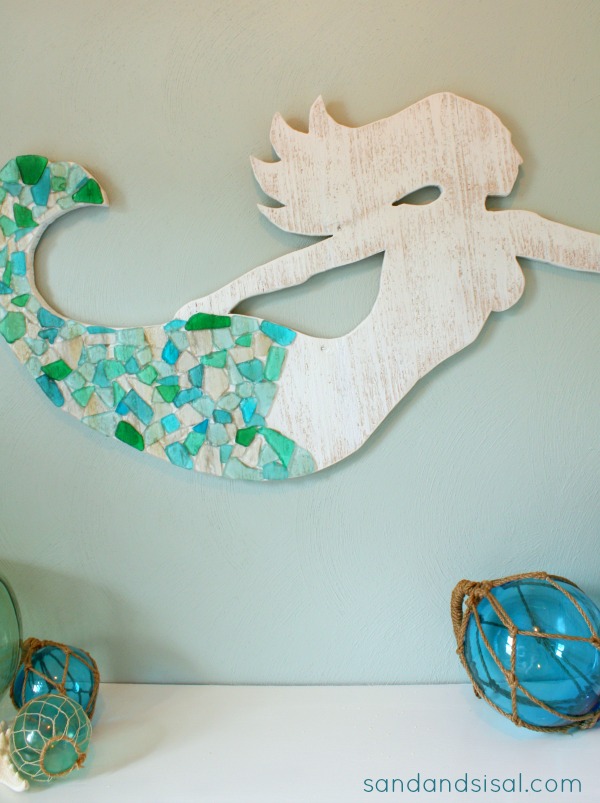
Hope you love my mermaid as much as I do! To see all the other Mixed Materials you can bond together with ProBond and other amazing projects, click that link!
Linking up to: All Things Heart & Home
Wow! I love your Mermaid! Wonderful job with the tutorial too! I’m scared to use the saws too but just might have to try them to create such a beautiful piece of art.
Pinning!
~ Ashley
Thank you Ashley! It is a bit scary at first. But like anything, the more you practice, the more comfortable you get. 😉
Kim, is there a printout for this mermaid? Thanks so much! I live near Lake Erie, which is a wonderful beach to grab lots of lovely glass. If the printout isn’t available, I’d be happy to pay you for one. Thanks so much and HAPPY SUMMER!!!!
Another awesome pallet project!
Thank you Gina!!!
This is VERY cool! 🙂
Thanks Cindy!
Kim, once again you knock it out of the park. I so have to do this. Is ther any way of downloading your mermaid image?
Thanks
Erin
Kim,
Your projects are always amazing. Another job well done!
Oh thank you so much Dana! I appreciate that!
Fabulous! Think I will give this a try!
Thanks Wende!
This is beautiful, Kim! I’m in VB and I love the mermaids. I love that you gave yours more curves in the right places! Beautiful!!
Ha! My hubs & sons wanted the “curves” to be even larger…. um… no. Men!
Thanks Christy!!!
Kim, can you download the mermaid stencil. Thx
Wow Kim, this is positively stunning!! I love it so much!
THank you Amanda!
I love this-it’s beautiful! Where do you buy the flat sea glass from?
Thank you! You can buy seaglass at Pier One or on Amazon (links provided in the post). 😉
Beautiful!!! Where did you buy the flat sea glass for your project? Love, Love, Love the colors!!
Thank you! You can buy seaglass at Pier One or on Amazon (links provided in the post). 😉
I love the mermaids in Norfolk! (I’m not far at all!) Yours is fabulous though..really, just gorgeous! Love the sea glass.
Nancy
Thank you Nancy!
Love your mermaid! What a great idea adding the seaglass too!
Thank you Wendi!
UM. I need one of these. Yup. Summer project. 🙂
Kim, Fabulous! She is a beauty. OK< I am dense, am not finding the links for sea glass.
Hi Wende!
I’m sorry, I had entered the links for where to buy the sea glass, but I must not have hit save. I re-added the link to the supply list in the post. Basically you can find the faux seaglass on Amazon & at Pier One.
Thanks!
KIM
I love the mermaid. It looks great. I also love the color of the floating balls. Where did you find them?
Thank you Ralinn! I found the dark blue ones at TJ Maxx/Homegoods. The light blue one I made. Have a great weekend! ~ KIM
Wow…seriously amazing! What a cool idea.
Erica
http://www.fortheloveofdecorating.com
Look at you using the band saw!!! Impressive! Sea glass is one of my favorite things followed closely by mermaids! This is just the best project!
I’ve also never used Elmer’s ProBond…but I’ve wanted to try it. I’ll get some asap!
Thanks for sharing this with Twirl & Take a Bow my friend! (had to pin for later too!)
I would have never thought of combining thinner pieces of wood like this!What a great idea, now I just need to find someone with this type of saw!
Your mermaid is super pretty!
Oh this makes me want summer even more.
I will be featuring this on out TWIRL and TAKE a Bow link party on Tuesday.
thank you so much for linking up!
Hugs
Karin
I love your mermaid! Since you gave the directions on how to, is it okay to copy this idea?
Hi Julie!
Thank you so much. You are welcome to make one for your personal use, but not for sale in your ETSY shop. If resale is your desire, then the entire look and shape needs to be very different. I’m sure you understand.
Thanks,
KIM
Thank you, Kim, I do understand. I have been on the lookout for a nice mermaid shape for a cut out. I’ve done dogs and horses and other shapes from pallet wood. I will have to come up with my own design, I guess!
The boards are 8 ft long but are they 1×6 or 2×4 or? Thank you 🙂 Im making this for my bathroom…its beautiful!!
Thank you Kathy! The boards were actually 1/2″ thick, 3″ wide, 8′ long.
This is amazing and I could really use one on my pool deck wall…it would look awesome. Thank you for the inspiration.
Hugs, Lynnie
I would pay you to make me a sea glass mermaid like yours and ship it!
I’d love to buy one that you’ve made. I won’t go near power tools.
Kim,
Is there nothing you can’t do? Your creativity amazes me..I was on Hobby Lobby’s website today and saw a mermaid like this on their website but it was small and metal, so I thought you got it from there. What a wonderful idea to make your almost lifesize pattern. Gosh gal, you think and can do everything!
My DH has all these power tools and because of his handicap doesn’t use them anymore and I want him to show me how to use his compound miter saw(aka chop saw). I think I’m talking to the side of the wall though. I’ve been thinking how I could use his router in making signs from scrap wood we have here.
Does the craft stores have that sea glass? I have something like it in my one birdbath out on the patio. Or at least that is what it looks like to me! But seaglass is flat, right? Mine are like stones of glass(?)or compositie of glass. Have you ever used a router for any projects?
Ha! You flatter me! Yes, there is a TON I can’t do. I just like pretty things, but when I couldn’t afford them I then tried to figure out how to make them myself (that’s how the blog was started). I’ve never been to a Hobby Lobby or ever been on their website to be honest.. (gasp!). I heard our area will be getting one this next year and I’m so excited!
You can buy manufactured sea glass (like I used) at Pier One Imports or on Amazon. I’ve provided direct links for purchasing in the supplies list. As far as the power tools go… I recommend experimenting with some scrap wood. But first, look at the brand name of the miter saw you have. Write that name into a Google search and find the owner’s manual for it. They are usually available to read online. You can learn so much about how to use the tool before you even attempt to use it. I’m a 3M DIY blogger and so I do need to tell you that safety is paramount. Know your tools first, then use them. That being said, my miter saw is my favorite tool ever! I use it for most of my projects.
I’ve used a router a few times. It takes a lot of practice and a very steady hand.
LOVE this! I am doing a mermaid themed nursery for my daughter and want to make this! Did you use one or two bags of the sea glass from Pier One?
about 1 1/2
Hi Kim,
Beautiful! Is there any way for you to provide a downloadable mermaid? I can’t draw worth a lick!
I absolutely love this mermaid! What is the actual finished dimensions of the mermaid? I need to figure out how to draw one because I am terrible at drawing. Could you share your template for the mermaid? That would be really helpful. Thank you so much!
Hi Kim, your mermaid is fabulous! You are incredibly talented. I’m thinking of trying this by using one of the zillion plastic stencils available,and drawing in the empty parts..then enlarging “blocked” sections and taping them forever and a day..ha!! I can’t help but Im seeing a big sea glass palmtree in my head too! Thanks for your wonderful inspiration and this realy cool site! Rose in NJ
THank you so much Rose!
Hi Kim,
I love this Mermaid! I’m lucky enough to live near some lovely beaches and have a tonne (literally lol) of unused seaglass. This is a super idea! Thank you for the inspiration! Just wondering though, if using outside, should the wood be sealed to sustain weather? If so, my concern is the seaglass not sticking well to the sealer. What would you suggest?
Thanks a bunch ?
Hi Krista! Great question! I’m not totally sure, but the glue is crazy strong so I would be surprised if it didn’t stick to the sealed wood.
Can you please send me the link to where I can download your mermaid design drawing? Love this idea!
Thanks so much!
Hi Cindy,
I’m sorry, I don’t have a link. I just hand drew a mermaid on a piece of paper and then traced it onto a transparency.
I had my husband cut the mermaid out of plywood and attached the sea glass that myself and my aunt collected from the beaches of NFLD. Instead of a starfish we gave her a sand dollar to hold. Thanks for the lovely idea. She turned out lovely!
How nice! Thank you for sharing that with me Suzanne! Feel free to email me a pic of your pretty mermaid if you want. I’d love to see it!
She is going to look amazing in my bathroom♥
I love this but do not have the tools to do it as Im sure many of us dont. I was wondering if you would be interested in cutting all the pieces out and shipping them to me. I can put them together and paint and decorate. I just love this! With all the interest you could sell these as a starter kit im sure your customer base would skyrocket! Im in VA too. Thanks!
I made the mermaid! She is so beautiful! Had so much fun making this project. Everyone is in love with her. Thank you
Yay! That’s wonderful to hear Wanda! Send me a photo if you want some time!
It’s gorgeous! You make it look so easy!
Thank you Nancy!