• Home
  • Meet Kim
  • Blog
    • Facebook
    • Instagram
    • Pinterest
    • Twitter
    • YouTube

Sand and Sisal

  • DIY
  • Home Tour
  • Decorating
  • Gardening
  • Recipes
  • Thanksgiving
  • Decor Crafts
  • Seasonal
  • Christmas/New Years
  • Winter/Valentines
  • Spring/Easter
  • Summer Holidays
  • Fall
  • Halloween

December 3, 2013 ·

Sea Glass Ornaments

Christmas Trees· Christmas/New Years· Coastal Christmas· Coastal Decor· Crafts

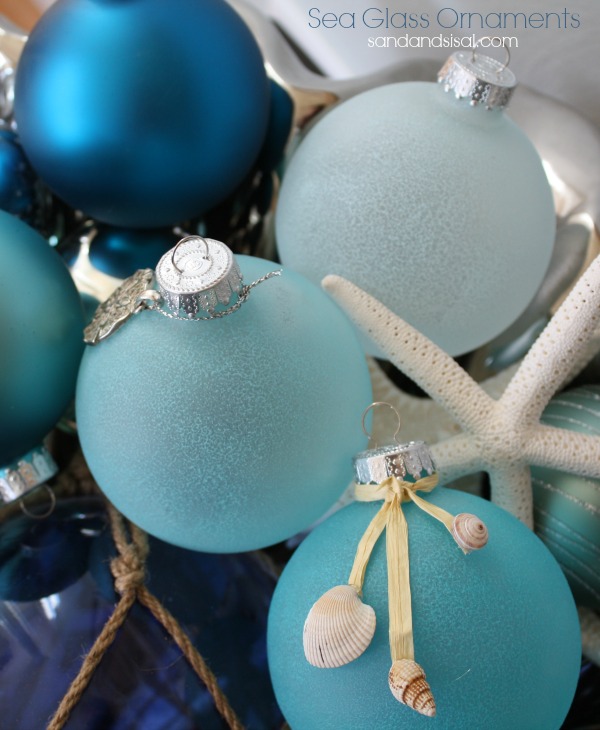
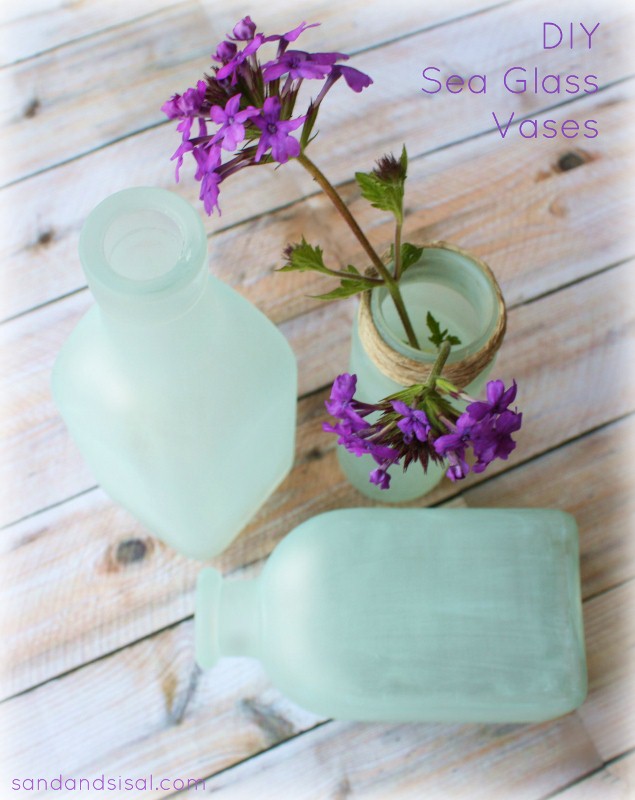
Who loves easy? (I see your hands raised). I do too! To be honest, I was surprised at how the DIY Sea Glass Vases went viral this spring. They seriously take no time or talent to make and look just as beautiful as Pottery Barn’s for a fraction of the price. So when I pulled out my Christmas boxes, I found a few clear glass ornaments I hadn’t sabotaged yet and thought, “Why not use the same technique to make these look like Sea Glass Ornaments for my Coastal Christmas Tree?” Voila people… welcome to the most simple Sea Glass Ornaments you have ever made!
 Sea Glass Ornaments

All you need to make Sea Glass Ornaments is:

NOTE: Since the time I wrote this post (2013), Martha Stewart Paint discontinued the line. THANKFULLY, due to popular demand… ahem 😉 ,  they have brought out a new line of glass paints (2017) and I have updated the links to reflect the new paint available. 

  • Glass Ornament Balls
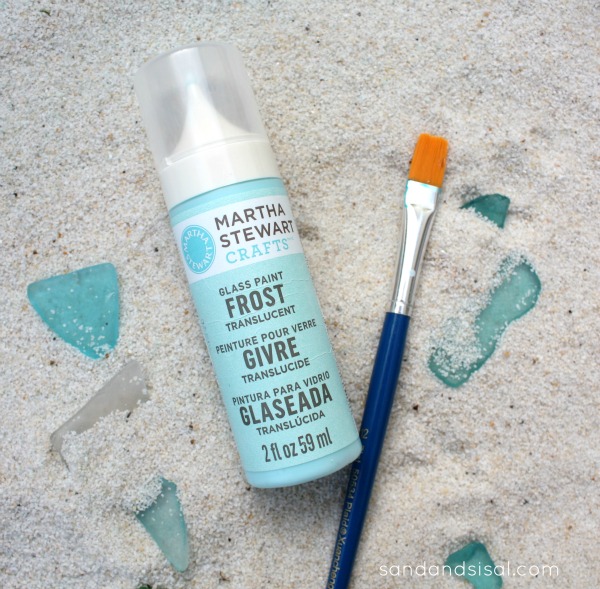
  • Martha Stewart Glass Paint – Sea Glass
  • Martha Stewart Foam Pouncers
  • embellishments (broken jewelry, charms, beads, tiny shells, ribbons, raffia, what ever you like!)

Martha-Stewart-Glass-Paint-DIY-Sea-Glass-

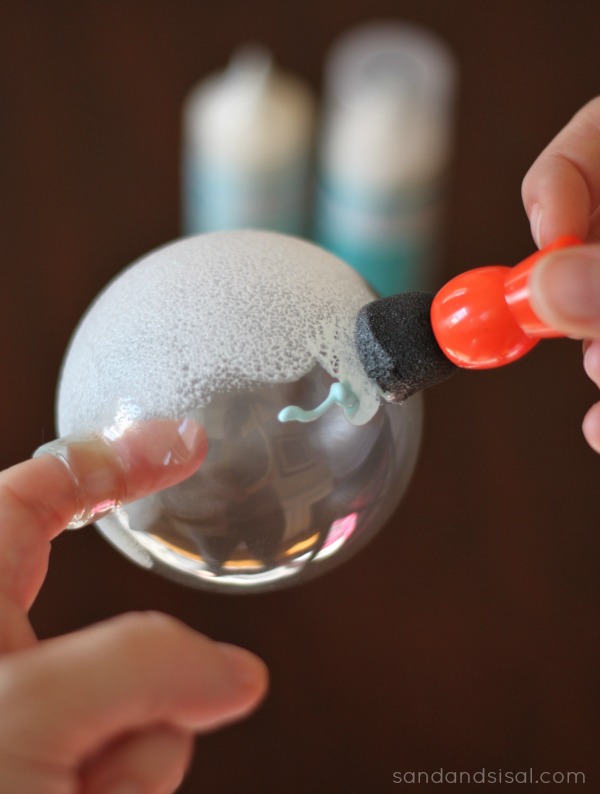
Step 1) Clean your glass ornament with rubbing alcohol. This removes any grease that might exist on the glass and allows the paint to adhere best.

Step 2) Squirt on the MS Glass Paint and use your sponge dabber to evenly distribute the paint. (To create 3 different colors I used each color separately then I combined the Surf with the Sea Lavender). The sponge will leave a bit of texture on the ornament which will become more subtle as it dries. It actually adds a more authentic look to the glass bauble.

How to make a sea glass ornament

Step 3) Allow to dry and embellish (if desired) with shells, ribbon, charms, etc. I hot glued a few tiny shells to a bit of raffia tied around the base for one ornament, and tied a pretty silver sand dollar charm to another. It was from a broken piece of jewelry I had.
Sea Glass Ornaments by @sandandsisal

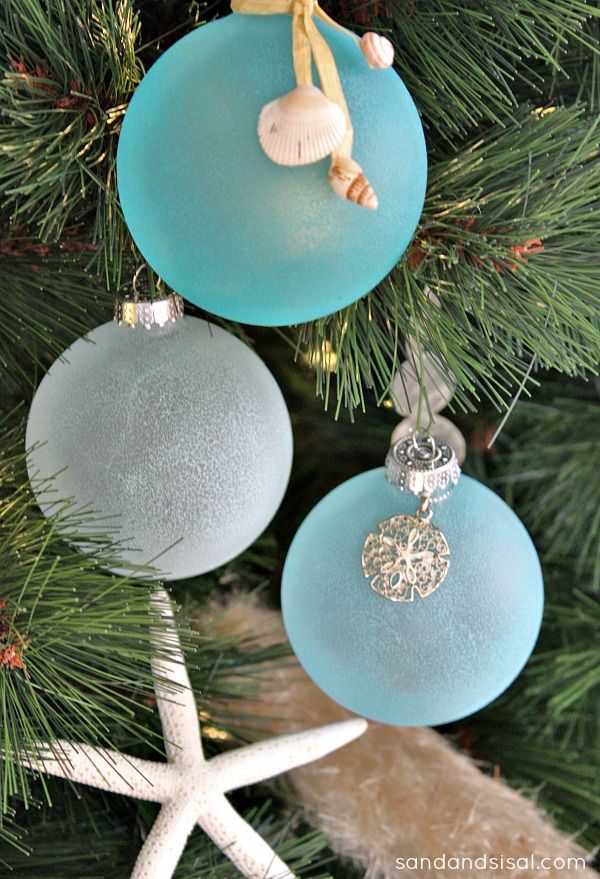
You should see how they glow at night with the Christmas lights! It’s beautiful! Sea Glass Ornaments

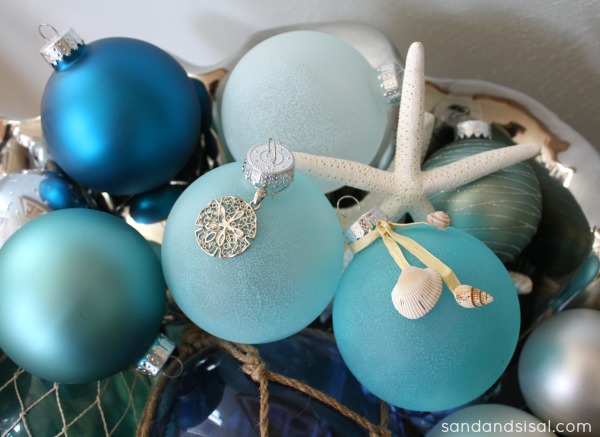
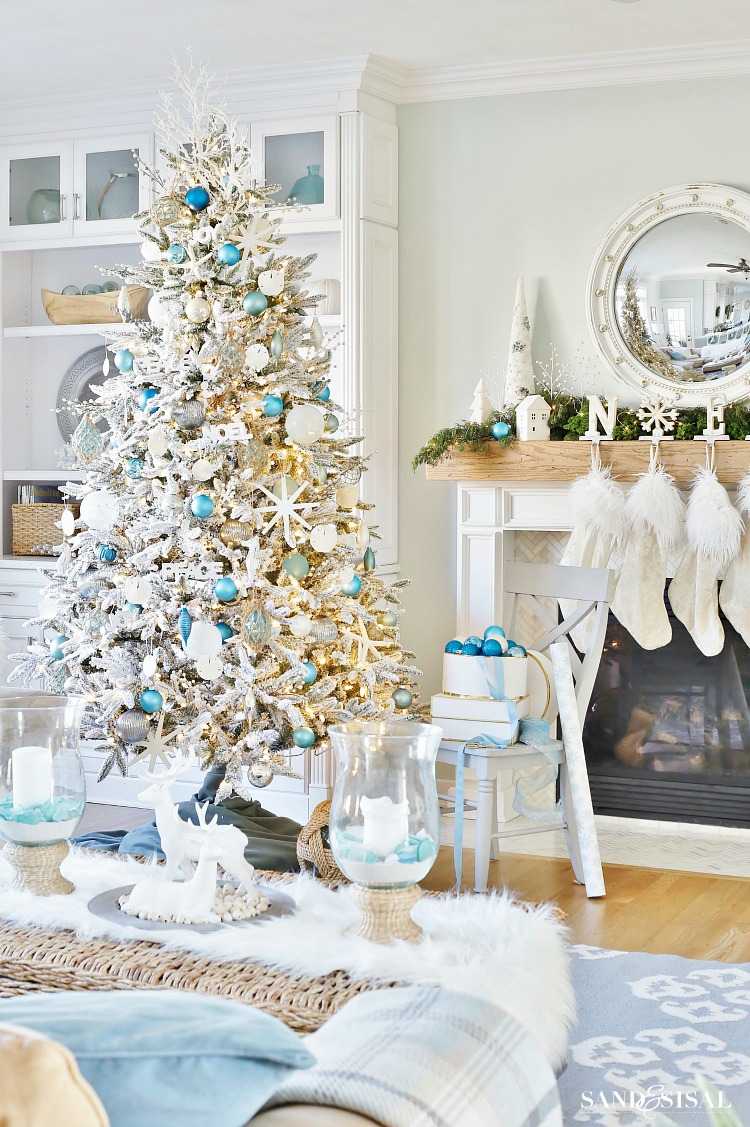
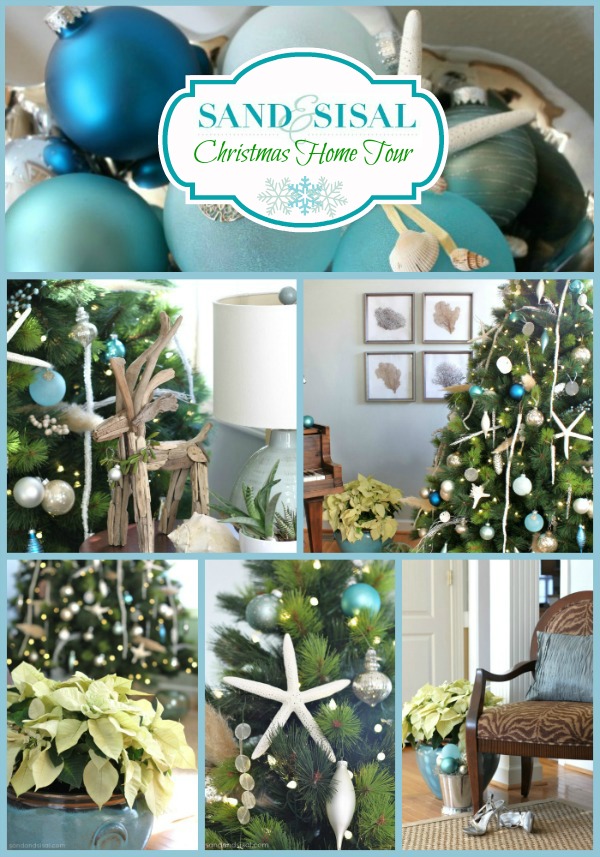
Make sure you see how they look on my Coastal Christmas Tree!

UPDATED:

COASTAL WHITE CHRISTMAS TREE

White Coastal Christmas Tree and Family Room Tour

You might also love  these posts! Click the title above each post to be taken to the tutorials.

Sand & Sisal Christmas Home Tour 2013

Coastal Christmas Home Tour

DIY Sea Glass Vases

DIY-Sea-Glass-Vases

Sea Glass Mosaic Tray

Sea Glass Mosaic Tray

Glass Float OrnamentsGlass Float Ornaments

Kim


« 10 Festive Holiday Drinks
Balsam Hill’s 12 Bloggers of Christmas »

Comments

  1. Brandi says

    December 3, 2013 at 9:03 am

    These are so unbelievably gorgeous… you kill it when it comes to coastal Christmas ideas! 🙂

    • Kim Wilson says

      December 3, 2013 at 9:09 am

      Thanks Brandi!

  2. Leslie says

    December 3, 2013 at 9:55 am

    These are beautiful! They’ll make a great addition to my tree. Thanks for sharing!

  3. Katie says

    December 3, 2013 at 10:23 am

    Ahhh! Kim I love this idea. I’m all for easy these days! 🙂

  4. KC Saling says

    December 3, 2013 at 11:26 am

    These are wonderful! I’m suddenly seeing a coastal inspiration for this year’s tree – which will be tiny since we’re renovating and don’t have a lot of free space right now! Almost thinking of buying a rosemary tree, decorating it, and planting it in the garden before we leave for the holidays!

    • Kim Wilson says

      December 7, 2013 at 8:32 pm

      That sounds just lovely KC! I have a few rosemary bushes in my home this year too.

  5. Lisa@ Cooking with Curls says

    December 3, 2013 at 11:47 am

    Those are awesome!! Now I know how I will be decorating my tree next year!! Pinned…so I don’t forget! 🙂

  6. Maya @ Completely Coastal says

    December 3, 2013 at 12:49 pm

    These are gorgeous Kim! Love how you attached the shells too!

    • Kim Wilson says

      December 7, 2013 at 8:30 pm

      Thank you Maya!

  7. kristin says

    December 3, 2013 at 1:01 pm

    ABSOLUTELY GORGEOUS!! Love this tutorial.
    xo

  8. Deb says

    December 3, 2013 at 7:02 pm

    Oh so pretty! And very easy, which is right up my alley! Thanks for the wonderful idea!

  9. Shannon at MadiganMade says

    December 3, 2013 at 7:41 pm

    LOVE these Kim! So simple and elegant!

  10. jessica @fourgenerationsoneroof says

    December 3, 2013 at 9:38 pm

    Very pretty and I love the blues 🙂

  11. Erin @ DIY On the Cheap says

    December 4, 2013 at 12:34 pm

    These are beautiful! Great job!

    • Kim Wilson says

      December 7, 2013 at 8:29 pm

      Thanks Erin!

  12. Amy says

    December 7, 2013 at 3:15 pm

    Did you only do one coat of paint? Mine aren’t looking super sea glass like. They are looking more frosted. HHMM

    • Kim Wilson says

      December 7, 2013 at 8:29 pm

      Hi Amy!
      It depends on the look you want. Some I did 2 coats, others just one. If you want more color then add a 2nd coat. There is no right or wrong way with these. Enjoy!
      ~KIM

  13. Alice Ross says

    December 10, 2013 at 11:55 pm

    That is absolutely wonderful!! I love putting up a Christmas tree during Christmas and seeing those Christmas ornaments makes me thing of redecorating my tree. However, Christmas is just around the corner so I think I am going to do this next time. I will surely pin this! Thanks for sharing.

  14. Mel the Crafty Scientist says

    December 16, 2013 at 8:38 pm

    Love these ornaments – so creative and beautiful! Just wanted to let you know I featured it in my roundup of glass ornament crafts here. Feel free to check it out if you want and hope you like it! : )

    -Mel the Crafty Scientist

  15. paula says

    October 24, 2014 at 4:41 pm

    I saw your pin on pinterest and loved them. I have made them and I absolutely love them!

    • Kim Wilson says

      October 25, 2014 at 1:22 pm

      Thank you Paula! Everyone who makes them can’t believe how pretty and easy they are to make! Have fun!

  16. Celeste says

    November 8, 2014 at 2:46 pm

    Beautiful! Do you think you could use the plastic ones? Would that work?

    • Kim Wilson says

      November 8, 2014 at 10:04 pm

      Hi Celeste! Yes, just be sure to use the Martha Stewart all-surface paint instead of her glass paint.

  17. Bonnie says

    December 2, 2014 at 3:35 pm

    i love these. I tried the mod podge and paint but it didn’t work very well. Love the colors. Thanks

  18. Kim C. says

    December 3, 2014 at 12:26 am

    LOVE these!!! I spend many childhood hours picking up sea glass along Lantana Beach (West Palm Beach) FL… brings back so great memories. Love your coastal tree also!!

  19. Gail says

    May 13, 2016 at 8:47 pm

    I wonder if you could use an already frosted ball of a darker color and then dab over it w Martha Stewart frost paint???

Trackbacks

  1. » Paint Palettes {Frosty Holiday Dream} Concepts and Colorways says:
    December 6, 2013 at 2:25 pm

    […] Here is the Sea Glass Ornaments DIY tutorial if you would like to make some ornaments of your own: Sea Glass Ornaments from Sand & Sisal. […]

  2. Coastal Christmas Tree says:
    December 7, 2013 at 1:20 pm

    […] most favorite ornaments this year on my tree are the Sea Glass Ornaments.  They are so simple to make and you should just see how they look at night! […]

  3. Christmas Home Tour says:
    December 12, 2013 at 10:20 am

    […] Immediately upon walking in my front door, you enter the foyer and my piano room is on the right.  It is also known as “Mama’s room”, where mama gets her own “adult” tree. My Coastal Christmas Tree is from Balsam Hill, has a very realistic appearance and is dripping in icicles, coral, pampas grass fronds, starfish, capiz shells and beautiful mercury and Sea Glass Ornaments.  […]

  4. Roundup of Christmas Ideas | diyinreallife.com says:
    December 16, 2013 at 3:00 pm

    […] Sea Glass Ornaments by Sand & Sisal.  Super […]

  5. » Paint Palettes {Merry Birch Wonderland} Concepts and Colorways says:
    December 24, 2013 at 9:42 am

    […] Here is the Birch Vase DIY tutorial if you would like to make some vases of your own: DIY Birch Vase on Coordinately Yours by Julie Blanner. […]

  6. » Mini-Palettes {Classic Woodsy Contrast} Concepts and Colorways says:
    December 30, 2013 at 10:52 am

    […] Wreath: Antique White Berry Wreath from Wild Ridge Designs. […]

  7. » Paint Palettes {Soothing Morning Fog} Concepts and Colorways says:
    January 2, 2014 at 10:58 am

    […] Paint: All colors from Sherwin Williams- SW6794 Flyway, SW6245 Quicksilver, SW6255 Morning Fog, SW7076 Cyberspace, SW7002 Downy, SW6795 Major Blue, SW6258 Tricorn Black […]

  8. » Paint Palettes {A Flicker of Tranquility} Concepts and Colorways says:
    January 6, 2014 at 8:43 am

    […] Paint: All colors from Benjamin Moore- AF-685 thunder, AF-65 fossil, AF-475 lush, AF-490 tranquility, AF-20 mascarpone, AF-420 agave, AF-480 boreal forest […]

Welcome

Kim WilsonWelcome to Sand & Sisal: where love of home and sea meet! I share tutorials in DIY, decorating, crafts, gardening, & recipes.  [READ MORE]

Let’s Connect

  • Facebook
  • Instagram
  • Pinterest
  • Twitter
  • YouTube

Keep in Touch!

Love this post? Let's keep in touch!

Subscribe for free to have Sand and Sisal delivered straight to your inbox.

Search

Categories

Archives

Copyrighted Content Permission

All images and tutorials on this blog are copyrighted material. Please contact me if you would like to use any media (photos, video or audio files), tutorials, or ideas from this blog. 99% of the time I would be happy to allow you to use ONE photo with appropriate credit and link back to Sandandsisal.com (preferably to the same post it was borrowed from.) Absolutely no text or tutorials can be replicated. Contact Kim via email: sandandsisal (@) gmail (dot) com

Amazon Associates Disclosure

Kim Wilson is a participant in the Amazon Services LLC Associates Program, an affiliate advertising program designed to provide a means for sites to earn advertising fees by advertising and linking to amazon.com.

Privacy Policy

Click HERE to review our Privacy Policy

Copyright © 2025 · captivating theme by Restored 316