This poor table had been begging for a makeover for ages. It was a wedding present from my mom 21 years ago. There’s the saying, “If walls could talk”, well, better yet, would be, “If THIS table could talk”. It has survived 4 kids with all their glue sticks, glitter, and magic markers, graffiti messages written in crayon, countless spills and watermarks, a few accidental nail gun staples during DIY projects (ahem… ), and a lifetime of family dinners, gatherings and memories made around it. You all know me by now, and if I can try to bring beauty back to something, I will! I’m happy to show you today, my total labor of love, How to Refinish a Table! 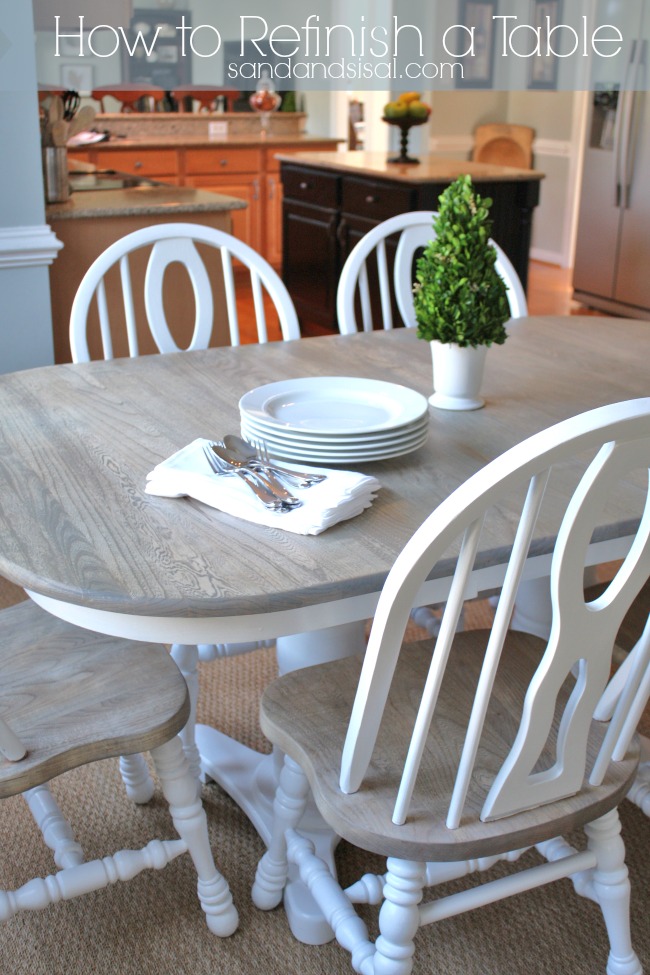
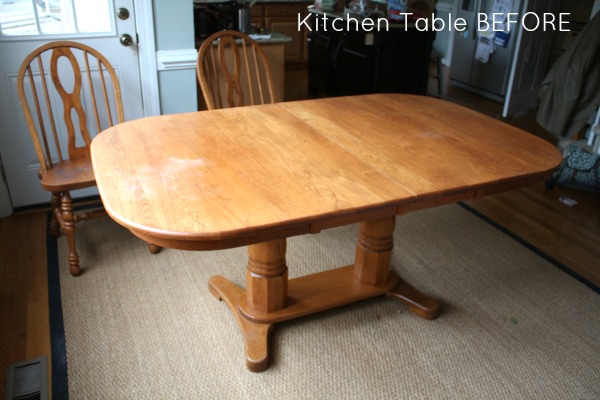
Here is the sad table before. It is a sturdy table that seats 8 with a leaf. It is made of rosewood, a tropical wood. The stain on it though was very golden or orangey, much like my oak floors and kitchen cabinets. I have be drowning in a sea of orange. Yuck. I desired a more natural, brighter table, yet wanted to show the beauty of the rosewood grain. So I decided to stain the table top and chair seats and paint the table base, chair backs and legs in white.
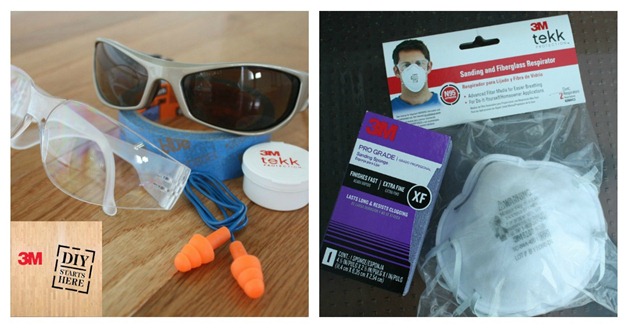
 These are the items needed to refinish and paint a table:
- 3M™ Safety Products (Protective eye wear, protective ear wear, sanding respirator)
- Rotary Sander and sanding discs (60, 100, 150 grit)
- 3M Advanced Abrasives (120 grit and an extra fine grit sanding sponge)
- ScotchBlue™ Painter’s Tape
- Stain (I used Minwax’s Weathered Oak)
- Spray Polycrylic
- Primer (I used Rustoleum’s 2x Extra Cover Primer in white)
- Paint (I used Sherwin William’s Emerald latex, semigloss, in extra white)
- Sponge brushes (multiple sizes)
- Flat tipped, 1/2 inch artist paint brush
 Get ready to start sanding! To be honest, this is the fun part! Take the table outside or into a garage. This process is very messy. Also make sure you have the proper, protective eye wear and ear wear.I really enjoyed using my new rotary sander to strip away all the old stain. It was far easier than I thought it would be. When sanding, make sure you sand in the linear direction of the wood grain.
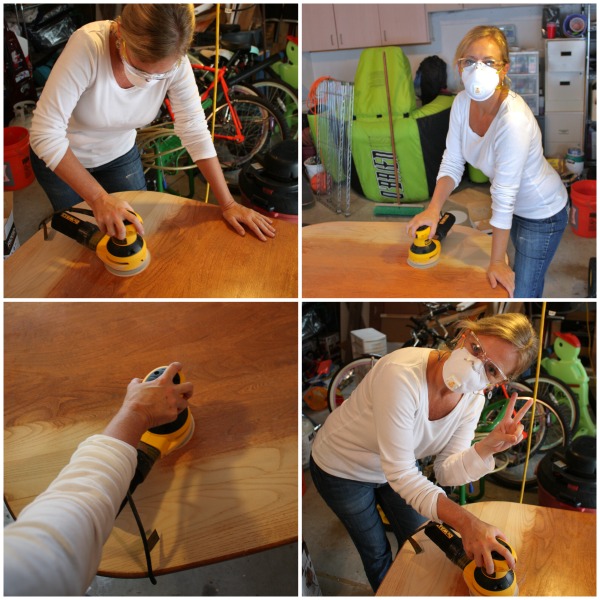
Hubs wasn’t convinced that my rotary sander would do the job, so he went and bought a big ‘ol belt sander for himself. Men… boys and their toys… hmph… I sanded my side with the rotary sander and he tackled the other side with the belt sander. Well, his side came out rough and scary! My side came out smooth and consistent. Guess what? He had to use MY SANDER to clean up his side. Hee, hee, hee. Big and powerful is not always better. 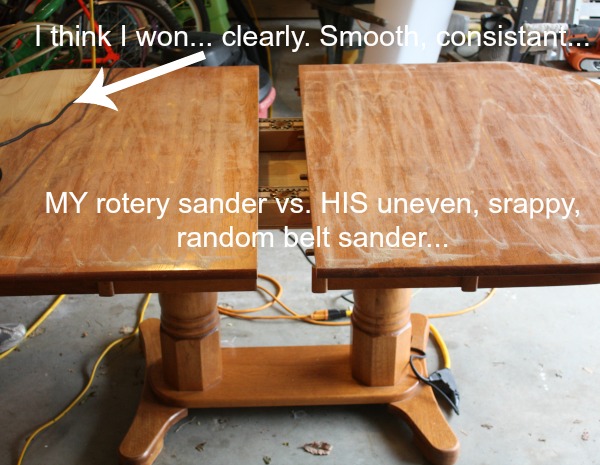 I’m giving him a hard time, but really, I couldn’t complain. He was awesome at helping me sand all EIGHT of the chairs. I didn’t think sanding down to the bare wood was necessary at all but he is rather “Type-A” when it comes to projects that I involve him in. Beggars can’t be choosers so if he wants to sand… let the man sand. 😉
 After everything was sanded well, (thanks to hubs), we made sure to wipe off every bit of dust. First, go over it all with a dry cloth, then over it again with a damp cloth and allow to dry. Now we were ready to stain. My favorite stain color is Weathered Oak by Minwax. I’ve used it on my Pallet Shark Art and my Wine Crate Storage Box. It has a beautiful driftwood quality look about it.
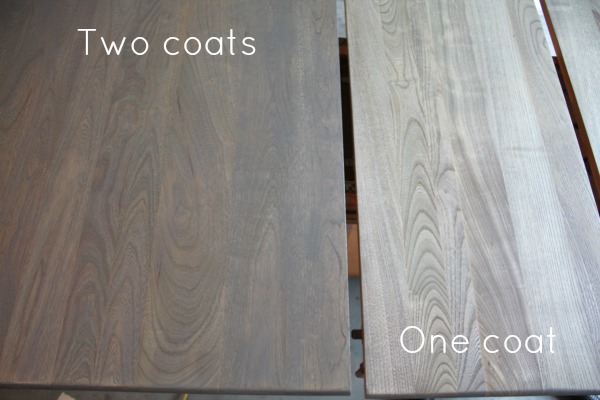
 I like to use inexpensive and disposable foam brushes for this project. I applied the stain, in the direction of the grain, and allowed it to sit for about 20 minutes. Then I wiped it off with a paper towel. The depth of color was not what I wanted so I applied a second, thin coat of stain and allowed that to sit for a few hours until dry. I wiped off any residue and reveled in the gorgeous color and grain! I was exactly what I had envisioned.
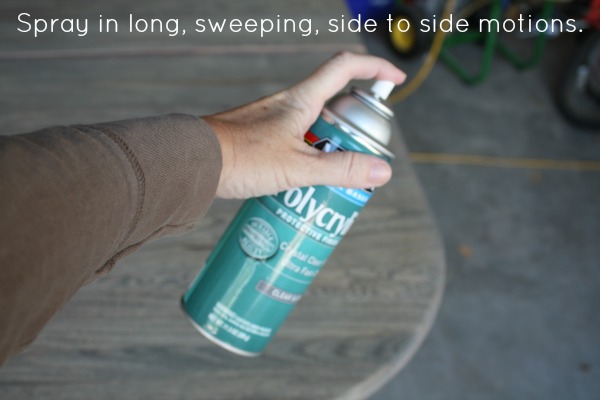
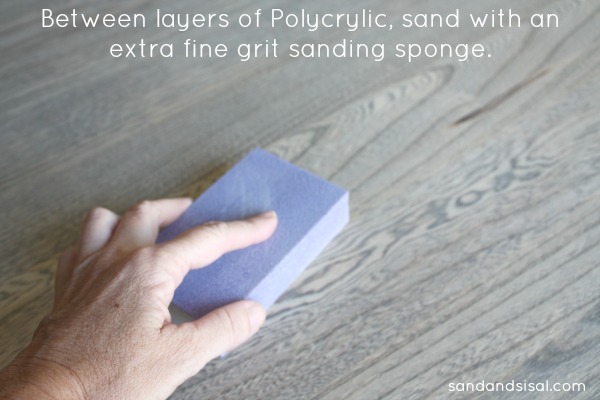
 After staining the table top and all the chair bases, I gave the stained areas, several coats of spray polycrylic and used my extra fine grit sanding sponge between each coat. Always follow the directions on the back of the manufacturer’s can.
 Here is where the this project starts to become a time sucker and labor intensive. I won’t lie to you, it took longer than I thought it would. You need to PRIME! DO NOT IGNORE THIS STEP! I did… and I paid for it in time and labor. I am such an impatient person and tried to cheat by not priming my wood, but the existing stain bled through the paint…. after I had already painted several chairs… grrrrr. I had to essentially start over.
LEARN FROM MY MISTAKES! PRIME PEOPLE… PRIME!
You can paint on the primer or use a spray primer. If you use a spray primer then you MUST make sure you cover and protect the areas that you have stained. Then it’s time to paint. Here is another lesson I learned. If you don’t like brush strokes then use a sponge brush for your painting. Buy several sponge brushes and in different widths. They don’t seem to last very long. Use a high quality paint. I love Sherwin Williams and I already had a gallon of their Emerald line in my garage. So I chose to use that. For those small areas around the spokes of the chair back, where they meet the stained seat, use a nice, flat tipped artists brush to apply the paint. 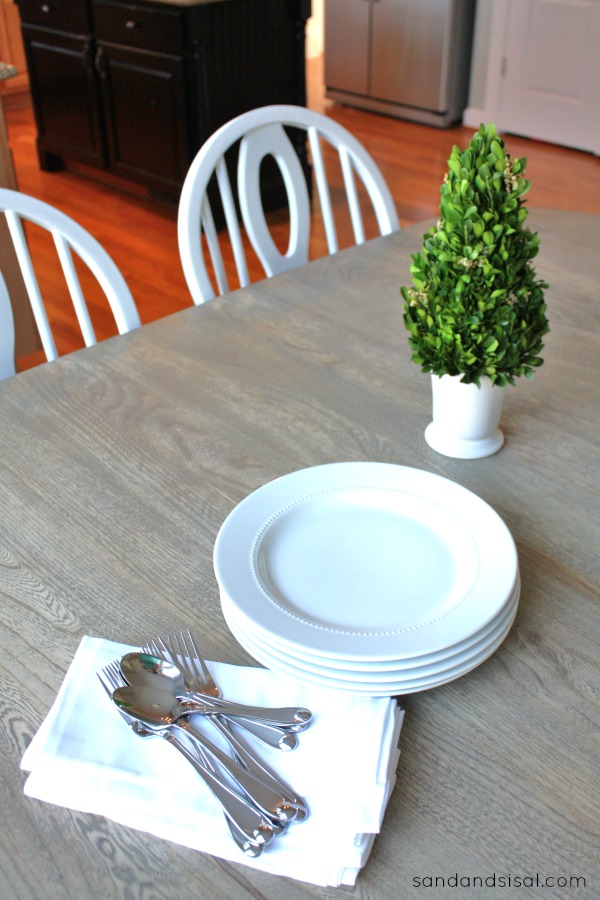

Overall, I’ve so happy with the results. The table is brighter and lighter, full of rich texture and interesting grain. It blends in beautifully with my coastal decor. Refinishing a table is certainly not my area of expertise, but it is a worthwhile investment of your time and effort if your table is of good quality.
 In this era of such materialism and waste, I’m hoping that some of my DIY projects are helping to teach my kids how to preserve, reuse, yet renew the items they already have, so that they can be enjoyed by generations to come.
Now to tackle those orangey kitchen cabinets! (Hubs just rolled his eyes… haha!)
Happy DIY-ing my friends!

This post is a collaboration with 3M DIY. To keep up-to-date on projects, products and sampling visit 3MDIY.com.
Kim
I love how this came out and the two toned white paint and stain look great together 🙂 Nicely done!
Thank you Jess! I’m so pleased with it and glad I took the effort and time to make it look the way I wanted.
beautiful table! which step ‘ prime’ is included and how to do it properly
thank you:0)
How long would you say it took. I have nearly an identical set slightly smaller ( seats 6) I would love to do this but I am horrible at finishing projects and those spindles seem soooooo annoying to deal with.
Also how many coats of white did it take? It looks professionally done.
I have the same cabinets as you, thinking of spraying them white ( with a sprayer not spray paint) I have seen a few good tutorials and it seems do-able.
Are you planning to re-finish yours, replace them or leave them?
Beautiful! It totally changed the look and feel of the pieces. It will make me look at sets twice when I might have walked away from them before because of the oranginess.
Thank you so much Laurie! Back in the 90’s that stain color looked just fine, but it did get orangier (if that’s a word) over the years. If you purchase quality to begin with, then you can essentially keep it for ages with a little love and effort. 😉
This is PERFECT timing!! I’m wanting to refinish our dinning table that my dad made us 15 years ago. I’ve been searching tutorials and and products lately!!
Love how yours turned out!
Thank you Cheryl! It certainly wasn’t hard to do, it just takes TIME. Hopefully my tips will help a bit. How special to have a table that your dad made for you! (makes me miss my daddy!) 😉
WOW Kim your table and chairs look FABULOUS!! Love the way they turned out!
Thank you Martina! You are always so supportive! I appreciate it! Have a fabulous week!
Your project came out great!!! You gave them a nice update..a cross between Pottery Barn and Restoration Hardware.
Haha! You are so correct Maria! Those were both my inspiration for the overall look! Thank you!
That is a gorgeous table! I love the shape and you did a fantastic job on the makeover! I too have a hubby who thinks the bigger the better when it come to tools! ~Sonya
yep… it’s boys and their toys. This time he learned which was better. 😉 Thanks girl!!!
Thanks Kim, love the table. I have one that looks very similar to your (before), and I have not decided what to do with it. Love the natural coastal look. Growing up in the Florida Keys, it really speaks to me.
Thank you! I appreciate it! 😉
Your table and chairs look amazing! I am definitely pinning your tutorial for later reference. My kitchen table is the same one I grew up with as a kid, so it will definitely need refinishing eventually.
Thanks Andrea. I’m so happy I refinished it. I’m keeping a bit of our family heritage alive yet maintaining our family’s style. Go for it. 😉
It looks beautiful, Kim! Great job!
Thanks Erin! I’m wishing I had tackled it years ago.
That table is just beautiful! You did an amazing job!!
Thanks!
Beautiful, Kim! Why do men always think they know better when it comes to tools?! You showed him! This really looks updated and fresh, love it 🙂
Seriously girl, what is with them? Sometimes ya just gotta let them play their “buffness” out…. and watch as they realize YOU were right to begin with. But I’m a good wifey… I didn’t rub it in… I just handed him my sander after the fact. 😉 He’s learning. (wink)
Thanks so much!
Kim
Kim I love it!!! What a great makeover, it reminds me of one I saw at Pottery Barn last year. I have a side table that’s in line for a redo and you’ve made me think I ought to just do it! ox
Thanks luv! I appreciate all the sweet comments you give!
Love your sweatshirt note, my hubs has a similar shirt I dare not toss out. Classy style, love your stuff. Aloha!
hahaa! Oh Heather, if I EVER tossed that sweatshirt it would be divorce court! He had it WAY before he ever knew me even! Thanks!
What timing!! I am getting ready to paint a pedestal table from Craigslist to use in a banquette that we are building in our nook.
Your table and chairs turned out beautiful!!
Great job! Love the weathered oak stain. I wonder how it would look on my upper cabinets with dark red painted lower ones. Hmmmm!
Your table looks amazing! What a great transformation. You are giving me the inspiration to try it on mine. How long did you wait before using the table? My table is our main table and we eat dinner there each night I was just wondering if it is ready to use a few days after fully dried? Thanks so much!!!
Turned out fabulous! I have an old oak table my parents gave me thats about 25yrs old. When the time comes this would be the perfect DIY for it 😉
I love your “new” table…like you said, it’s so much brighter and lighter and goes so well with your coastal decor! What a difference!
Kim!! This looks AMAZING! I absolutely love the color of stain you used and it’s such a great tutorial! 🙂
Vanessa
It is stunning! And the grey colors from Minwax are my new fave!
I love the look. Love the color of the top and seats. I’ve been thinking of doing something like that. Unfortunately the top of my table is formica, but I think just the legs and chairs painted white will spruce it up. Thanks for all the “experience”. Do you think it’s really important to sand all the finish off if you are going to put on a primer? Or would just roughing it up be good enough?
Thanks for your posts, I’m new but love your ideas.
Really nice looking! So Coastal! What are you thinking for your kitchen cabinets?
KIM!! This is an awesome transformation and tutorial!
xo Heidi
I have an entire pinterest board called “white and wood” – this fit perfectly. Great project!
I LOVE how you are teaching your kids to repurpose things. That’s such a great idea! Your table looks beautiful. Great job and inspiration!
Totally LOVE this! My overly dark, shiny kitchen table is in desperate need of a makeover! I think the time has come…Life to the full! Melissa
I wish I could refinish furniture like this! Awesome redo!
Kim, your hard work really paid off….stunning transformation! Can’t wait to try that weathered stain~Christy
Beautiful job on this table! And I love the captions you made for your husband!!! lol. I’m pretty sure Jon’s caption would read the same!
Haha Katie! Yep… I bet his would! ha! Thanks so much!
This is GORGEOUS! What an amazing transformation – seriously.
Thank you so much Amy! 😉
Oooh, your table and chairs are gorgeous, Kim. I redid a table similar to that, and hubby did the same thing to it with a belt sander! But, I made the mistake of not getting all the old stain/varnish off, and the new stain did not go on evenly- that table was a nightmare. So glad yours turned out great!
I love this Kim! I have this exact same situation and need to do this exact same thing!!
Looking real good Kim. I live by the sea in beautiful Queensland, Australia, and had given up hope of finding the right “look” for my place……, but suddenly, YOU came along!!
Thank-you Kim, for the inspiration.
Awww, thank you so much for those kind words Russ! I appreciate it!
All my best,
Kim
Wow you have nice skills!. Really nice.
I love your table n chairs! Thats exactly what im going to do. Good tutorial. Im almost done painting my ‘orange’ cabinets in the whole house. I used oil rubbed bronze cup pulls on the drawers and bar pul
Wow! Stunning! It’s like a brand new table!
Love your table, Kim! it turned out great. I have a very similar table – with only one pedestal and it is the white/butcher block look. But I want to stain the wood part to be a dark walnut. Thanks so much for this great tutorial – makes it look a little easier than I had been dreading 🙂
And the artist brush tip – that was the part that was the scariest to me – how to paint those chair back rods without messing up the stain. Maybe I can get mine done before Thanksgiving too 🙂
I’ve been wanting to do this exactly with our table! Thanks for the inspiration! I have to ask though…. when you didn’t prime the first time, what did you do? Did you sand all the paint off? And if so, how did you do the legs?! I was planning to prime, but my table and chairs were hand-me-downs and already painted without primer. You can scratch the paint off with your fingernail… but there are so many spindles and things I don’t really know what to do! So, I’d love to hear how you did yours! And did you finish the white parts off with a coat of something too? Did I miss that?
Oh wait… the abrasives? Does that really get in there?
Hi Sarah, sorry for the delay in responding. Somehow I missed this comment. I should have clairified about the priming. I started the project with a different type of white paint (a chalk paint) but the existing stain and wood tannins kept bleeding through the white chalk paint. I later found out that with some types of wood, that can sometimes happen with chalk paint. I primed over the chalk paint and then painted with 2 coats of the SW white latex. (I could have used the chalk paint over the primer, but I was getting frustrated and was running out of time.) I only put poly on the table top and chair legs/backs.
Now with your chairs…. if the existing paint is already able to scratch off with your nail, then that is not a good sign. It means all of the paint needs to be removed. I recommend using a paint stripper like Citristrip first.
Hope that helps! Thanks! ~KIM
Hi!
I love how your table turned out! I’m a bit confused though. What did you do first after sanding?
When does the minwax stain, primer, and sherwin williams paint come in??
Hi Michelle,
After sanding and wiping clean, I then applied the stain, allowed it to dry, then I primed and painted, being very careful not to get any primer or paint on the stained seats.
I’m not sure what you are asking exactly in the 2nd part of your question though. Could you clarify a bit?
Thanks!
KIM
I have the “farm table” that was fashionable 15 years ago. The chairs and base of the table are white, and the tabletop and seats are polycrylic over the natural wood. as you can imagine, the finish is less than pristine (three boys, you know). I really love that driftwood-colored stain! might have to try it!
Thanks for posting this!
Thanks for including this in your top ten posts, I had missed it the first time around!
What a beautiful transition to your coastal look, and I appreciate your reuse mindset.
I just found this post on Pinterest. I’m pretty sure I’ve pinned a few of your DIY’s and read a few of your posts, but I just discovered this one and I’m in heaven! This is EXACTLY what I want my kitchen set to look like! I’ve been searching so long, because I seen one at a furniture store and refused to pay the price they wanted. I’m off to DIY my ktichen set! Thank you!!
Hi Kerry! That is so kind of you to say! Thank you so much! Happy DIY-ing!
A massive thank you. This is exactly what I have been looking for. Can you please tell me what I would need to do to make this outdoor friendly? We have a covered veranda but we experience a bit of dew and wanted to make sure it would handle the moisture in those months. Any suggestions would be hugely appreciated. Thanks again, I love your blog
Found your site on Pinterest. Love your DIY ideas. I’m looking for ideas on how to redo some of my indoor decor. The red-looking wood look is getting tired and worn looking, need a new outlook! 🙂
Hi Lisa! I’m so glad you found Sand & Sisal! Thank you for your kind words! 😉
Love the rosewood grain and your step by step info…..I am refinishing my 18 year old table now with AS paint. I’ll be back to your site. Love it.
Thanks so much for this post. I have been wanting to redo my oak table and this is a great tutorial. My one question is the color of your finished table. I’m using all oil based products, not sure if this matters. I went to get the minwax stain, but the weathered oak looks to have a yellow tint to it. The picture looks more like the gray stain that is new to minwax also. Is it the lighting of your house? I like the greyish weathered color, but was nervous the weathered oak would come out looking yellow. Kind of afraid of the yellow, if you know what I mean! 🙂 Thanks again, I love this tutorial!
Hi Andrea,
The stain is not yellow at all, it is very gray. That is why I used it, because I was running as far away from orangey yellow as possible! Ha! I recommend you buy a small can and try it out on a scrap piece of oak and see what it looks like. Make sure you stir it really well!!! If you have a leaf in the table try the stain out on the underside. I tested several stains on the underside of the table before choosing the weathered oak. Here are 2 other examples of the Weathered Oak stain on different wood projects. https://www.sandandsisal.com/2012/05/wine-crate-storage.html and https://www.sandandsisal.com/2012/07/pallet-art-shark.html Hope that helps! 🙂
We got it and tried it ourselves. Very yellow, too? That’s what we were trying to get away from. 🙁
Hi Jackie,
I’m not sure what you were referring to as yellow. Are you saying the stain was yellow? I can’t imagine that could be the case. Mine was very gray. Did you stir the can well? Also, I recommend testing several shades of stain on the underside of the table to see how the color looks. Different types of wood will result in different look. My table is made out of rosewood.
Hope that helps a bit. Best of luck!
~KIM
We went and bought weathered grey instead. It’s giving more of the look of your chairs. Our set is oak and I think that’s the difference. We’re doing the poly spray right now and then off to priming. Doing one chair first. 🙂
Oh good! I’m so glad you found a stain color that works! 🙂
Kim,
Thank you so much for your detailed instructions! I followed them exactly and am in love with the results. You can see it on my flickr at jennchantal.
You are an inspiration!
It is beautiful! You did a great job! You should be very proud of yourself! Do you mind if I share your pic of the table on my FB page?
I’d love that! It’s literally the very first DIY project I’ve ever done and I’m so proud of it.
QUESTION…..I love this. It is so pretty, BUT HOW DID YOU SAND THE CHAIRS?
We arendoing the exact same thing. Same chairs
Hi Kyrie! We sanded the seat as best we could with the electric sander and then the spindles and legs by hand (yes… totally not fun).
Hi Kim,
I love this post, I want to refinish a round oak table similar to yours. I knew I wanted to go two-toned just like you have done here! However, I was thinking for using Chalk paint for the base and the chairs. What do you think? Also so you think I should sand and stain the table top and seat tops before painting the rest? I appreciate your opinions. I have never attempted at DIY project yet. I just purchased my first home so I have lots of ideas and this is the first project I plan on tackling. So needless to say I can use all the help I can get!
Thanks!
Hi Nina!
I started off using chalk paint in Pure White but the tannins from the wood bled through within a day. No matter how many coats of chalk paint I used, I couldn’t mask it. I then read that you need to really research the type of wood you have and if they have a tendencies to bleed tannins. If I had primed 1st, then that would have prevented any bleed through. I actually ended up switching to latex and did prime beforehand. And to answer your question about sanding the seats first or painting first. I recommend doing all your sanding first, then stain the seats, then prime and paint last (carefully masking off the stained areas with painter’s tape). Hope that helps! Best of luck to you! 😉
Very nice – I LOVE the finish! This gives me the courage to tackle ours. However, I’ve been a bit scared of polycrylic after I couldn’t get a bubble-less finish using the liquid variety. I might have to try the spray. How is yours holding up?
Hi Sarah!
Thank you so much! I hear ya about the bubbles… drove me nuts! That is why I chose the spray. It is holding up really well so far with 4 (very rough) kids! I will probably add a few more layers of spray this summer, just to maintain it. Overall, I am so, so happy that I tackled the project. It was really worth the effort.
Have a very Happy New Year!
KIM
Hi Kim, your table and chairs are beautiful, how did you paint the backing of the chairs where the post meets the seat? I’m in the processes of refinishing a table and chairs set and am having a little trouble getting it to look clean.
Hi Sara! I used a flat headed artist paint brush for the areas where the spindles meet the seat. You can also try using painters tape to protect the seat, but an artist brush was all I needed. Thanks!
Lovely job! Quick question for you… I want to stain a kitchen island that is yucky orange oak with grey stain (same brand you used). do you think this might work? A lot of people swear you can’t apply a stain unless it is significantly darker than the wood. Your project suggests this may not be the case so I just thought I’d ask if you had any experience with oak and grey. I plan on doing a very thorough sanding job with an orbital sander first. Thanks!!!
Hi Jolene! I haven’t stained oak before but if you look at some of the last comments on the post you will see a conversation from a reader who did this on her oak table and chairs and she had to switch to a darker gray stain (which minwax makes) vs the very light weathered oak. My recommendation is to try out a few stains on the underside of the table first which is usually the raw, unfinished wood. I tried 5 stains and experimented with multiple applications until I found the shade I loved best. Hope that helps!
Hi Kim…luv luv luv your table. I have been contemplating about doing my dinner table but never had the courage to do so until i saw your awesome results! Ok the part where you spray with the polycrylic…how many layers did you do? Is there a certain kind if spray of polycrylic that i need to look for? Im gona try and go by the way the can looks but everytime i go to the hardware store there are so many of choices. Thanks for the inspiration
Thank you so much Miriam! We sprayed at least 3 layers of the polycrylic. We bought the several cans of spray polycrylic by Minwax in a satin sheen from Home Depot. It comes in a blue/turquoise colored spraycan. Hope that helps! Best of luck!
Feeling very nervous about my project of redoing table & chairs for my daughter. Doing my research and came across your post. Thank you so much for the tutorial, it is extremely helpful and your finished result is lovely. We are doing the table top in a black wash and the legs in black paint. The table top has a parquetry type effect, and I don’t know if this will disappear when I sand. It doesn’t appear to be a veneer? Do you have any tips/ suggestions about this? Would be very grateful for any advice!
Hi Cheryl!
I haven’t sanded a tabletop like that before. I’m not sure what to tell you except to proceed with caution. Try looking under the table and at the edges to see if you can determine if there is a veneer. Vaneers can vary in thickness and it might sand just fine. Wish I could be more help. The table sounds like it will be very pretty though when you are done! 😉
i love your table. But most I enjoyed your description of the process. I am nervous about choosing the right stain and putting it on correctly. And evenly. At any point did you think you need to stripp using chemicals instead of sanding?
I have a question- what color paint did you have in the dining area? I really like it. Can you send me or comment on that?thanks kathy
Hi Kathy, I didn’t think chemicals were necessary because the finish was so very thin to begin with and very worn. Sanding was quite easy.
I love what you have done with this table!!!! How does the finish .
hold up with the moisture from hot plates and water spills? Do you use place mats?
Hi Erin!
I treat all my table tops with extra care. I’ve always used a hot pads no matter what the finish. Water is not a problem at all. It has several layers of polycrylic so the water beads right up. 😉
Thanks so much!
KIM
Love love love the table! I am currently sanding and about to stain a set of end tables and then I am going to tackle my kitchen table as well. Just have a quick question which polycrylic did you use, Semi-gloss or gloss?
Hi Kaila!
I actually used clear satin. Anything higher gloss would make it look laquered, which was not the look I was going for. Satin has a very subtle sheen to it. Thanks!!!
What an amazing transformation! Love how you refinished it!
I’m attempting the same project! However, my table legs and chairs are painted with a black, glossy paint. I’m not sure the best thing to do with this – sand it or use a paint stripper? I plan to paint the legs black anyways, but I’m not sure how the paint will adhere to this glossy type finish. There are also major chips out of it and it seems quite thick. Also is it best to use chalk paint or can you use just a regular oil-based or acrylic paint? Thanks so much!
Hi Leigha,
Thank you for the kind comment! For your table, if there are large chips then it will most likely be better to use a paint stipper. You can try to sand the chipped areas first to even them out. If you don’t want to use a paint stripper then you will need to lightly sand the the entire surface of the legs. I recommend using a black tinted primer (the paint store will tint it for free), then paint them in a lower sheen (high gloss shows imperfections). As far a paint recommendations.
Hope that helps a bit!
KIM
Hi,
I’m trying to create the same look as you. This is my inspiration for my table. I sanded down my table set and used the weathered oak stain but my wood doesn’t seem to take the stain, even after three coats. Do you have any other suggestions? I love the colour of your table. I’ve been through three different stains to try it out but my table is not behaving.
Please help on my diy disaster!
Thanks,
Megan
Hi Megan!
I’m sorry you are having trouble. Do you know for sure what type of wood your table top is made out of? Every type of wood will absorb and look different. Did you experiment with the stains on the underside of the table first? When you say it’s not taking the stain, do you mean it is not absorbing it? One thought I had was that your table top is possibly maple. Maple’s grain is very dense and doesn’t accept stain well. Or it’s possible that the table was sanded with too fine of grit of sand paper, which causes the stain to sit on the surface vs. absorbing.
I wish I could help you more, but I’m not an expert in this area. You could try calling Minwax’s customer service number and see if they can help give you some tips. Best of luck!
What sheen of paint (satin, semi-gloss) did you use on your chairs? And, did you need to use any kind of clear protective coat on top of the paint to prevent chipping or normal wear?
Hi Julie! I used Sherwin Williams Emerald brand in Extra White- Semi Gloss. I didn’t use an protective coat. The only wear that is showing after 2 years is on the base where my kids are constantly kicking and resting their shoes on.
I love the way your table set turned out! And I was wondering about the table top. Is it durable? I don’t want to do all the work on my table and then the top not be able to hold up to stains or spills. My table is just like yours and you did a wonderful job.
Thanks so much Pam. Two years later with a family of 6 it still looks as good as the day I finished. The several coats of poly is what keeps it protected. 😉
I have a great older table (nothing vintage or antique) that is rectangle and opens with a drop leaf to a large square that seats 8. I have wanted to refinish it for years! It’s got that orange oak looking too and chair seats with distressed (from years of abuse) white table legs, chair legs and chair backs.
I was thinking of doing the table in that weathered oak with grey legs. Would that look good?? Oh and yes I suffer from orange cupboards too!
Hi Kim, I recently found your site and am loving it! It all started with the dresser you painted with Paris Grey chalkpaint (we are planning to do the same) and we are currently halfway finished with trying to duplicate your dining room set! (Were planning to buy a new one until I saw yours, so thank you!) I have also used some of your ideas for your teen daughter’s room since my daughter’s room is also in need of updating to a more sophisticated look. Back to the dining set, I am nervous because my husband and I have never really stained anything before and once we finished sanding and began using the stain we realized it isn’t as easy as it looks! I realize now that while our table is a very similar style, the wood is very different and the stain isn’t going on as evenly as I want it to. I am tempted to try sanding and applying a third coat but the can says not to sand between coats. What do you think? Did you have any of these issues? I am afraid that I will really mess it up if I sand it since we have already stained with two coats. One more thing, did you say that you did not spray the seats with poly but only sprayed the table top, chair legs, and chair backs? I would appreciate and advice you could give. Thank you so much!
Hi Stephanie! I’m sorry you are having issues. Stain might look uneven depending on a few things:
1) how you apply it
2) not applying it quickly enough or in an even application
3) not enough of the original stain or sealer was removed during sanding
4) different types of wood will naturally absorb stain in different ways.
I’m not sure sanding will help even out your coats. You would need to completely sand it down to the bare wood again and start over. Do you know what type of wood you have? And do you suspect it is the wood type that is causing the different absorption issues or DIY error? Feel free to send me a pic so I can see exactly what the issue is. 😉
Hi Kim, Thank you SO much for such a quick response to my message. I apologize that this reply was not as quick! Your tips did prompt me to go ahead and completely re-sand and re-stain all the chairs and the table :/ . It was really the only way to find out if what I was reading about using pre-stain on cheaper woods would make a difference in the splotchiness. I do think it helped some and was definitely taught me what to do or not do in the future (with cheaper furniture I will pre-stain from now on). My chairs still aren’t perfect, but at least I know that I did all I could to get the best results possible. By the third chair I started getting the hang of it and figured exactly how to apply the stain and how much to apply (I did it a little too thick on first two and stain came out splotchy, but I can live with it). The next major problem we came across is that we used the same exact white paint as you, but wanted to use a sprayer, and let me tell you, that was a nightmare! It’s obviously great paint and so thick that it would not work in sprayer (even watered down). We were about to give up and go ahead and use a brush like you did, but our bro-in-law loaned us a more efficient sprayer and it FINALLY worked! The finish looks great! STILL need to give another light coat of paint on chairs and poly them, but we LOVE the look of everything (minus the two splotchy chairs!) and although it has been MUCH harder than we expected we have learned so much in the process (about staining in particular). Thank you for the tips and ideas. We have gotten frustrated along the way, but for these two non-handy people it’s been a great learning experience that will help us in the future! LOVE your blog and am so happy I found it! Thanks, again!
I’m sorry you ran into trouble! I’ve never used a sprayer before but would love to try it someday. You both should be very proud of your accomplishment! That’s what DIY is all about, being confident enough to give it a try, to sometimes fail along the way, but to learn from our mistakes and push on! Now you know what awesome projects you can tackle and the next project will go much smoother, because of what you learned. Email me a pic! I’d love to see it!
All my best,
KIM
Dear Kim,
It’s been several years since you posted about your kitchen table re-do. You were adamant that priming needs to be done so older stains don’t bleed through. Is there a clear primer? I am unclear how grain would show up if one uses a typical primer (Kilz, e.g.).
Kindly,
Marta
I am not familiar with a clear primer. You only need to prime where you are going to be painting, not where you are staining. Paint will always minimize wood grain but even on my chairs, I can see a bit of wood grain texture in areas where I painted, but it is very minimal.