• Home
  • Meet Kim
  • Blog
    • Facebook
    • Instagram
    • Pinterest
    • Twitter
    • YouTube

Sand and Sisal

  • DIY
  • Home Tour
  • Decorating
  • Gardening
  • Recipes
  • Thanksgiving
  • Decor Crafts
  • Seasonal
  • Christmas/New Years
  • Winter/Valentines
  • Spring/Easter
  • Summer Holidays
  • Fall
  • Halloween

July 30, 2013 ·

Reader Feature: Coastal Cabinet Makeover

antiquing· Before/After· chalk paint· DIY· paint techniques

Prev postNext post
Use your ← → (arrow) keys to browse

Sand and Sisal reader, Kamryn Jaroszewski, loves to crochet, but her yarn collection was taking over the family room. She knew she needed to find a better storage solution for it all, especially when her little one became more mobile and discovered he could get into all of mama’s pretty yarn! She had an older cabinet that had seen a bit of wear and tear, and thought it would work out perfect for a crochet cabinet.

Kamryn is an army wife from Florida, currently stationed in Washington. She wanted to bring a bit of the beach back into her home by adding in coastal decor. Today she is sharing how she gave an unexciting cabinet a coastal makeover! Coastal Cabinet Makeover

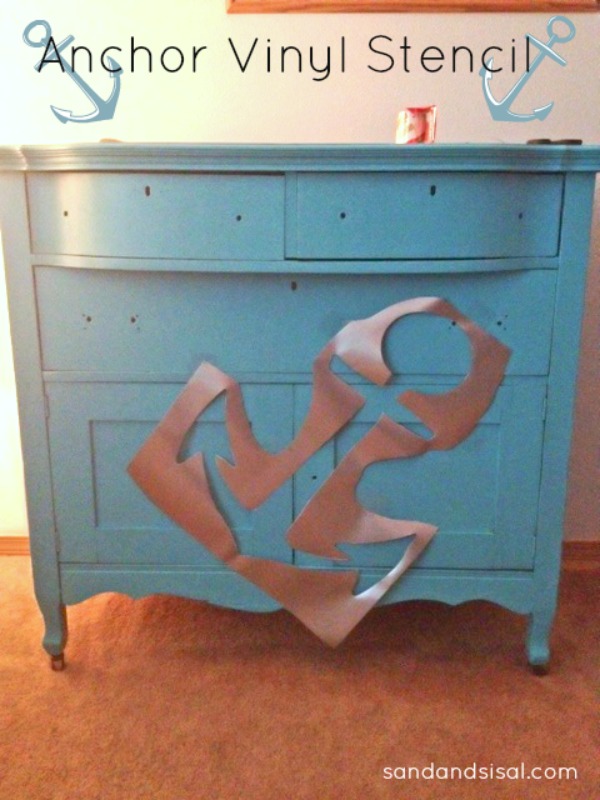
Kamryn loved Behr’s Ultra turquoise blue paint called Mermaid Treasure and made up a batch of homemade chalky-finish paint with it and added a bit of Floetrol to the paint also. She gave it four coats of paint to cover well and sanded between layers with a 200 grit sanding block. She didn’t use any primer beforehand. Kamryn’s friend, Megan with Goode Design, created the vinyl anchor stencil for her.  She applied the stencil to the cabinet and then painting in with some left over white paint.

Anchor stencil


After allowing the paint to all dry, she distressed the cabinet with a heavier grit sanding block and waxed the entire piece with two coats of Minwax Paste Finishing Wax (natural finish) and gave the top an extra 3rd coat.


Coastal Cabinet Makeover

The hardware was spray painted with Rustoleum primer as there were a few rust spots, then Rustoleum semi-gloss protective enamel. She finished with Krylon’s Matte Finish sealant. (She realized the semi-gloss enamel was a little too shiny for the distressed look).

Coastal Cabinet Makeover

Isn’t it lovely? She did such a nice job on it! Thanks for sharing your cabinet makeover with us Kamryn! And special thanks to you and your hubs for military service to our nation!

If you have been inspired by a project you’ve seen on Sand & Sisal tried it out for yourself then I’d love for you to share it with me. You might be my next Reader Feature!

Kim

Follow Sand and Sisal on Pinterest

« 10 Recipes for Fresh Basil
Haven Conference 2013 »

Comments

  1. Elizabeth@ Blue Clear Sky says

    July 30, 2013 at 11:58 am

    She did a great job and I love the colour! I use a vintage dresser in our living room to store my yarns and crochet projects, plus seasonal candles.

  2. Lorraine Castellon-Rowe says

    July 30, 2013 at 12:35 pm

    I LLLOOOVVVEEE this chest!!! The color is awesome, the drawer pulls look great, the anchor is my favorite part and the distressing just pulls it all together!! Thank you so very much for all the details and supplies. Now I need to get one of those anchor stencils and I’m ready to make one for myself!! THANK YOU Kamryn Jaroszewski for the great project and for keeping us safe with your service!!

  3. Shirley@Housepitality Designs says

    July 30, 2013 at 2:58 pm

    Wow…that chest is fantastic!!!…just love it! The colors are just perfect!

  4. Mercedes says

    July 30, 2013 at 11:54 pm

    Lovely. Just lovely!

  5. Becky@OrganizingMadeFun says

    August 4, 2013 at 11:37 am

    Kim – Your blog is so beautiful! You are also such a beautiful person and I loved getting to know you better this weekend at Haven! You are fabulous! Becky B.

  6. annpauley says

    January 23, 2014 at 3:51 pm

    kim,
    have you ever used xhalk paint to paint walls before. i need some info on this kind of project,please!
    ann p.

  7. Josh fortney says

    August 19, 2015 at 10:24 am

    Any advice on how to make the stencil?

Welcome

Kim WilsonWelcome to Sand & Sisal: where love of home and sea meet! I share tutorials in DIY, decorating, crafts, gardening, & recipes.  [READ MORE]

Let’s Connect

  • Facebook
  • Instagram
  • Pinterest
  • Twitter
  • YouTube

Keep in Touch!

Love this post? Let's keep in touch!

Subscribe for free to have Sand and Sisal delivered straight to your inbox.

Search

Categories

Archives

Copyrighted Content Permission

All images and tutorials on this blog are copyrighted material. Please contact me if you would like to use any media (photos, video or audio files), tutorials, or ideas from this blog. 99% of the time I would be happy to allow you to use ONE photo with appropriate credit and link back to Sandandsisal.com (preferably to the same post it was borrowed from.) Absolutely no text or tutorials can be replicated. Contact Kim via email: sandandsisal (@) gmail (dot) com

Amazon Associates Disclosure

Kim Wilson is a participant in the Amazon Services LLC Associates Program, an affiliate advertising program designed to provide a means for sites to earn advertising fees by advertising and linking to amazon.com.

Privacy Policy

Click HERE to review our Privacy Policy

Copyright © 2025 · captivating theme by Restored 316