I have to admit, I’ve been in a bit of a creative funk. Now that all my 4 kiddos are home for summer, I’m finding it very difficult to work or get anything productive done for that matter! But hey, summertime is a chance to relax and play and I don’t have too much time left with the children, right? My oldest is off to college in one year! Well today I had a sudden urge to create something nice.
I was doing laundry. Let’s be honest. I-am-ALWAYS-drowning-in-laundry!

As you all know I gave my laundry room a coastal mega makeover about a year ago. It was so worth the effort and was even featured in First for Women Magazine!
 But everything needs a little re-vamp time from time, but it has to be FAST & EASY.
I wanted to change out the artwork. I’m a fine artist by trade, so I feel very guilty whenever I purchase artwork from a store… yes, that is another subject for my therapist to deal with… anyhoo, the point is, I try to create all my art myself. I mean, after years of expensive art school, wouldn’t you?
Now, before you click off, let me tell you ANYONE can do this artwork. It is so scary simple. If you can hot glue then WAH-HOO!!!! You can create this too! (No fine arts degree required!)

You will need the following items:
- burlap table runner
- burlap garland
- starfish
- scallop shells
- hot glue/ glue gun
- dowel rod or pvc pipe
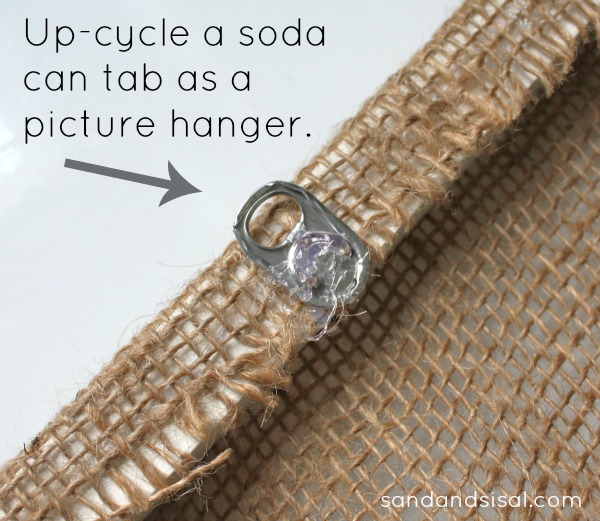
- soda can tabs
Step 1) Cut your burlap table runner and burlap garland to desired lengths
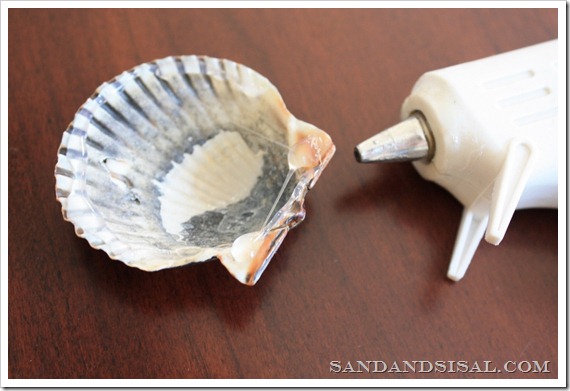
Step 2) Hot glue starfish and shells to the burlap. You can see how I hot glue shells in this Shell Art post.
 Step 3) Wrap burlap around dowel rod or PVC pipe, painted broom stick… whatever you have and hot glue to secure.
Step 4) Use 3 soda can tabs as picture hangers. Secure with hot glue well. (I completely believe in up-cycling any chance you get! Go Green!)
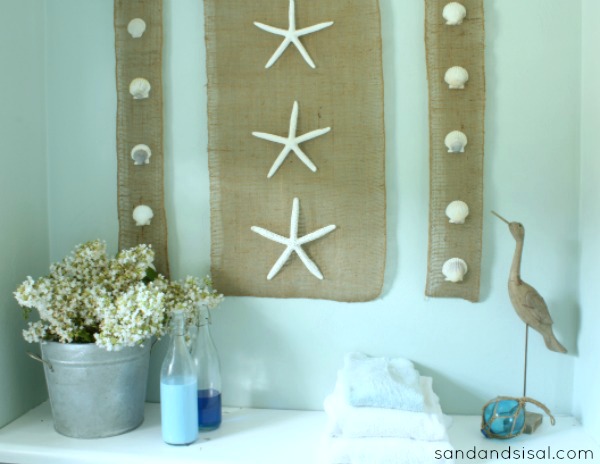
Step 5) Nail 3 small finishing nails into the wall and hang! Voila!

Once you gather all your supplies, this DIY wall art will take you less than 30 minutes.
The burlap adds a nice organic texture to the walls and fills the space with a fun and easy coastal vibe.
Give it a try yourself.
Kim

![]()
Love this, so cute! Great job Kim! Great use of the soda tab, very clever!
Heather
Thanks Heather! I love those soda tabs! I swear half my pics are held up by them! 😉
How is the soda tab attached to the artwork?
Hi Patti! It is attached with hot glue.
I adore the burlap craft, so cute. I would love it for one of my rooms in my home. Thanks for sharing.
Looks great and like the name 🙂 hehe
What a wonderful fresh makeover! I love the new look of the laundry room – and those burlap wall hangings are a wonderful addition. Pinning even more references for the Hawaii house makeover that we get to start next month. 😀
I love this! Burlap and sea shells? Yes, please!
xo Heidi
Love it Kim. And I dig the quick, cheap and easy aspect too 😉 Loving your laundry room still, real life or staged!! It’s fab 🙂 Happy Summer girl!
Love it! So simple and pretty, and how genius is it to use a soda can tab for the hanger?! Definitely keeping that idea in mind.
I’m not artist, but I don’t like buying wall hangings either. My hubby and I have something against things manufactured in mass quantities, which leaves us with bare walls. We are gradually finding things at local art shows, antique and junk shops, or making them ourselves. I may have to make this! Do you buy your shells? I live in Coastal NC but finding shells that are the same size and same kind is difficult.
Hi Karen! I buy my starfish, but all the shells in this project I found along the OBX on vacations. We collect bags full. 😉 They don’t have to all be the same size. You can start with smaller shells at the top, graduating down to larger ones if you like. Thanks for stopping by! ~KIM
I don’t think we’re in a very good area for shells. We visit Atlantic Beach, Fort Macon beach, and the sound here. When I used to go to Hammocks Beach in Swansboro I could find better shells. Maybe I’m just not going early enough in the morning.
I can’t get the last link to work, just a heads up! – It’s my favourite! I think my house could use one of these beauties! Pinned!
Hi Brandi! Which link isn’t working for you? I couldn’t find one that wasn’t working.
I die for the lobster…that thing is so amazing I might need to buy it.
Well after seeing I don’t know how many beachy projects done by you on pinterest, I had to come over to see for myself and now I’m a die hard subscriber.
Must be latent memories from San Diego causing me to love beachy things so much. So far that’s where we’ve lived longest (21 yrs). Lived few other places/states too, so far, MT is my favorite, 7 yrs. there after S.D.
I most likely will be hanging out on your blog to soak up all the incredible projects. So glad i found you. Think the shell/burlap project will be one of my first of yours to copy. We’re in middle of redoing living room paint mostly and art I make. Redoing old tables to go with lighter palette. This all started with some light gray background with white designs curtain panels I got on clearance at T.J.Maxx, Bought fabric today to make pillow covers.
Wow what a difference just the curtains have made in our little single wide (16×80 whole house) living room. Found some great light gray paint/tinge of blue at True Value and off we’ll go. Been waiting for almost 8 yrs. to get painting done, guess was right time since my color choices have changed few times since we moved in in July 2006.
Blog world has had an incredible affect on me, loving it. Think the tan burlap will look pretty against the light gray walls. Also using apple green and light aqua for accessories.
Happy days to you.
Hi. I love the colour you painted the wall. Can you tell me what colour it is?
Thank!
Hi Bridget!Thank you! It is Rainwashed by Sherwin Williams.
This iss o simple and yet genius at the same time. Thanks for sharing!! Sometimes it’s t he little brainstorms we have that make a big impact!
Thank you Mary!
Merci pour toutes ces belles idées