Over a year ago I fell in total love with big striped curtains. I wrote a post about it in “Seeing Stripes“. That post is full of striped eye candy! That week I even went out and bought white curtains, but for a year they sat in their bag on the floor. I figured well, I could sew on some gold stripes. One problem though, I don’t own a sewing machine. Or I could just use stitch witchery like I used in my no-sew roman shade. I finally kicked myself in the rear this last week and decided to go the easiest and most inexpensive route possible…. DIY Painted Curtains! We all love easy and inexpensive! I’ll show you how you can make your own.

To make DIY Painted Curtains you will need the following items:
- Solid curtain panels
- Scotch Blue painters tape
- Measuring tape & pencil
- latex paint (I used Sherwin Williams Ivoire wall paint in egg shell sheen. It was left over from my dining room!)
- foam paint roller
- drop cloth
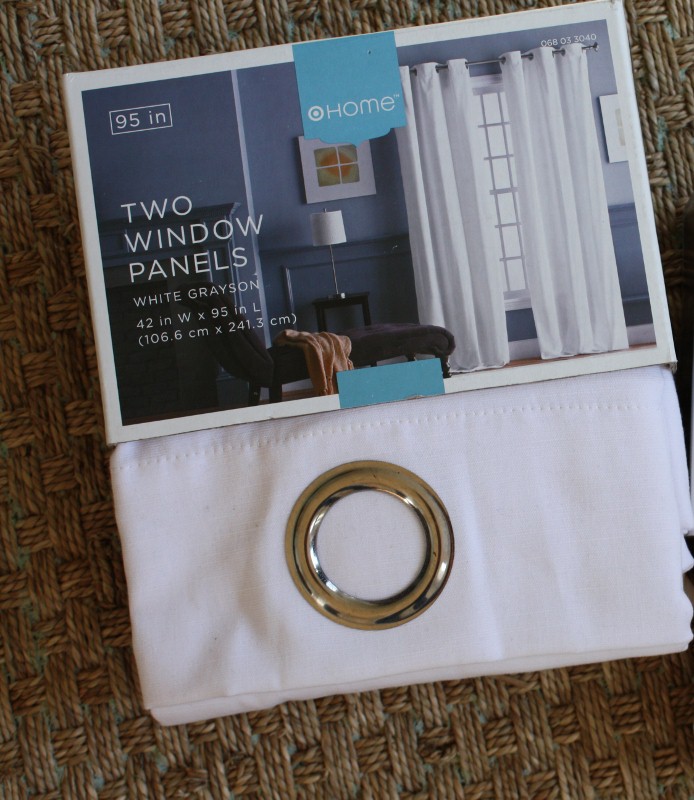
The simple grommet topped curtain panels were from Target and they are a cotton linen. They are quite inexpensive and I will admit, thinner than I’d prefer.
Step 1) Iron your curtains.
Step 2) On a large flat surface lay down your painter’s drop cloth. Spread one curtain panel over it.
Step 3) Decide on the width of your stripes and mark that dimension with a tiny pencil dots.
Step 4) Line the Scotch Blue tape along the dots and press the edges well.
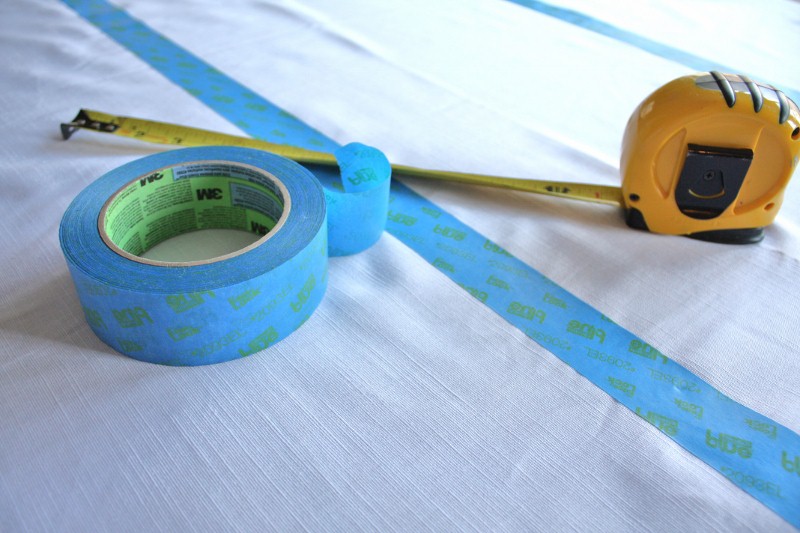

Step 5) Fill in the area between the tape with latex paint using a smooth foam roller. Be sure to cover the surface very well! Allow to dry and remove tape.

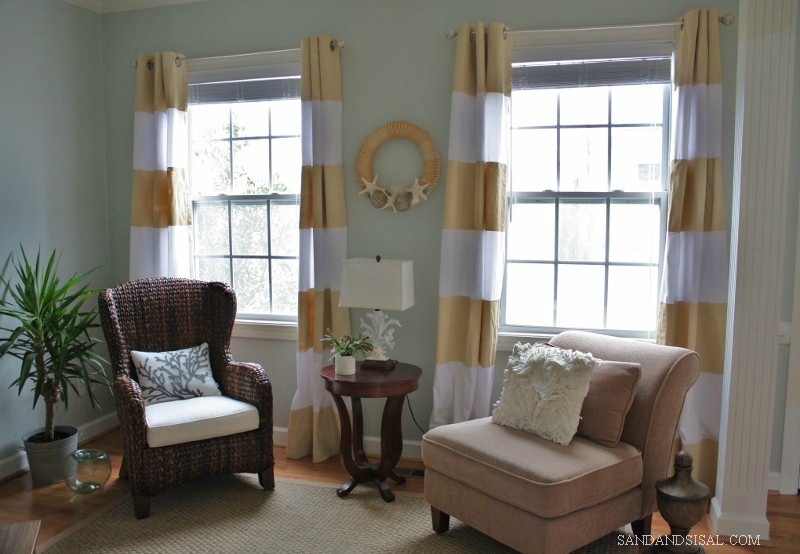
That’s all there is to it! The latex paint does make the fabric stiff, so if you plan on opening and closing your drapes, I wouldn’t recommend using paint. But because my drapes will remain open and are simply for decorative purposes, then painting was a good option. I found these pretty shell covered silver drapery rods and finials at Lowe’s and they are perfect for my coastal decor.

I wasn’t planning on putting up the Glass Float Wreath, but wow it goes perfectly, don’t you think?

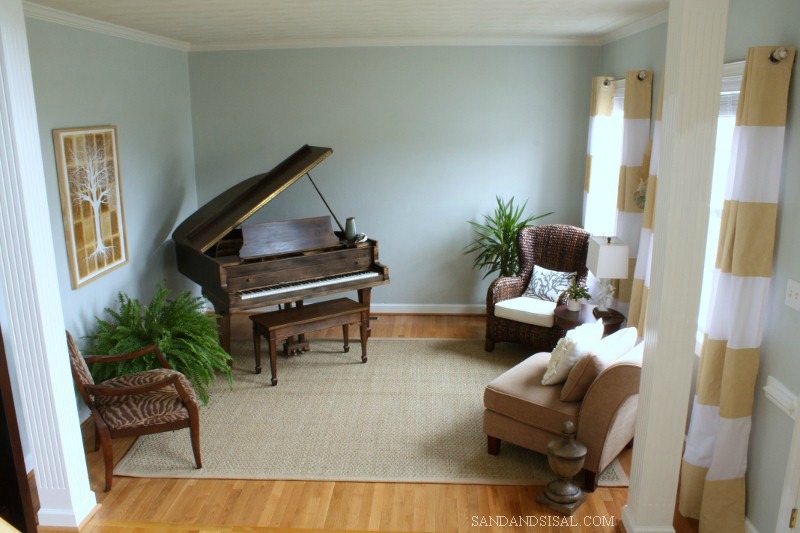
And here is what the entire room looks like. This is our music room, it is the first room people see when they enter my house. The walls are painted in Sherwin Williams Sea Salt. I do need to find or paint some large piece of artwork for that back wall. It needs to balance out the Twilight- Tree of Life Painting I made on the left.
I love how it turned out! What do you think? Ready to give DIY Painted Curtains a try for yourself?
KIM
Linking up to: Serenity Now, Beneath My Heart, Home Stories A to Z
Wow! I love them. They look great! I will definitely try doing this myself as I’m a stripe kind of girl. Thanks again for another wonderful idea.
LOVE them. your room is gorgeous!
I love these curtains! I have a set of IKEA ones that need some new life given to them!
Luv!!! Beautiful room Kim.
Hugs, Gee
kim, these came out amazine. I just finished painting some curtains the other week in my den and it could’nt have been more easy. I ended up buying some inexpensive panels at Ikea.love your music room
Those look so great!!! Really add so much to the room. I love the preppy stripe!
lovely!!!
These look beautiful! I love the color and your wreath looks great in the middle 🙂
I love these curtains! So pretty — I think they complement your room just perfectly!
I never EVER would have dreamt to do this. I love it!!
This look great! I do have the bug for striped curtains too! Thanks for sharing how they worked for you in your space. 🙂
They turned out so beautifully. The whole room is stunning!
I love the stripes! They turned out great, and they look so good in the room.
Positively gorgeous Kim! Looks perfect with the wreath and the Tree of Life! Love.
Just stunning, Kim. Really brings the room together. Another fabulous DIY. Thanks for the great tutorial!
YES!! Love this idea! Pinning to use in my guest room … thanks for sharing, Kim!
xo Heidi
They look great!
I love them! The color is gorgeous and I love stripes too!
Susan
Love how they turned out Kim!! They are so gorgeous and chic!! This is on my to do list for my living room…the color your chose is a nice contrast to the walls and coordinates so well with the rest of the room – great result!!
I love your room! The color is beautiful. The curtains go lovely with your decor.
These are really pretty! The colors look great! How creative- I would have never thought to paint these!
LOVE the thick stripe … and that wreath looks like it was made for that spot!
Love these Kim – everything except that whole pesky ironing part! Really adds pizazz to the room!
Kelly
LOVE this!! LOVE the color & cannot believe how great they came out beings as its paint?! Great job as always 🙂
Great idea but would I be able to wash them afterwards?
I’m sorry, I really couldn’t say. I’ve never machine washed any drapes before, for fear of destroying the quality. Thank you 😉
Hi! If you mix fabric medium into the paint before painting and heat set it by ironing after it dries, you should be fine to wash it.
I love the stripes! It really brings a coastal vibe to the room.
Gorgeous, Kim! I’ll be right over ;).
Not that you need any ideas for the ‘blank’ wall, but I could see a triptych – either a series of 3 or one image split into thirds. I’d love to see more of your artwork, ‘natch. You know, in your ‘spare’ time.
LOVE these drapes (and I have to say that I totally heart those Easter eggs, too)! Totally pinned!
Have an awesome day rock star!
karianne
I love the whole color scheme of your room. The curtains really POP! and you are brave for using latex paint. I think I may try this using fabric paint.
Amazing job!! 🙂
I wonder if you can add a fabric medium to the paint to prevent if from getting stiff? Your room looks amazing!
So if they were to be used to slide open/close, what would happen due to the paint? Do you think it would crack, or is it that you just don’t think they would fall back into place nicely after they’ve been closed?
Thanks – yours look gorgeous – way to save $$’s!!
Hi Pam,
I’ve actually opened & closed them a few times. I’m not worried about cracking at all, but yes, they do take a bit of prepping after opening them so that they’ll look extra nice. Thanks!!
Stunning!! I LOVE them!! These turned out amazing!!
Every time I see striped curtains, I fall in love all over again! I love the neutral color you used and how it pops next to the bright white. How tough was the process? I’d love to tackle it but keep getting scared.
Not tough at all, the longest part was the ironing!!!Thanks Ann Marie!
OK! Just got back from the paint store… was going to buy Magnetic Gray and changed it for the Comfort GRAY! SO glad I did too!
Wondering about the curtains… I can’t tell if you painted the darker part?? I know that you showed a picture of WHITE drapes… but you painted soooooo neatly around the grommets!!! Or did you 😉 LOL!!
LOVE THIS!! I am redoing my dining room just like this. I have about 10 yards of the beige color of fabric like on your stripes… so I think I will be painting them with a white stripe!
Who KNEW? Painting CURTAINS!! WOO HOO!!
CLINK!
Hi Lynette! I’m not sure which darker part you are referring to but I did use a paint brush to paint around the grommets and then wiped off any paint that got on them with a damp cloth. I hope that helps! Thanks for the kind comment and following along with the blog. I appreciate it!
~ KIM
PS…. I have the same curtain rod that was left by the previous MRS. It’s in the bathroom right now… but it’s now going in the dining room!
Love this! I’ve been crushing on stripes as well. Newbie to your blog and I love everything. Will definitely be subscribing
Hey There-
I’m new to your site, I just love it. I was wondering if you could share the width of your stripes? I love the chunky stripes and with the same cutains and the exact measurements I could totally do this! Thanks for your website!
Haha, Thank you! I did them every 13.5 inches apart.
I absolutely love them, but am just wondering how would you wash them?
Hi Ana,
To be honest I’ve never washed curtains ever! Probably because I change the look of things so often. If you want to make them washable you could mix in a fabric medium into the paint and then iron them (dry set with a pressing cloth) and that should make it permanent. Hope that helps.
Thanks!!
~KIM
One of my other fave blogs, Magnolia Mom, uses sea salt paint color & it looks lovely here & there!
So impressed we are by your work! Its truly amazing! Thank you for your inspiration and creativity!
Ananasa.com- Home For Handmade
The perfect inspiration for the curtains I’m finally getting around to installing – I’m going with a blue-gray slate color on mine!
Oooo, very nice! I’m planning on painting a valance for my kitchen dining area in a similar color too. Gotta love paint! (I’ll be visiting you blog later this weekend KC, I’ve been so swamped but I think this weekend I’ll actually get a chance to sit and read for a bit!) Hope you are doing well. 😉
Hello – love these and I’m planning on trying very soon with curtains in my sons room. You are one of of the very few sites/blogs Ive found that has the TOP of the gromment curtain painted – and i love this. Did you remove the grommets to paint, and then replace them? Or did you paint and then wipe them off? Would love to know your trick there. I can’t see taping each grommet, but perhaps that IS what you did. Thanks so much!! Great job!
Hi Wendy! No, I’m certainly not disciplined enough to tape the grommets off. I just used a flat edged paint brush to paint around the grommets and then wiped off any paint on the metal grommets, where I screwed up. 😉
Hope that helps!
Thanks,
KIM
Hey! So I have these hideous curtains-printed. They came with the house and I was thinking about painting those. Do you think it would work? I think I am really looking for darker colors though my living room is gray and purple.
Hi Kaitlin,
It depends on what the material is made out of and also, covering prints is not as easy. In your case, I would just start over. Sorry. 😉
I love the pillow in the picture as well (the one with the branches). Can you please tell me where you got it from?
Hi Melissa, thanks so much! I love them too. I have two of those coral pillows, one red & one blue. I found them a few years ago at HomeGoods.
Love this room and great idea for the curtains! I never thought about painting fabric. I’m going to try it. By the way, what color is the paint on the walls? Thank you! Would appreciate the help. I love it.
Thank you Michelle! The wall color is Sea Salt by Sherwin Williams. It is one of my favorites! I just wrote a post last week about all the different coastal colors in our home and included links under each pic to all the other rooms with the same colors. 😉 https://www.sandandsisal.com/2015/02/coastal-colors.html