Summer vacation is in full swing! The summer issues of Pottery Barn Kids are loaded with fun beachy décor items. One accessory that caught my eye was their weathered wood beach banner. I’ve been slowly working on my boys’ room and knew the Wood Beach Banner would be an easy DIY project that I could accomplish in a few hours. With just a few tools you can make your own Wood Beach Banner too!
Don’t limit yourself to the word “BEACH”. This project could work for any child’s name, boy or girl, and you could paint it in any color. How cute would this be for a baby shower or birthday gift? The possibilities are endless!

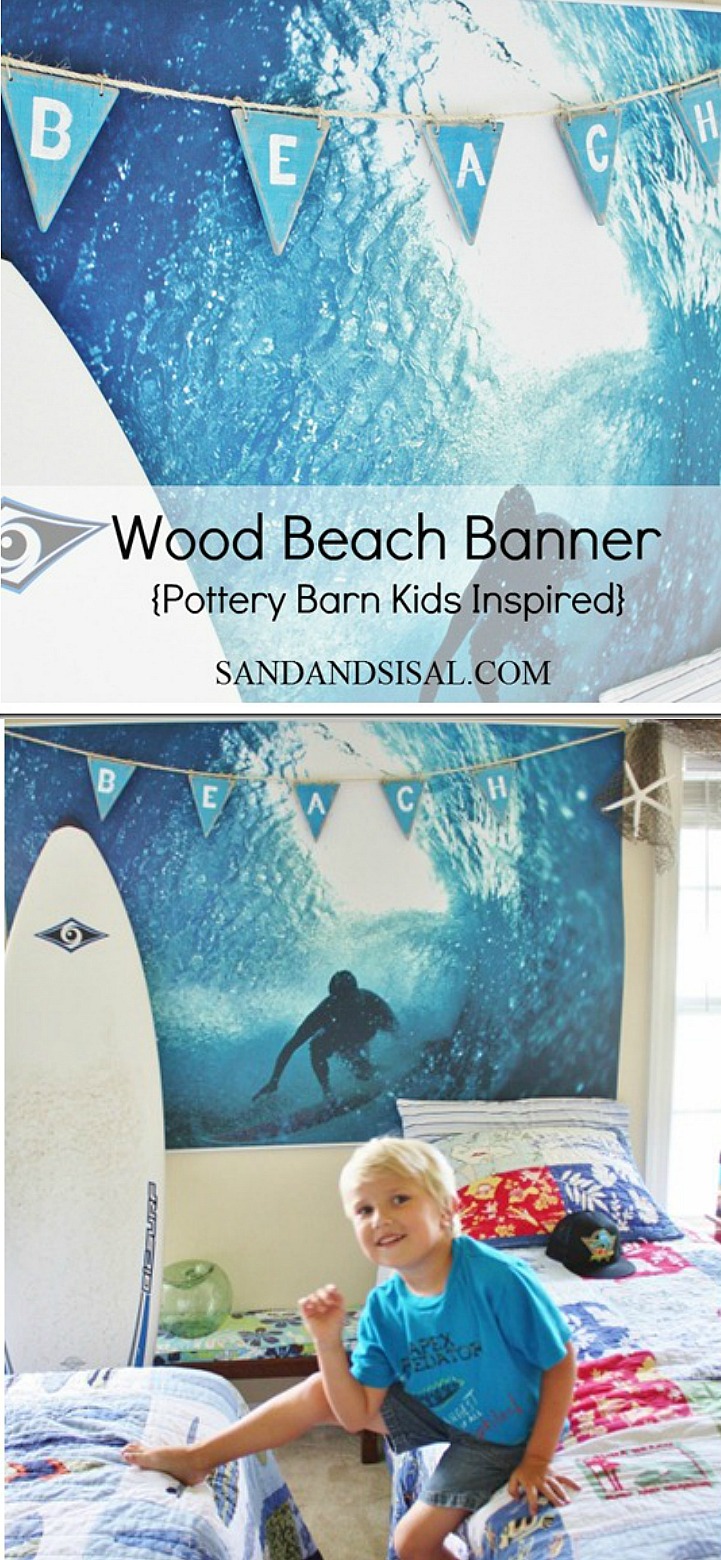
Here is a picture of PB Kids weathered wood beach banner pictured below.

How to make a Wood Banner
To make a Wood Beach Banner you will need the following:
Pallet wood (or any rough wood plank)
saw
vibrating sander
drill
craft paint
flat tipped paint brush
shorthaired round bristle stencil brush
sisal twine or rope
I had pallet wood left over from my Surfboard Pallet Art project. I cut 2 planks of the pallet wood into 7 inch long sections with my miter saw. I only needed 5 sections to spell the word “BEACH”. Make as many triangles as you need for the word or name your choose. After I cut them, I drew a triangle on each board and then cut along those lines.

Now that you are left with 5 pennant shaped triangles, it’s time to sand the edges. Use a vibrating sander if you have one. They make any sanding job easy! I used 60 grit sand paper. I sanded all the edges of the triangles and paid close attention to the corners so they would be a bit rounded. Don’t sand the top surface of the triangles. You want a rough texture there.

Choose your paint color and apply the craft paint with your short haired stencil brush. You want to dab the brush into the paint and work off some of the paint onto a paper plate first. The look you are going for here is a weathered, light look, not a thick coated paint job. Just rub the paint into the wood and don’t overthink it!

Allow the paint to dry. It will only take a few minutes. You can choose to drill holes into your banner triangles now or you can do it later. Just be sure to choose a drill bit that will make a hole large enough to easily thread your twine through.
The reason why I suggest using a flat tipped brush is because it makes painting letters so much easier. I chose to paint simple letter forms just like PB Kids did. Notice how the width of the main letter strokes are the same width as the paint brush? Allow your lettering to dry.

Time to sand! With your vibrating sander lightly sand off the edges of the paint and a bit of the lettering. You are going for a weathered wood look. This step is very quick and easy and the results are so cool!

Tie small loops of twine through the predrilled holes and tie in a knot. Leave enough room to slide another piece of twine or rope under the loops. I used a larger width sisal rope which I thread through the loops and hung the the pendants from.

You are now ready to hang and display your Wood Beach Banner! My boys’ banner hangs across their 6 foot surfer mural from PB Teen.


Love it? Pin it!
Love it! There are so many possibilities with this project!
There are!! Thanks Deneen!
That is too cute and so is your son.
Thank you Kim! He’s a ham and loves to get in front of the camera whenever possible.
Great knock off! Your son’s bedroom looks terrific…….you are just so crafty snazzy!
Crafty-snazy? Haha! Thanks! I love your new profile pic Vicky!
Great knock off! Your son’s bedroom looks terrific…….you are just so crafty snazzy!
Nice job! I have to do this. Thanks for the great idea and the great pics!
Thank you Jill!
Free and beautiful!!…you did a wonderful job!…and your son looks like he really loves his room…He is adorable!
Thanks! I love Free! He’s such a little ham!
OH my word your little man looks like he is a pb model kid! That picture looks like it could be in their magazine 🙂 Send it to them! Nicely done and I love the blue color. Looks great with the wall hanging.
Haha, thanks Jess. I don’t think PB would be overly thrilled about my easy knockoff of their accessories though. I do know that they watch blogger’s knockoffs too. 😉
Cute! My son has that bedding :-). Now if I can learn how to work a saw!
Wow!! This is as GREAT as your surfboard pallet art, although I’m sure this was A LOT easier 🙂 Soooo LOVE your beach theme!
Thanks Kim!
This is too darn cute and very clever and I’m sure much cheaper than the Pottery Barn version.
Thanks Katie! If I can replicate something relatively easily and cheaply then I think that’s a win-win in my book! I just hate paying retail if I don’t have too!
That is fantastic Kim! Turned out so cute. Your boy is adorable too!
I love it!
LOVE this – you are so inspiring!