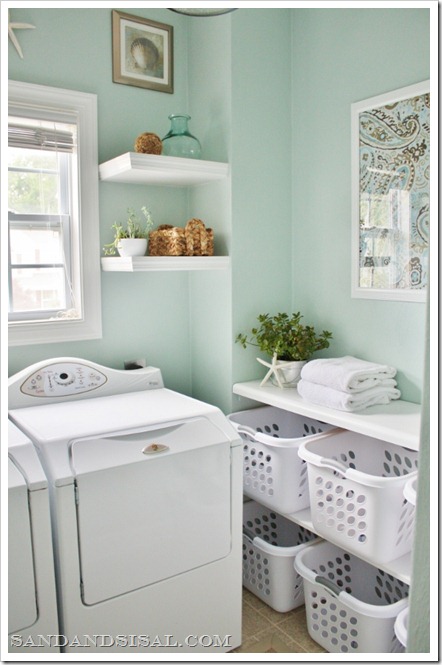
After my recent post featuring my Laundry Room Makeover, I had several people inquire as to how I made the shelves. The laundry room has strange angles yet conventional cupboards would still fit. I preferred keeping an open and airy feel to the space because the room is quite small, so we chose to build floating shelves instead. Let me show you how to build floating shelves and add stylish storage you will love!
How to Build Floating Shelves

How to Build Floating Shelves
you will need:
- 3/4” MDF board
- 1 x 2” pine boards
- decorative trim molding
- wood glue & liquid nails adhesive,
- paintable caulk, primer, and satin paint
- stud finder
- Nail gun & compressor
- 1” & 2” nails
- Table saw & miter saw
- safety glasses
Build Shelf Base– Decide how deep and wide you would like your shelves to be. Mine are 12” deep and 18” wide. We purchased a 2 x 4’ sheet of 3/4” MDF board and cut the board into four 12 x 18” rectangles with our table saw. Because the corners of our laundry room are not perfect 90 degree angles, we had to make some extra cuts to accommodate the actual angle of our corners. You will most likely have to do this also, unless your home was built by a perfectionist. Mine was not.
Attach Trim– Cut 2 pieces of decorative trim for each MDF rectangle, mitering the corner where they join. Lay the trim against the board to check for fit and then run bead of wood glue along the MDF edge and trim joint. Nail to the MDF board with the 1” finishing nails.

Allow the glue to dry. Fill any gaps with paintable caulk.

Caulk, Prime & Paint– For an open bottomed shelf, you will want to caulk the interior joints and allow to dry. Then prime the top and underside of the shelf. Allow to dry and finish with a coat of white satin or semi gloss paint. A white painted underside is not only more aesthetically pleasing, but it also helps reflect light underneath your surfaces.

Cut your cleats– Now it’s time to make wall cleats. These are what will support your shelf. Cut two, 1 x 2” strip the same length and depth of your shelf minus one inch. For example, if my MDF rectangles I cut earlier measured 12 x 18” then I would cut one cleat strip 17” and the other 11”. Choose the height of where you want your shelf and then find and mark where your wall studs are located with a stud finder. I chose a height that would accommodate the new washer and dryers that sit on pedestals. I don’t have that type, but I wanted to be sure anyone moving in would be able to easily fit their washer and dryer under the floating shelves.
Nail Cleats to Wall – This is where you will need the 2 inch nails to secure your 1 x 2” cleat to the wall. Try to drive your nails into the studs. They give you the most strength and support. If you desire, you can also put liquid nails behind the cleat for extra adhesion.

Glue & Nail Shelf to Wall Cleat- Run a bead of liquid nails along the top of the wall cleat and rest your shelf on top of the cleat. Have your nail gun close within reach and ready to go with 1” nails.

Nail through the top of your shelf along the wood cleat every 4-6 inches. (I love using my nail gun and get pretty trigger happy with it, so my shelves probably have twice as many nails than they need!) Voila! You just made a floating shelf! Allow the liquid nails to set up over night before putting any weight on the shelf.

Extra Options– Now if you want to get really fancy, you can cover the bottom of your shelves with very thin (1/4”) fiberboard cut to size. I only covered the bottoms of the upper shelves, but not the lower ones. I primed and painted the fiberboard first then ran a bead of paintable caulk along the edge of the fiberboard and pressed it against the bottom of the shelf. A few pieces of painters tape held it in place until the caulk dried. For a finished look, caulk all the edges of your shelves, fill the nail holes, and touch up with paint.

Your shelves will hold a significant amount of weight but always test it out with lighter objects to start off with. My laundry detergents and fabric softeners are stored in decorative glass bottles. Not only are they pretty but they are also convenient and easy to use! I love how they give the laundry room a little touch of a “spa feel”. Click HERE to see the the before and after pictures of the laundry room.


I hope you now feel a little more confident on how to build floating shelves!
Be sure to PIN this tutorial for future reference!
Kim
For the latest updates, join me on FACEBOOK, TWITTER, PINTEREST, G+ or SUBSCRIBE
| linking up to: |  |
 |
 |
 |
Cleats are my best friend 🙂 Cool idea building the shelves from mdf and pine trim. Nice! This picture is awesome, the brightness and colors are perfect 🙂
Cleats are great! Thanks Jess!
These are great! But, how does this support weight if your only attachment
is at the back of the shelf? Seems like heavy stuff would topple it from the front.
Hmmm, if you look again, you will see it is attached on two sides.
Lovely, Kim. I am going to give these a go this summer. Thanks!
Thank you Jen!
Lovely, Kim. I am going to give these a go this summer. Thanks!
What I really want to know is…….. what is that paint color on the walls? It is beautiful. : )
It’s Rainwashed by Sherwin Williams. I love it too!
Hi ladies,
Just wanted to address the paint color. My husband and I LOVE the way this paint looks in the final picture. However, we went to Sherwin Williams and got a sample and it looks nothing like the finished photo. If you scroll through the pictures that Kim posted during her beautiful transformation you will see that it is considerably darker and more grey. We have tried to duplicate the exact color in the finished photo and have yet to be successful. 🙁 We absolutely love your washroom! Great job.
These shelves are great and I love the entire room:)
Thank you Irma!
Those are beautiful and you make it look so easy.
Thank you!
I fall in love with the color! The entire room is so so cute!!! Wish I had a laundry room…
Thanks for the inspiration…love the color as well!
It does look easy, and probaly has more strenght than the shop’s floating shelves.
I do love the idea of puting detergent in bottles, it does look spa-ish – what an amazing thing to say about a laundry room! Kudos!
Wonderful tutorial & love the floating shelves. We have a spot in one corner with wire shelves and I think these floating shelves would look much more finished & upscale. Thanks for the step-by-step! BTW, I agree – the soaps in a jar look really nice. Just curious…do your softener sheets dry out sitting in a basket?
No, not at all. They make the room smell great and still work just fine. Thanks for the sweet comment too!! 😉
These are beautiful and love the tutorial. Great job. Floating shelves are on my priority list!
Great tutorial Kim! They look wonderful and your pics all come out so good too. I just pinned this.
Hope your 4th’s a blast!
Hugs…Tracy @ Cotton Pickin Cute
Thank you Tracy!!! And a special thanks for the pin!
I am totally loving your beachy laundry room. Thanks for the instructions on the floating shelves. They look great!
Kelly
Hi Kim…I am your “neighbor” at Debbie Doos party..I just pinned your this great tutorial and beautiful shelves!…fantastic job on the shelving and I love your laundry room!…
Absolutely fabulous lady! Great work…
Love your shelves!! Pinned 🙂
Debbie
nice idea..it s simple way to decorate my room
I can’t wait to tackle this project! My bathroom has no storage space, resulting in a big messy counter problem. And between my job and Dish and keeping up with the rest of my household, I have been putting off thinking of a solution. These shelves seem to be the answer to my problems! Thank you for also including step by step instructions. Some blogs can be so vague, so I usually end up recording projects off HGTV and the DIY network; that way I can pause and play back a step when I inevitably get confused. Luckily, I have the Hopper DVR that has loads of recording space to house all the projects I aspire to do. I don’t think I’ll have any trouble accomplishing these shelves with your instructions though, except I might have to enlist in my husband’s help when it comes to the power tools!
These shelves are beautiful! Thank you SO much for posting this!!!! Can’t wait to look thru the rest of your blog now.
Lesley
http://byporchlight.blogspot.com
What was the estimated cost of these?
I have been looking for wall shelf options that would hold a lot of weight. All the ones sold in the store barely hang onto the walls! Thanks so much for the tutorial. I will definitely try this out soon.
Just gave this great post a shout out!
http://4you-withlove.blogspot.com/2013/01/my-friend-kari-of-newlyweds-on-budget.html
Wow! What a clever idea. Definitely going to use it in my home.
Great tute! I’m pinning your darling floating shelves too! Little Bit
I love the shelves but I also love the paint. However, when I purchased this color at Sherwin Williams and put it on my white walls…it was blue-grey? what gives with that?
Hi Lynda! Yes, it is a grayish blue. I have Rainwashed in 3 rooms in my home. You can see another example of the color in these posts I’ve done. .
https://www.sandandsisal.com/2011/01/painting-stripes-made-easy.html & https://www.sandandsisal.com/2011/03/add-glass-stone-tile-border.html .
Never rely on what you see on a computer screen as actually reality, because every monitor presents colors differently, some more saturated or warmer or cooler. Out of the 3 computers in our home, the color looks different on each one. In bright sunlight, that color looks more sky blue than gray and in darker areas of my house it takes a more blue-gray hue. It’s a funky color for sure. That’s why I love it! 😉
I think the shelves are great, but the framed pix at the top are a miss. You need to center the two frames equidistant to the shell in the center top of the window. All that space between them right now is not resting space, it is awkward space. Love the shelves and the room as a whole, though!
Hi Kim,
Your laundry room is absolutely beautiful. Mine is a work in progress right now, but I have space at both ends of my window. These floating shelves are the perfect solution. Thanks for such a great tutorial and for sharing your design finesse!
Val @ artsybuildinglady.blogspot.ca
Love the way the shelves came out. Excellent job and you also did a great job explaining how you got the end result. Thanks
Hi, can you please tell me what color you painted the shelves?
thanks!
The laundry room look amazing!
THank you so much Gwyn! I just painted the shelves in Pure White by Sherwin Williams. 😉