We’ve been cleaning up the garden beds and deck, preparing the beds and planters for new spring flowers.
This year I wanted a brighter punch of color and lighthearted, fun feel on the deck, so I decided to give my fiberglass planters a makeover and transform them into Whimsical Hand Painted Planters.

I was inspired by these beautiful planters in the Grandin Road catalog this spring. They look like ceramic pottery but are made from fiberglass with a poly high gloss finish. They run $169 a piece! As beautiful as they are, I simply don’t have a budget for that so I made mine for free! I like free!

To make a hand painted planter, start with a fiberglass, lightweight planter. This is one I already owned. It actually has a nice patina on it, but I’m going for bold color this season, so as much as I hate to change it, I know it had to go!

Spray your planter with a good outdoor primer. Give it 2 coats.

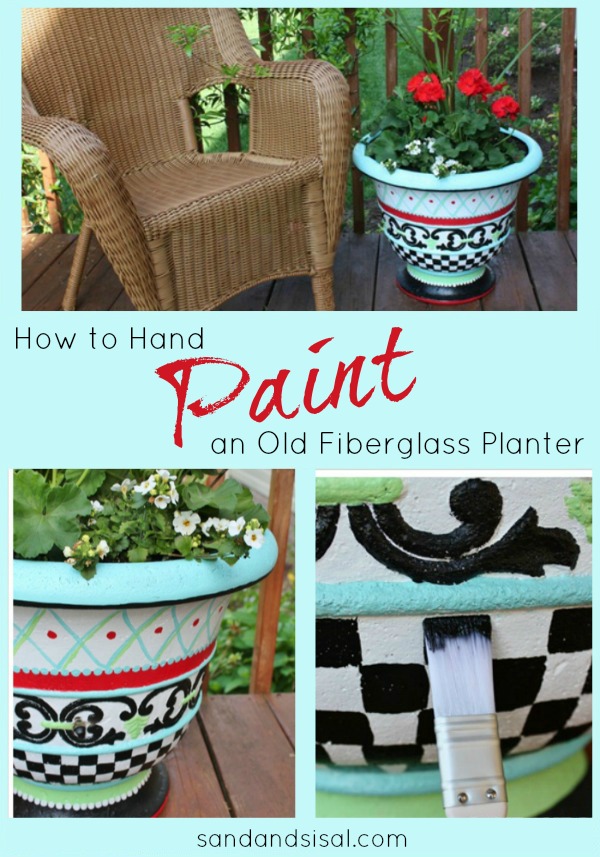
For this project I highly recommend Martha Stewart Paints by Plaid. The sweet folks at Plaid sent me a ton of supplies to try out (click here to see the awesome loot!) These paints are multi-surface paints (glass, paper, wood, plastic, etc.) and are perfect to this type of project. I had the privilege of representing this brand in a recent post (Martha Stewart Crafts Etched Glass Vase), and have been very impressed by the quality of the products. I chose black and white and then limited myself to 3 colors. Black, white and turquoise are the main colors, and red and lime are accents.

I painted the entire planter white first and then I started painting all the raised areas of the planter. The easiest way to make a checkerboard pattern is to use a flat, rectangular brush. The wider the brush is, the wider your checkerboard pattern will be. This brush is also by Martha Stewart Crafts. I dipped it in the paint, then pulled the brush down one inch. I then turned my brush upside down and stroked upward, going over the little square I had already created. This ensures, nice crisp edges. Skip a brush width and repeat. Don’t worry about perfection, you aren’t a factory machine! Hand painted pieces have painterly imperfections and character, which is GOOD!

To make the large bands of color, use the same flat brush, loaded with paint, and stroke the brush width evenly around the planter. If you want a thicker band of color, consider using a larger flat brush. Different sized brushes make projects easy! A simple way to make little dots is to dip a new pencil eraser into paint and then dot it on the planter. The dots soften the hard lines between the stripes.

To get a high gloss ceramic look, spray your planter with a high gloss, non-yellowing acrylic sealer. I gave my planter 2 coats of sealer. You can find acrylic spray sealer at craft stores or big box hardware stores. I added a few bright red geranium, a spike plant, and white trailing bacopa. I can’t wait until they grow full and spill over the sides!

Save yourself $170 and try to create your own whimsical hand painted planter! I love the cheerful pop of color it adds to my deck.
Hand-painting tips: Limit your color choices & use multiple sized flat brushes.
Kim
For the latest in DIY, Décor, & Recipes be sure to join me on
FACEBOOK, TWITTER, PINTEREST, G+ or SUBSCRIBE!
 |
 |
 |
 |
 |
 |
 |
 |
 |
This is great! I have two pots that would really look great with this. Thanks for the idea.
Well aren’t you Miss Clever 🙂 your planter looks fabulous….you should attend the plant party that’s at the nester this week. Go ahead and show off this great beauty.
http://www.thenester.com/
Well aren’t you Miss Clever 🙂 your planter looks fabulous….you should attend the plant party that’s at the nester this week. Go ahead and show off this great beauty.
http://www.thenester.com/
Oh very nice and with all that Martha stuff you have enough to do 100 more planters 🙂 ha. Came out great!
So pretty! what a difference some paint makes!
Looks great Kim!!! LOVe the colors!! 😉
Wow. That looks like a million bucks 😉 So stinking happy and cute! Perfect for a zingy Summer patio. So smart to DIY, can’t imagine paying $200 bucks for a planter??? Plus, love the color combo you used even better =)
LOVE this!!! So funky & whimsical 🙂 GREAT job as always!!
This is SO gorgeous!! LOVE it…hope you can link up tomorrow for my Turquoise Lovin’ party!! http://www.sweetlittlegals.com
Hi! I wanted to get to your blog and thank you for featuring my ottoman at homestories… And the good news is that now I’ve discovered you! I’m your newest follower. Thanks again.
LOVE!!! Holy Moly LOVE! It may be gone in the morning, no joke…. I am on my way to Steal that Cutie! 😉 Great job, adds great funk and fun to your deck! Seriously I am in love! -Jen
Kim that is so pretty! I will have to check out the paints!
Debbie
These remind me of the McKenzie Childs’ line of dishes and furniture that was so popular a few years ago. Yours turned out so great…thanks for sharing the “how to”s.
This popped out at me in the A2Z link up right away. Gorgeous!
Hmmm … I’m sensing a Martha Stewart theme at Beth’s party tonight. This is the second post I’ve landed on lauding her products!
The pencil eraser as dots is a brilliant idea! Seriously. One of those head-smacking why didn’t I think of that ideas!
Love how it turned out. Now I’m thinking of ideas for my very own cheapo Home Depot pot. The original finish is flaking away …
So thank you (and Martha) for some inspiration!
🙂
Linda
That is simply gorgeous! You did a wonderful job!
Amazing! Love the bright colors!
Hello! I found your blog though your link at the Nester’s Plant Party. And I’m doubly excited, because not only do I have a great new blog to follow, but I actually live in the same area you do! Now I don’t have to get depressed when I see a source that I can’t get to. I love your stuff!
Oh wow! Your planters are amazing!!! I would love for you to share it at my party going on now at Jillify It!
Jill
http://www.jillifyit.com
This is awesome!!!
Ahhh! I love the color combo–super talented that you can free hand paint like this!
This is fantastic! I recently painted some birdhouses that I made into garden stakes in a similar style and this would go so well with them. I guess I’ll have to be on the look out for a cheap planter next. Thanks for the inspiration!
This is gorgeous! So much more cheerful and fun than a standard concrete planter. Love this look 🙂 xx
Anna (My Design Ethos)
Seriously great looking pot – and look how much money you saved!
Wonderful colors. I have the paint and the fiberglass pot. Will be trying this. Love it.
Jacque
Kim, this planter pot is sooo adorable! I love the palette you used and the whimsical nature of your planter. Thanks for joining the DIY Talent Parade!
Yay…..adorable. I love it. Not only do you have the color of the plants you have the color popping out of the pot. Nice.
Now that’s a good looking planter !!
OMG, I can’t believe what I just scored at the local Goodwill yesterday. Two of the inspiration planters posted by you. They are identical to the black and white check one in the middle (with the orange and chartreuse trim at the top and bottom). Never been used and they still had the Grandin Road instructions inside. I paid $9.99 each and they sell for $129 now. Can you see me doing the happy dance??
Woohoo!!! Happy dance for sure! 😉