 You all know my master bed/bath is undergoing a facelift and adding framed mirrors is part of the process.
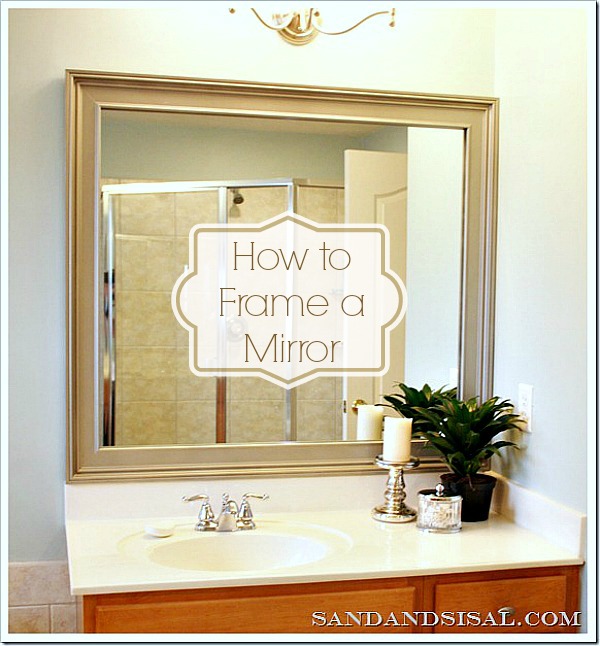
Most homes have these huge behemoth mirrors and mine is no exception.
Don’t get me wrong I love mirrors!
Is that vain to say?

Mirrors magnify the light in a room, and I love lots of natural light, but they tend to look a little big and naked.
(I’m talking about the mirrors now, not necessarily what they’re reflecting!!!!)
Let’s dress that mirror!

This project was so unbelievably simple and inexpensive that I kept giggling while making it!
Step 1: Measure the height and width of your mirror, including mirror clips, adding 1/2 inch to account for my desired overlap.
Step 2: Choose your molding (at least 3” width). Base board moldings work great! I chose PVC molding (strong, light, inexpensive). Where to find the molding: Home Depot has this in their “Decorative Finished Moldings” section. It is next to some of the dark stained looking finished molding. This molding is their Celucor vinyl interior molding. For all my mirrors in my home I used HDRB3 Casing in the color bone white, for one exception and that was my one seen in my girl’s bathroom (blue/gray distressed mirror)and that molding number was LWM390 Creations Chair Rail.
Step 3: Take your width measurement and mark the width on the molding. Cut a straight (90 degree) cut. Label the back of that piece “Mirror Top”. Repeat the cutting process with another piece of molding and label that piece “Mirror Bottom”. Do this also for the sides of the mirror, using the height measurements.
Step 4: Lay the outer edge of molding against the saw fence and cut a 45 degree angle inward at each end. Repeat with all pieces. Make sure both side pieces are exact same measurement and the top and bottom are exact. If not, cut tiny amounts off to make it exact.
Step 5: Lay the 4 sides down on a large covered surface to form a box.

Step 6: Glue your edges together, one corner at a time, holding for 1 minute, and allowing glue to set for 5 minutes, before moving to next corner. I used clear PVC glue. It was crazy-easy to glue and the bond is so strong!


Step 7: SPRAY PAINT TIME! (my favorite part!) Choose whatever you love! The possibilities are endless. I chose another Rust-oleum Universal Metallic Paint, this time in Satin Nickel. Don’t forget your inner and outer edges and also you’ll need to spray 1”-2” of the inside edge of the frame back (mirrors reflect).

Step 8: Apply small 1” pieces of strong double-sided tape to all corners and the middle of all sides. My tape said only 4” of tape are needed for every pound! I tend to always do a bit more.


I had to apply a double stack of the tape to account for the center dip in the moldings.

Step 9: Carefully place your frame against the mirror and press to adhere. You only get ONE SHOT at this part, so having a friend help you is a good idea.
Step 10: Enjoy your dressed up frame and your fabulous reflection!!


I’m so pleased with the cost ($30) and outcome, I can’t wait to start framing the other bathroom mirrors in the house!
Amendment to this post 10/12/11
Hi everyone! I have received numerous emails asking about how I dealt with the existing mirror clips.
My mirror had the big, chunky, clear plastic clips on each top corner. I removed those, kept the screw that held it in place and replaced the plastic clips with 2 sizes of washers. I stacked the washers to fill in the space needed and the large washer holds the mirror. Trust me, the mirror is very secure. BUT if you can find flat mirror clips then use those. I could not find any at the time.

I hope this picture helps explain how the mirror is held in place!
To embellish your mirror in other ways, check out these posts “How to Decorate a Mirror With Tile” and Painted Custom Mirror Frame Using Paint and Glaze
Kim
This a great idea! I have 3 mirrors that I need to dress up. So excited for this inexpensive fix! Thanks for sharing!
HEY that looks so much better!!!!
Great job!
What a difference, looks great! I’m visiting from kim’s:)
Rondell
So how did you compensate for the clips?
Kim, that is a gorgeous change. We did that to a bathroom upstairs except my husband added to the mirror like he would add trim to the wall. I like your way better. Good tutorial, too. Thanks so much for joining the party this week.
Leah- I took off the chunky plastic clips and should have just replaced them with flat metal clips, but I was lazy and it was raining, and I didn’t want to go to HD again! lol. So I removed them and just added a quarter sized washer, screwed it in, and stuffed a little cardboard behind it so it wouldn’t flex ourward. It worked great, and my hair didn’t get soaked in the rain!
Would I be able to apply this to a round mirror? If so what would I use?
Probably not, since moldings are not made with curves.
I love the framed mirror! I’ve been wanting to do this for a while and hearing you say how easy it was makes me want to do it even more. Thanks for the step-by-step instructions!
It really makes a big difference! I’ve got three mirrors like this that I need to do!
I love you for posting this! I was just thinking about doing this and wondered how I’d figure it out. Problem solved!
I’ve heard that sometimes the glue shows in the reflection behind the frames. Does that tape show? I am wanting to do this, and your tutorial sounds the easiest of anyone’s I’ve seen!
I’ve seen many mirrors around the blogosphere get trimmed. Yours is, by far, my favorite. Loving the metallic.
Denise
http://www.extremepersonalmeasures.com
Melissa- The tape does not show. If you set your tape at least one inch in from the center, then you shouldn’t see it. Always do a “test prop” before you take the covering off the tape, to make sure there isn’t anything you can see in the reflection. Thanks everyone! Keep the questions coming!
thanks for the tutorial!!! I’m going to show my husband this!
Nice job! I haven’t seen PVC molding, but I’ll definitely look for it now! Thanks for sharing.
Brittany
http://www.prettyhandygirl.com
I.Love. This. I’m. Scared. of. Power. Tools.
visiting from http://imnotatrophywife.blogspot.com
Great job! I’ve been doing some of the same things around here, I love your blog,Following from the blog-hop. I’m your newest follower. Please take time to follow me back, thanks.
Tchoplin2009@gmail.com
http://www.nontypicalmom.com/
Great job! I’ve been doing some of the same things around here, I love your blog,Following from the blog-hop. I’m your newest follower. Please take time to follow me back, thanks.
Tchoplin2009@gmail.com
http://www.nontypicalmom.com/
I have been wanting to do this in our bathroom for 8 years but have been scared. Your tutorial has given me the courage and gumption to try. Thanks!
Love this mirror makeover…looks soooo much better. I have no more plain mirrors…it’s just to easy to dress them up. I would love to have you join me at my weekly party…it’s NIFTY THRIFTY TUESDAYS…hope to see ya there:)
Blessings,
Linda
I have big nekkid mirrors too. Thanks for this tute. I got a compound miter saw and I’ve been looking for little test projects so I can learn how to use it.
This will be perfect in my bathroom re-do! I’ve been so stressed about what to do with our massive mirror. Thanks so much for sharing this, I can’t wait to try it!
Thank you for this! I want to do this to my bathroom mirrors SOOO badly…….
That looks great!!! It makes it look totally different…wow-
Sandy Toe
Perfect one. A new follower from Thrifty Thursday bloghop. See you.
Just found your blog from a response from one I am following. I am new to the blogging world and was so excited when I ran across your blog and this mirror idea. I have been wanting to do this for quite some time but have not been confident in doing it on my own as of yet. However seeing your step by step it is def. a project in the VERY NEAR FUTURE. Thanks for little push.LOL
Kim this turned out fabulous! What a great addition. Love the color too. Fantastic job! Thanks so much for linking to the Sunday Showcase – I greatly appreciate it. I’ll be featuring this today. Hope you have a wonderful week ~ Stephanie Lynn
i have been looking for an easy and inexpensive way to frame the mirror in my bathroom – this is it! thanks so much for sharing! i love it! 🙂
thanks for the great tutorial, this is definitely going on the project list!
Hi, thanks the tutorial. Two questions. 1) What tool did you use to cut the framing? We don’t have any power tools yet, and my wife is worried Lowe’s or Home Depot won’t be able to cut it very sharply / exact. 2) What did you do about the metal bracket holding the bottom onto the vanity? Thanks!
Edward: I have a compound miter saw but you can easily used a miterbox and a hand boxsaw. This pvc molding cuts like butter. HD/Lowes should be able to cut it exact for you. Once they cut two equal sides then line the molding up back to back to check for equal lengths, repeat with the top & bottom pieces. Line out the frame right there on the floor of the store to make sure you like it. As far as the bottom metal mirror channel, I just placed the frame right on top of it.Please let me know if you have any more questions.
I love this! I’m compiling a list of all things Crabtree that I love for my new house. 🙂 You girls are so fun!
this is a great tutorial with allowing for a ton of customization and tweaking! awesome! I did a tiled mirror a while back and love mine too!!! http://designbuildlove.co/?p=119
I’ve seen so many tutorials for framing a mirror and this sure does seem the easiest!
Question, did you have a “mirror rail” (the metal thing they slide a mirror into to hold it on the bottom) and any mirror clips? I have both those and what I’m finding as my biggest challenge to come up with a design for a frame.
Any suggestions?
Pamela @ pbjstories.blogspot.com
Where did you get your molding, it looks so nice. I can’t seem to find it. I am a new follower, thanks for all the inspiration.
Thank you
Home Depot! 😉
Love your tutorial! Gave me the courage to finally dress my naked mirror. Was concerned about the mitered corners (HD wouldn’t do the miters) so I purchased rosette corners and adjusted my measurements to reflect their 3-1/2″ W and H.on all sides. Haven’t painted it yet, but it looks great and was so easy!
I still do not understand the mirror clips.. If I use your washers they still protude off the mirror and the molding will not lay flat.
Hi Kim!
This is another one of your great projects I am about to do. I completely removed my mirrored cabinet from above my sink, so I will be starting this project from scratch. My local glass company is going to install a 36×36 mirror for me. Should I see if they can mount it with having to use those ugly clips? Also, would it be easier to attach the pvc frame before the mirror is hung on the wall? But, wait…idk how they’d get it attached to the wall then if the frame is already attached. Any thoughts??
Thanks!
Linda
Hi Linda!
Thanks! I’d ask them to install it with flat mirror clips on the top vs. the bulky plastic ones. The only reason why I used the washers is because I could not find the flat clips anywhere at the time. I’d also just put the frame on after the mirror is installed. Best of luck to you!
Do you happen to have the name or number of the PVC molding you used for this? I went to Home Depot and didn’t find anything in PVC that looked similar. Thanks!
Hi Mandy,
Home Depot has this in their “Decorative finished Moldings” section. It ‘s next to some of the dark stained looking finished molding. They are their new Celucor vinyl interior molding. For all my mirrors in my home used HDRB3 Casing in the color bone white, for one exception and that was my one seen in my girl’s bathroom (blue/gray distressed mirror)and that molding number was LWM390 Creations Chair Rail. My Home Depot still carries them. Maybe check at a larger HD if you have one? Hope that helps. 😉
Hello! Your project came out beautifully! I have two questions: What kind of saw did you use, and what is a saw fence? (I’d love to make a frame for my bathroom’s mirror, but have never done any woodworking of any kind before!!)
Very awesome !!! We just bought a house with these huge mirrors in every bathroom. Can’t wait to try this… But was wondering what u thought about using industrial Velcro to adhere the molding to the mirror. That way you could possibly take done and repaint when ever you wanted to change the look.?
I love how beautiful this turned out for such an easy project! I’m about to move into a new apartment and would love to do this to cover up the messed up edges of the mirrors in the bathrooms, but need something that will not tear up the mirror and can be easily removed. Would the double sided tape mess up the mirror or do you have another suggestion? Thanks!
Hi Kathryn,
Thanks for the kind comment. I think maybe industrial Velcro would be a better choice than the tape. I haven’t used it though, so I can’t really say how difficult it would be to remove from the mirror, but I think it would be less messy. The adhesive can always be removed with “Goo-Gone” and a straight razor blade too.
rezeptfrei viagra and mittel gegen impotenz . More discussion results
I was thinking of doing this exact thing but was considering using velcro to attach the mirror in case I ever needed to clean the edges of the mirror. Has anyone ever tried this?
Hi Kim,
I am in the middle of a bathroom remodel and am starting to frame the mirror. Where did you get PVC molding?
Thanks
Hi Cindy,
Home Depot has this in their “Decorative finished Moldings” section. It ‘s next to some of the dark stained looking finished molding. They are their new Celucor vinyl interior molding. For all my mirrors in my home used HDRB3 Casing in the color bone white, for one exception and that was my one seen in my girl’s bathroom (blue/gray distressed mirror)and that molding number was LWM390 Creations Chair Rail. My Home Depot still carries them. Hope that helps. 😉
Gorgeous! I’ve been wanting to do this to my master bath double-sink vanity mirror (in other words…very big), but thought it would require carpentry skills. Now I have guidance! I did get stuck on the plastic clips comment. What did you mean that you took them off and then added a washer and some cardboard? For some reason, I’m just not getting the visual. If you take off the clips, how does a washer hold the to the wall? Thanks again for the terrific post!
Hi Lisa,
Thank you!!!! If you look at that last picture showing the washers, you can see that the tiny washers serve as a filler and the large washer up front is the one that overlaps the mirror and the large screw threaded through it holds it in place. If you can replace your chunky plastic mirror clips with flat mirror clips, then do it! I could not find flat mirror clips to save my life back when I wrote this post years ago. The washers are just a very inexpensive fix, but work. I’ve used the washers on all 5 mirrors in our home, one of which is a very long mirror like yours. Here’s the post for that one. https://www.sandandsisal.com/2011/10/painted-mirror-using-paint-glaze-to-enhance-details.html
Kim, I love this! We have two bathroom mirrors that we want to preserve when we remodel and frame so that they look more finished, and your way is a lot easier and poses less risk of damaging the mirror than ours! Thanks so much for sharing this – and all your other wonderful tutorials!
i am currently doing your project, thanks for inspriing people and projects.
My problem is, the pvc molding is not straight.
i have about a 6′ mirror i am doing. so i am currently in the gluing the corners phase and they wont stay glued because of the bowing. i try to line up the new corner, and the other corner comes apart. frustrating. i’m thinking of using some of the tape to try to tape the corners on the backside together. thoughts?
Hi Rob,
If your molding is not straight, you might just have to purchase another piece unfortunately. Make sure the top and bottom are the exact same length and that the sides are exact also. I also recommend using painters tape to help hold the corners together while the PVC glue is drying. Be sure to give enough drying time for one corner before you attempt to glue the next corner. Hope that helps some.
~KIM
I really want to try this! My problem is the metal strip at the bottom of the mirror. It sticks out a bit. If you’re *gasp* sitting on the toilet you may see a gap. Any suggestions on it sitting flush? No pun intended 😉
Hi Courtney,
We have metal strips at the bottom too and I was worried that you would see a gap from the side but you don’t. The frame overhangs the side of the mirror enouogh that any gap that might exist is not noticable.
Thanks!
KIM
I really want to do this. I still have a question… If I use your washers they still protude off the mirror and the molding will not lay flat. Having this gap, how the molding sticks to the mirror?
Hi Gabriella!
You can substitute flat mirror clips instead of the washers. They should be available at home improvement stores and might be a bit flatter. Either way the frame will not be totally flush with the mirror. There will be a tiny gap. I used several 2-3 layers of the tape to build it up to a thickness that would adhere to the mirror. Don’t worry about how the gap might look, because you won’t notice it. Just be sure to paint the underside of the molding about an inch inward, so that any reflection will be of the painted color.
Hope that helps!
KIM
my mirrors are beveled. Do you think this would work for me?
Hi Stevie,
I think you would run into issues getting the tape to stick well with the beveled edges. I’m sorry.