• Home
  • Meet Kim
  • Blog
    • Facebook
    • Instagram
    • Pinterest
    • Twitter
    • YouTube

Sand and Sisal

  • DIY
  • Home Tour
  • Decorating
  • Gardening
  • Recipes
  • Thanksgiving
  • Decor Crafts
  • Seasonal
  • Christmas/New Years
  • Winter/Valentines
  • Spring/Easter
  • Summer Holidays
  • Fall
  • Halloween

December 10, 2010 ·

Pottery Barn Inspired Noel Tutorial

Christmas/New Years· Crafts· Pottery Barn· Tutorial

Prev postNext post
Use your ← → (arrow) keys to browse
Pottery Barn inspired noel sign
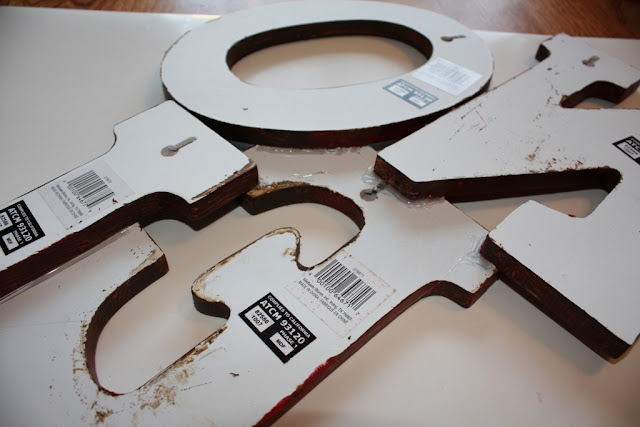
 The blogosphere is loaded with Pottery Barn inspired goodies this season, especially their Noel letter sign. And with each blog viewing, I thought to myself, “Hey, I can do that!”.  Let’s make a Pottery Barn Inspired Noel Sign for the family room! So the search began for ginormous letters to mount on my wall. Huge letters, I found, were more than I wanted to spend so I found some nice sized 9″ MDF letters at Michaels . MDF Classic Font Wood Letters & Numbers 9.5“
Pottery Barn Inspired NOEL sign tutorial
One of the things I love about these letters is the rich look of depth to the letters. To create your own faux, weathered-wood look, you’ll need some acrylic paints in Raw Umber and Crimson, or whatever colors you like.
Paint the letters first with the Raw Umber and while they are still tacky and not yet dry….
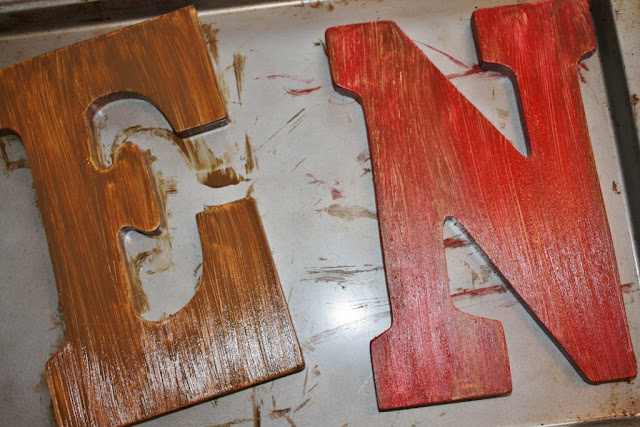
…go over them with the Crimson. Blend, add some paint, take away, smudge with a paper towel, and have fun until it looks something like….
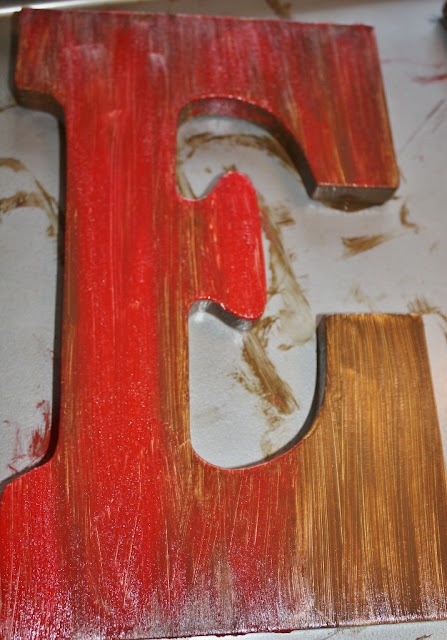
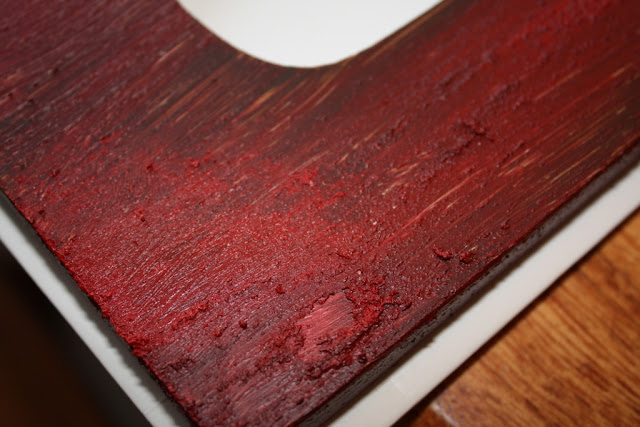
…THIS! See all that beautiful depth and faux-woody goodness? That’s what you’re going for here. If you keep messing with it while it’s wet and still drying, you’ll get this rich gorgeous look.
When your letters are completely dry, arrange them how you want on a piece of cardboard. Place another piece of cardboard on the front of the letters and flip ’em over like a cake. Now you are ready to glue your letters in place.
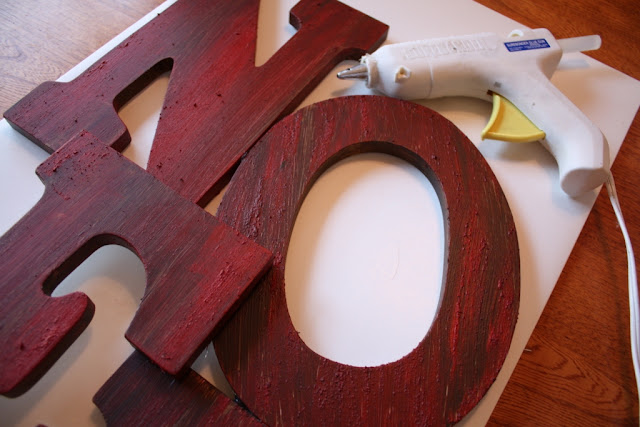
Take your glue gun and fill all the gaps of your letters with hot glue. Never underestimate the power of your hot glue ladies! Goop it on…and it will hold.

When your glue is set, simply place a few strategic nails on your wall and voila! Cute sign that cost you the price of your letters and a bit of your time.

Pottery Barn Inspired NOEL sign tutorial by Sand & Sisal
Add some poinsettias, a candle, and you have yourself some gorgeousness!
For more Holiday Craft Projects be sure to check out Sand & Sisal’s Christmas Project Gallery.
Sand & Sisal's Christmas Project Gallery
Click on over to my sister’s blog The Stories of A2Z where I guest posted this project!

Want to see more easy crafts? Please consider following me.

« ORB, Oh How I Love Thee
Cranberry-Citrus Cream Cheese Hostess Gifts »

Comments

  1. Megandvd@Beauty in the Attempt says

    December 12, 2010 at 5:09 pm

    I adore PB…but I LOVE LOVE LOVE a PB knockoff tutorial. 🙂 Great job my dear. It had me at hello.

    Cheers~
    e

  2. Tiffany says

    December 14, 2010 at 3:50 pm

    On my “to do” list!
    TFS

  3. Kara says

    December 15, 2010 at 10:38 pm

    You did a fabulous job! I think I might even like yours better than the original. 🙂

  4. ~Lavender Dreamer~ says

    December 16, 2010 at 10:10 pm

    Oh, I love this idea! Very nice! ♥

  5. Yanet @ 3 Sun Kissed Boys says

    December 31, 2010 at 9:50 pm

    I love the texture the letters have. Came out very nice.

  6. sara @ it's good to be queen says

    January 1, 2011 at 12:00 am

    hi…stopping over from the lettered cottage. LOVE this! i love the depth you gave to those letters…now i’m wondering what word i could do now that Christmas is over. hmmm…..

  7. Lettered Cottage says

    January 1, 2011 at 5:24 pm

    Bear hugs and butterfly kisses to you, my friend!
    SUCH a great tutorial!

    🙂

  8. Chrissy says

    August 21, 2011 at 3:33 pm

    Love this idea.. gonna try it with a couples name for a wedding gift

    • Karen M. says

      July 4, 2012 at 10:38 pm

      Ooo, what a great idea! Very unique gift. No duplicates I bet!

  9. Vivienne @ the V Spot says

    November 14, 2011 at 5:20 am

    Pure fabulousness!

  10. breanna says

    November 16, 2011 at 10:28 pm

    it.looks.SPECTACULAR!!!

  11. Jenna, SAS Interiors says

    November 18, 2011 at 2:54 am

    I love this sign – I am definitely making something like this for Christmas. I really like how dimensional the letters are!

    ~Jenna, SAS Interiors

  12. Linda says

    November 21, 2011 at 1:38 am

    Love your PB knockoff.

  13. Katie says

    December 1, 2011 at 10:18 pm

    I just finished painting the letters. It looks good so far. how long does it take the paint to dry?

  14. Bama Girl says

    December 5, 2011 at 2:10 pm

    Love the letters! They look like real wood! Thanks for sharing!

  15. debi at the cluttered craft room says

    June 29, 2012 at 3:08 pm

    i just bought my letters yesterday to try this! can’t wait!

  16. Karen M. says

    July 4, 2012 at 10:37 pm

    Lovely. I actually bought real wood letters as I liked the look better, but my paint covered up the wood grain. I’ll wait and see how they turn out when dry but overall, I am absolutely thrilled and I know this project will look great!!

    • Karen M. says

      July 13, 2012 at 3:58 pm

      UPDATE: Beautiful, incredible, looks professional! I am excited to hang it up this coming Christmas. My whole project (minus my time and labor) cost me less than $15.00. Can’t beat that!

  17. Anonymous says

    August 11, 2012 at 3:18 pm

    You inspired me !

  18. Sarah Rolf says

    November 11, 2012 at 4:29 am

    I’m going to really try to do this cheap, and make letters out of card board! Excited to see if I can create the same effect!

  19. Anonymous says

    November 29, 2012 at 7:11 pm

    I’ve been looking for letter idea like this to spell out our last name down our Christmas Tree. Really think this would work, color & all. THanks!!

  20. Unknown says

    December 21, 2012 at 7:02 pm

    Kim, how long between each coat? I know that room temp will play into it, but, I’m having some issue. 🙂
    Thanks.
    Erin
    erinandvictor@yahoo.com

  21. Anonymous says

    February 27, 2013 at 7:50 am

    So, if a person includes a monthly earnings of USD5,000 then they ought to not agree making loan repayments of more than USD1,500 a month paydayloans
    in recent times, there have been varying rules if it comes towards the
    purchase of a so-called flipped property.

  22. Carolyn says

    December 14, 2013 at 2:33 pm

    I sure feel sad for people who aren’t crafty. It’s so easy to save money on these expensive decor items. Thank you!

  23. Angela Michels says

    November 21, 2014 at 11:58 pm

    Rarely EVER do I look an someone’s entire blog, nor do I ever leave a comment but your work is so lovely! You are very creative!

    • Kim Wilson says

      November 22, 2014 at 10:22 am

      Awww, thank you so much Angela! You just made my day. 😉
      Have a beautiful weekend!
      ~KIM

  24. polly says

    November 2, 2015 at 3:58 pm

    I love this idea for teachers, the bus driver, etc, people I don’t know well enough to know their personal hobbies, etc. I’ll make ‘2015’ in gold or silver for Hanukkah gifts. great idea!

  25. Cheri says

    December 11, 2015 at 1:23 am

    I love how you made these look like wood grain. Fabulous project.

Trackbacks

  1. 6 Super Easy & OH-SO Pretty Holiday Decor DIYs | Fab You Bliss says:
    June 25, 2013 at 11:55 am

    […] keeping with the holiday message DIY, this Noel display as shown by Sand and Sisal is such an easy DIY. Blogger Kim Wilson has a great tutorial on how to make this display so be sure […]

  2. 27 Ideas for a Low Budget Christmas - Singing through the Rain says:
    August 20, 2013 at 12:30 am

    […] homemade decorations instead of buying them. Here are a few examples: Christmas Glitter Branches, Homemade Noel Letters, DIY Pine Cone Garland, 20 DIY Christmas Decor Ideas, Hobby Lobby Letter Wrapped in Garland, […]

  3. Do-It-Yourself Holiday Home Decorations says:
    November 1, 2013 at 11:41 am

    […] costly! While it’s much more affordable to make your own, it can be hard to figure out how. This Pottery Barn-Inspired Noel Tutorial by Sand & Sisal is one craft that is truly easy, from start to finish. Some wooden letters, […]

  4. Homemade Christmas Decorations {our reindeer + more} - Four Generations One Roof says:
    November 12, 2013 at 6:30 am

    […] NOEL sign tutorial […]

  5. Joy and Noel | Marla's Art Page Blog says:
    November 18, 2013 at 10:51 pm

    […] can be done it whatever decorating theme you may have going on.  Hope they bring you inspiration!Sand and Sisal The Happy Scraps We Heart This Etcetorize GF Mom […]

  6. 15 Christmas Decor Ideas ‹ Anything & EverythingAnything & Everything says:
    November 27, 2013 at 2:02 pm

    […] Pottery Barn Inspired Noel Tutorial from Sand & Sisal […]

  7. Day 8/9: DIY Christmas Decor: Noel Sign | Ditzy Domestic Diva says:
    December 4, 2013 at 9:59 pm

    […] is the original link’s beautiful version (which I now wish I had followed step by […]

  8. Day 8/9: DIY Christmas Decor: Noel Sign | Ditzy Domestic Diva says:
    December 5, 2013 at 12:37 pm

    […] I’ve seen a few of these types of signs at craft sales priced around $25 and apparently Pottery Barn had something similar one year (I can only imagine how overpriced that one was). So I decided to try and recreate it with the help of this pin. […]

  9. Red and White Christmas Mantel says:
    December 6, 2013 at 7:00 am

    […]  Every mantel deserves a fresh evergreen wreath. This one is a “Happy Holidays Wreath” from ProFlowers. It is made of noble fir, eucalyptus, and pepper berries. It smells wonderful! I placed it above my (dismantled) NOEL sign. […]

  10. How to make a Christmas JOY sign | Four Generations One RoofFour Generations One Roof says:
    December 8, 2013 at 9:21 am

    […] an easy way to add Christmas cheer to a room. You can also purchase wooden letters like my friend Kim did and paint them. If you are looking for more Christmas inspiration, be sure to head over to our […]

  11. DIY Wreath - Sand and Sisal says:
    August 5, 2014 at 11:43 am

    […] candy, kiddos)! This DIY (do it yourself) wreath is made with MDF letters just like I used in my Pottery Barn Inspired Noel Tutorial. Let’s make a fall […]

  12. Coastal Christmas Home Tour -part 2 - Sand and Sisal says:
    December 10, 2014 at 8:47 am

    […] ripped apart my Pottery Barn Inspired Noel Sign (gasp!!) from years ago and set it up on the shelf. Renew & Reuse is always my motto! I love […]

  13. 8 DIY Christmas Wall Art Projects - Sand and Sisal says:
    December 19, 2014 at 10:36 am

    […] Pottery Barn Inspired NOEL Tutorial  […]

Welcome

Kim WilsonWelcome to Sand & Sisal: where love of home and sea meet! I share tutorials in DIY, decorating, crafts, gardening, & recipes.  [READ MORE]

Let’s Connect

  • Facebook
  • Instagram
  • Pinterest
  • Twitter
  • YouTube

Keep in Touch!

Love this post? Let's keep in touch!

Subscribe for free to have Sand and Sisal delivered straight to your inbox.

Search

Categories

Archives

Copyrighted Content Permission

All images and tutorials on this blog are copyrighted material. Please contact me if you would like to use any media (photos, video or audio files), tutorials, or ideas from this blog. 99% of the time I would be happy to allow you to use ONE photo with appropriate credit and link back to Sandandsisal.com (preferably to the same post it was borrowed from.) Absolutely no text or tutorials can be replicated. Contact Kim via email: sandandsisal (@) gmail (dot) com

Amazon Associates Disclosure

Kim Wilson is a participant in the Amazon Services LLC Associates Program, an affiliate advertising program designed to provide a means for sites to earn advertising fees by advertising and linking to amazon.com.

Privacy Policy

Click HERE to review our Privacy Policy

Copyright © 2025 · captivating theme by Restored 316